Good stuff mate! 
Navigation
Install the app
How to install the app on iOS
Follow along with the video below to see how to install our site as a web app on your home screen.
Note: This feature may not be available in some browsers.
More options
You are using an out of date browser. It may not display this or other websites correctly.
You should upgrade or use an alternative browser.
You should upgrade or use an alternative browser.
**** DONE: Kittyhawk Mk III James F. "Eddie" Edwards RCAF - Aircraft of the Aces GB.
- Thread starter Crimea_River
- Start date
Ad: This forum contains affiliate links to products on Amazon and eBay. More information in Terms and rules
More options
Who Replied?- Thread starter
- #142
Crimea_River
Marshal
Thanks all.
Airframes
Benevolens Magister
Looking the dog's dangly bits Andy.
- Thread starter
- #145
Crimea_River
Marshal
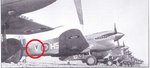
Thanks Terry, Wojtek. I remember, though, that before I do the gloss coat, I need to box out the areas behind the fuselage roundels for the a/c numbers and paint them dark green as it appears this plane and others in 260 Squadron must have had an ETO camo scheme before being repainted for the desert. It appears the Middle Strone was applied over the Dk Green and the Dk Earth areas kept as is. See circled details below and the depiction on the VWOC P-40 of the same scheme.
Attachments
brucejscott
Staff Sergeant
Great looking paint job Andy!
Looks great Andy!
Coors9
Senior Airman
That's one crazy lookin' bird. Awesome job ...
- Thread starter
- #149
Crimea_River
Marshal
Thanks again. On to the green blockouts.....
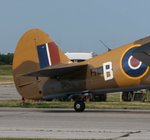
To locate the correct spot for the block-outs, I first had to lay out a temporary decal placement which I did by simply using representative bits of cut paper. This showed me a small issue which bothered me. If you look at the arrow where the "B" would go, the dark brown colour intersects the B whereas in the photo of the actual aircraft above, the B is just touching the brown at the lower left corner.

I decided to remedy this by masking and adjusting the demarcation as shown below.

With the Middle Stone colour extended accordingly, I masked the forward edge of the blockout using the paper bit as a locator.

From there, I masked the blockouts to a 5mm width using a 4mm letter height as a basis. Dark Green was then sprayed both sides after making sure that sufficient masking was applied to prevent any overspray from marring the finish underneath.


Pealing the tape away revealed the effect I wanted. I had to do a small repair on the port side where I chipped some of the brown at the upper right corner of the green blockout but, overall, it turned out allright.


Now comes the gloss coat and decal application. Thanks once again to everyone for your comments.
To locate the correct spot for the block-outs, I first had to lay out a temporary decal placement which I did by simply using representative bits of cut paper. This showed me a small issue which bothered me. If you look at the arrow where the "B" would go, the dark brown colour intersects the B whereas in the photo of the actual aircraft above, the B is just touching the brown at the lower left corner.
I decided to remedy this by masking and adjusting the demarcation as shown below.
With the Middle Stone colour extended accordingly, I masked the forward edge of the blockout using the paper bit as a locator.
From there, I masked the blockouts to a 5mm width using a 4mm letter height as a basis. Dark Green was then sprayed both sides after making sure that sufficient masking was applied to prevent any overspray from marring the finish underneath.
Pealing the tape away revealed the effect I wanted. I had to do a small repair on the port side where I chipped some of the brown at the upper right corner of the green blockout but, overall, it turned out allright.
Now comes the gloss coat and decal application. Thanks once again to everyone for your comments.
T Bolt
Colonel
Great attention to detail Andy.
Agreed!!
amazing Andy
Airframes
Benevolens Magister
Top hole old boy !
- Thread starter
- #155
Crimea_River
Marshal
Thanks guys.
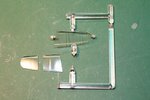
Bit of a setback unfortunately. After trimming one of the clear side panels, I went to dust it in a cloth and it broke in two with virtually no pressure. It must have got a small crack at the point of attachment to the sprue that propagated at the slightest tweak. It would have been nice if it had at least broken along a frame line. I might have had a fair chance of salvaging it but it's right in the middle of a panel - of course!
E-mail has gone into Hasegawa for a replacement.
Attachments
brucejscott
Staff Sergeant
To bad about the sidelights but your painting is amazing.
- Thread starter
- #157
Crimea_River
Marshal
Thanks Bruce. May have to put this one on the back burner til the new part arrives (if!).
Still work to do on the landing gear though.
Still work to do on the landing gear though.
Hotntot
Senior Airman
Too bad about the canopy - very annoying. Great project, however, and looking forward to the next instalment. Love the paintwork detail.
man that sucks...hope they come through for you Andy!
N4521U
Plastic Pirate
That's really interesting the arrangement of the serial in the block and the code letter overlap. And the distance of the "B" to the roundell seems to be odd as well. Great research. Good work.
Users who are viewing this thread
Total: 1 (members: 0, guests: 1)