**** DONE: Revell P-61A 1/48 scale, Nocturnal Nemesis, Night Fighter GB.

Ad: This forum contains affiliate links to products on Amazon and eBay. More information in Terms and rules

Thanks Guys... My dog is an 11 yr. old Blue Great Dane. For those who don't know, Great Danes usually only live 8 to 10 years. It is the rare exception that they live 11 or even 12 years. She had an infection on her leg that I've been able to take care of thus far. Mostly I need to keep her from licking her bandage off and I hate having to put the cone on her head. Better to just sit with her and keep her company. :)

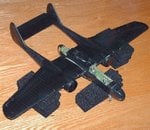
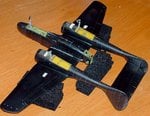
Yesterday was great for getting things done and a little more on track. Finished getting rid of the seams and fixing the sanded off rivets. I also made two of the vents on the nacelles. I think I'll add the grills after I paint it. I did finally add the elevator and add the whole assembly to the wings. Now it's looking more like the plane it's suppose to. Also did a test stand and found that, "Yes, it can stand on its own legs and not sit back! :) " My placement of the weights has been successful. :)
 

Attachments

  • P61A 040.jpg
    P61A 040.jpg
    71.3 KB · Views: 87
  • P61A 041.jpg
    P61A 041.jpg
    86.2 KB · Views: 91
  • P61A 043.jpg
    P61A 043.jpg
    83.4 KB · Views: 83
  • P61A 044.jpg
    P61A 044.jpg
    179.8 KB · Views: 85
Getting more filling done. Seems to be a few gaps here and there. The wings are giving me the most trouble on the underside. I taped up around the seams and used a sharpened match and toothpick to trowel the filler into the crackes. So far so good.
 

Attachments

  • P61A 046.jpg
    P61A 046.jpg
    57.2 KB · Views: 91
  • P61A 045.jpg
    P61A 045.jpg
    48.2 KB · Views: 92
Thanks... Speaking of 3D models, I wonder how Shinpachi san would do with making a 3D Widow? By the way, I'm trying to put in a new siggy but for some reason it always comes out smaller than it is... How do you get the larger picture siggys?
 
One of my next tasks is to make the support for the tail cone window. Early on, it was found that when the widow went into a steep dive, the back cone window would implode. The solution was the addition of supports added to the inside of the cone. Here are a few reference photos.

In order to do this I needed get an accurate measurement of the inside of the models cone window. The best way I could come up with was to put wet tissue inside the cone and let it dry. Then I will just pop it out and measure the plug. From this I will be able to fabricate the support pieces. :)
 

Attachments

  • tail.JPG
    tail.JPG
    26.2 KB · Views: 81
  • tail2.JPG
    tail2.JPG
    23.9 KB · Views: 75
  • tail3.JPG
    tail3.JPG
    32.7 KB · Views: 77
Jeez....never knew that Bill.....when I looked at the pics is there vertical and horizontal support pieces....?

You could try stretched sprue and bend it to shape and then fit it, similar to the red dive lines i put in my Ju88...
 
From all the photos I've looked at, there seems to be more of a horizontal component to the supports. The horizontal support is pretty much an A-frame made of plexiglass. On some photos I've seen what looks like a verticle component. My guess is that this cone window sometimes came in two pieces. Because of the sharper bend on the upper and lower parts, support is not as much an issue. Given the oval shape, the sides are the weaker parts and therefore need the added support. Kind of like the structure of an egg. It's strongest at it's ends and weakest at it's sides.

Once the tissue or paper has dried, I pull it out and set it on paper point facing up. With pencil, I mark the ends of the flater sides... I have my width. I'll mark a line between the two lines making an "H". Then I stand the cone on it's thin side with the bottom up against the cross part of the "H" and make a couple of marks just shy of the tip of the cone. Draw two lines connecting from the corners of the cross section of the "H" to the two marks I just made and I have a guide to the width, length, and angle for making the plexiglass (stretched clear sprue) A-frame. Once the A-frame is assembled and glued, I can dry fit it and sand it as needed until it fits perfectly. Add a little white glue and finish the assembly. Since the A-frame is flush with the cone's wide end, it shouldn't be too much trouble attaching it to the plane. :)

We should have a thread for creative solutions. This stuff is fun to figure out. :)
 
Last edited:

Users who are viewing this thread

Back