- Thread starter
- #321
Night Fighter Nut
Master Sergeant
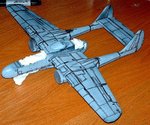
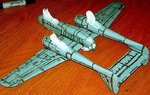
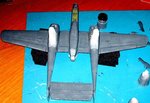
Thanks guys. I think the slight blue tint is from the blue work surface it's sitting on but it is still a bit light for neutral gray. I'll play around with the tints until I find something more satisfactory.
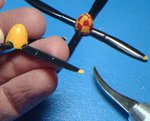
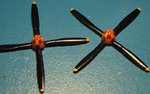
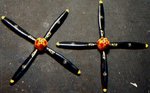
In the mean time I've been working on the props. That checkered pattern can be a mess. I have decals but I don't like them. Instead, I have been using a concave x-acto blade. The trick was to find the very tip of the spinner. In an earlier picture you could see that I already painted the spinner yellow. To find the tip, I held the propeller spinner down with the blades level with the table top. Then I lightly moved the tip across my matted surface until a little paint was removed from the tip. I now have the very tip of my spinner identified. Now there are 8 equally spaced verticle lines running from spinner tip to edge. There are four lines running from one edge of each prop to spinner tip. Using the concave blade, I put one edge of the blade on the tip and the other edge next to the edge of the prop and drew the blade back. This gave me a very straight verticle line. After the initial four lines I just took the middle of the space between lines and drew four more lines. This seemed to work out really well. There are three horizontal lines not counting the very bottom of the spinner that had to be drawn next. I placed the curved blade flat across the tops of the propellers and pulled across. This gave me the lower line. The top line was a little trickier. I looked at the decals and measured from the tip to the next line according to the decal to give me a relative distance. Then I measured from the tip of the spinner and marked out the same distance down for the top line. The last line I took midway between the top and bottom lines and drew it as well. The result looked pretty good. Pictures to follow probably tomorrow as time permits.")
Today I'll be working on separating the tires from the resin sprue.
In the mean time I've been working on the props. That checkered pattern can be a mess. I have decals but I don't like them. Instead, I have been using a concave x-acto blade. The trick was to find the very tip of the spinner. In an earlier picture you could see that I already painted the spinner yellow. To find the tip, I held the propeller spinner down with the blades level with the table top. Then I lightly moved the tip across my matted surface until a little paint was removed from the tip. I now have the very tip of my spinner identified. Now there are 8 equally spaced verticle lines running from spinner tip to edge. There are four lines running from one edge of each prop to spinner tip. Using the concave blade, I put one edge of the blade on the tip and the other edge next to the edge of the prop and drew the blade back. This gave me a very straight verticle line. After the initial four lines I just took the middle of the space between lines and drew four more lines. This seemed to work out really well. There are three horizontal lines not counting the very bottom of the spinner that had to be drawn next. I placed the curved blade flat across the tops of the propellers and pulled across. This gave me the lower line. The top line was a little trickier. I looked at the decals and measured from the tip to the next line according to the decal to give me a relative distance. Then I measured from the tip of the spinner and marked out the same distance down for the top line. The last line I took midway between the top and bottom lines and drew it as well. The result looked pretty good. Pictures to follow probably tomorrow as time permits.
Today I'll be working on separating the tires from the resin sprue.