Navigation
Install the app
How to install the app on iOS
Follow along with the video below to see how to install our site as a web app on your home screen.
Note: This feature may not be available in some browsers.
More options
You are using an out of date browser. It may not display this or other websites correctly.
You should upgrade or use an alternative browser.
You should upgrade or use an alternative browser.
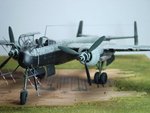
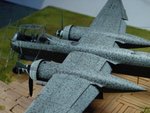
**** DONE: 1/48 Tamiya Heinkel He-219 WNr 290123 of 1/NJG 1 Nightfighter GB
- Thread starter Crimea_River
- Start date
Ad: This forum contains affiliate links to products on Amazon and eBay. More information in Terms and rules
More options
Who Replied?Airframes
Benevolens Magister
Neat !
- Thread starter
- #423
Crimea_River
Marshal
Thanks again gentlemen.
Man, this one is trying really hard to prevent me from finishing. After breaking of the SN-2 antennae twice as previously reported, while working on some fine details at lunch time today, I broke my magnifier light - cracked the crappy white metal casting at the hinge. I tried to fix it tonight but in doing so, the magnifying galss fell out of the mounting and smashed to bits on the floor, so now I binned the whole contraption and need to get a new one tomorrow. Then, while trying to fix a sag in one of the antenna wires that I discovered after it was glued, I broke the wire at the rudder end and had to try to re-install it without the magnifier. Broke it twice more. so I've set it aside for tonight. As it stands now, I'm putting the final touches on the hinged canopy (pics tomorrow) and will hopefully get the aerial fixed to give you the finshed pics tomorrow. Everything else is done.
Here's what I did in the wheel well. There's a rod connecting the two gear doors that looks like it served to pull the doors shut as the main gear struts caught it during retraction (see actual pic below at right). There are springs on each end where it attaches to the doors

I made these struts using stretched sprue with a piece of Tamiya Tape rolled onto each end and CA glued tight.

These were then glued to the doors and painted RLM 02. This is the final step in of detailing the main gear wells.

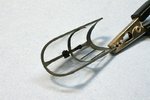
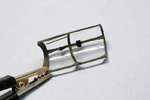
Here's the finished rear antenna mount, having been primed and painted today.

Hopefully, I'll have her all done tomorrow. Thanks for your patience!
Man, this one is trying really hard to prevent me from finishing. After breaking of the SN-2 antennae twice as previously reported, while working on some fine details at lunch time today, I broke my magnifier light - cracked the crappy white metal casting at the hinge. I tried to fix it tonight but in doing so, the magnifying galss fell out of the mounting and smashed to bits on the floor, so now I binned the whole contraption and need to get a new one tomorrow. Then, while trying to fix a sag in one of the antenna wires that I discovered after it was glued, I broke the wire at the rudder end and had to try to re-install it without the magnifier. Broke it twice more.
Here's what I did in the wheel well. There's a rod connecting the two gear doors that looks like it served to pull the doors shut as the main gear struts caught it during retraction (see actual pic below at right). There are springs on each end where it attaches to the doors
I made these struts using stretched sprue with a piece of Tamiya Tape rolled onto each end and CA glued tight.
These were then glued to the doors and painted RLM 02. This is the final step in of detailing the main gear wells.
Here's the finished rear antenna mount, having been primed and painted today.
Hopefully, I'll have her all done tomorrow. Thanks for your patience!
Last edited:
T Bolt
Colonel
Nice details Andy. My magnifying light broke too. Halfway through this build the pin that fits into the base bent and the whole thing came crashing down on the work bench. I've been using +2.75 reading glasses I bought at the drug store for $10. works pretty good but makes you think you're in a fish bowl if you look up from your work.
- Thread starter
- #425
Crimea_River
Marshal
Thanks Glenn. I might look at getting a pair of those jeweller's magnifiers you wear like glasses and that have a built in light. Less stuff in the way and less chance of something falling onto my work. When my hinge broke, it came close to smashing down on the model but fortunately I had it suspended behind while I was working on that rear antenna mount.
- Thread starter
- #427
Crimea_River
Marshal
Thanks Jason. Nice to see you back.
Night Fighter Nut
Master Sergeant
Nice addition to the landing gear. Very nice build there Andy. I'll keep this build handy when I finally build my plane. I have it as part of my stash but don't have the airbrush to tackle the fine painting parts. Still using a small paint brush or spare bit of wire. ")
- Thread starter
- #429
Crimea_River
Marshal
Thanks Bill. I'd say you can get away with a brush other schemes or even this one. In my younger days I did a Bf 110 squiggle scheme by dry-brush stippling the squiggles with a brush cut off to about 2mm. Tunred out not bad if I recall. Most of the other schemes on the 219 are an overall RLM 76 coat with small patches of 75 which could easily done by brush. I found that, even with a high quality airbrush, I had a real challenge with this scheme and need a lot more practice before perfecting it. The two pictures below are the work of another builder who got a much better definition on the squiggles than I did.
Attachments
Night Fighter Nut
Master Sergeant
Nice... I guess if I have the patience to put some thousand plus rivets on my widow I can do stipple for the squigglies. Thanks Andy.
- Thread starter
- #431
Crimea_River
Marshal
F!ck. Just broke another aerial and busted off an SN-2 antler again.....
At this rate it ain't gonna get done.
At this rate it ain't gonna get done.
Night Fighter Nut
Master Sergeant
Patience... put what got busted off on last. You'll make it.
- Thread starter
- #433
Crimea_River
Marshal
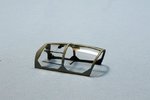
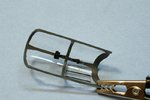
4 pictures of the canopy below. It's finished and ready to install in the open position on the model - unless I break it which is a distinct possibility with the way things have gone these last 3 days.
The bits on the inside along the top rail are the Revi for the SM cannon. References show there were two pieces - a projector was behind the pilot separate from the reflector glass and mount ahead of the pilot. The parts were made from cut up parts from my junk box plus the reflector glass from clear plastic packaging. I assumed there would be a power wire running down the frame so I added that. Also added were two rails for the sliding pane made from copper wire painted gray.
Close examination of the photo of 290123 does not show the SM Revi silhouette so it's likely the SM cannons were removed at the time the picture was taken. This was commonly done to reduce weight for increased speed and altitude on many operational Uhus but I decided to leave my model equipped with the SM. Arguably there might have been a time during this aircraft's operational history that the SM was still there. We'll never know!
Attachments
- Thread starter
- #435
Crimea_River
Marshal
Thanks Trey. Just want to get this thing done tomorrow and move on. I kinda feel like I've taken a drive in a Porsche 911 through a twisty alpine road, only to blow a turbo 2 miles from home.
Don't get me wrong about the squiggles. Airbrushing is something I'm still learning and I'm satisfied with the effort. I just know however that I can get better with more practise based on other builds I've examined. Overall, I think it does look pretty good but there's definitely too much splatter which I'm trying to figure out since the paint was quite thin.
Don't get me wrong about the squiggles. Airbrushing is something I'm still learning and I'm satisfied with the effort. I just know however that I can get better with more practise based on other builds I've examined. Overall, I think it does look pretty good but there's definitely too much splatter which I'm trying to figure out since the paint was quite thin.
I hear ya Andy,nothing is a kick in the dangly bits quite like a ill blast of splatter on a mottle or squiggle job. I've noticed it from my airbrush from time to time no matter the mix or how well cleaned the equipment. I do a spray off subject each time to blow off tip build up but still get caught with splatter from time to time. BTW the canopy looks real sharp!
Airframes
Benevolens Magister
Looks good to me Andy, and you have to look close and hard to see any splatter. Anyone who does that is an anorak wearing, carrot eating, rivet counting ****wit!!
Wildcat
Major
Doing some amazing work on this beast Andy. She's looking awesome mate.
- Thread starter
- #439
Crimea_River
Marshal
Thanks gents. So all that's left to do is to re-attach one of the aerials and glue on the canopy. If all goes well, I'll have finished pics tonight - finally!
Airframes
Benevolens Magister
Look forward to seeing them Andy!
Users who are viewing this thread
Total: 1 (members: 0, guests: 1)