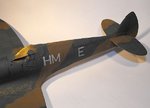
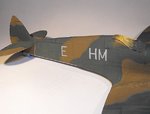
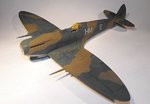
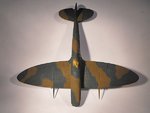
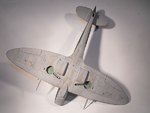
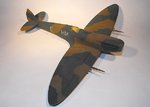
**** DONE: Spitfire MkVIII, 136 Squadron RAF, Burma, 1944, Commonwealth GB.

Ad: This forum contains affiliate links to products on Amazon and eBay. More information in Terms and rules

I'd love to see some of your painting techniques. I've recently acquired a simple airbrush. Not very good for details but I think I can manage since I've worked with a paint brush for so long. Your plane looks wonderful Terry!
 
Thanks guys, and yes, I'm going with the green spinner!
After studying all the photos I can find, there's evidence to suggest that some of the spinners might have been a green shade, judging by the tones. I can't prove it, other than in the profile posted by Antoni, but then again, I can't prove they weren't green at some time! Seems the sort of thing the 'Woodpeckers' would do, especially as the woodpecker cartoon doesn't seem to have been applied to the Squadron's Spits.
Anyway, the Dark Green has been sprayed, using Humbrol No.30, as my preferred shade, Humbrol 163, has dried in the tin - surprise, surprise!
The No.30 has got somewhat bright lately, being very 'green', so I added a spot or two of Dark Earth, just to tone things down, and give a better appearance. It'll also look better once the clear coats are applied. The paint was sprayed in misted coats, to give a patchy, sun-bleached and dust abraded look, with some areas in 'solid' colour, to add variation across the airframe.
Work is underway on the first stage of adding staining, dirt and 'wear and tear', but keeping it relatively subtle, as this aircraft had only been on the Squadron a little over a month.
PICS1 and 2. The code letters after removing the masks. As already mentioned, some corrections and re-touching are required here, but I think they'll turn out OK in the end.
PICS 3 to 6 show the progress to date, with some staining, fading and dirt added, although there's still a lot to do before applying the clear gloss coat.
Thanks for your continuing interest, and I should have some more progress pics in the next day or two.
 

Attachments

  • Bob Cross build 164.jpg
    Bob Cross build 164.jpg
    36.1 KB · Views: 117
  • Bob Cross build 159.jpg
    Bob Cross build 159.jpg
    36 KB · Views: 101
  • Bob Cross build 157.jpg
    Bob Cross build 157.jpg
    37.5 KB · Views: 126
  • Bob Cross build 161.jpg
    Bob Cross build 161.jpg
    34.1 KB · Views: 99
  • Bob Cross build 162.jpg
    Bob Cross build 162.jpg
    38.9 KB · Views: 93
  • Bob Cross build 165.jpg
    Bob Cross build 165.jpg
    34.1 KB · Views: 101
Your paint job looks great Terry. I hope I can get my panel lines and shading to look as good as yours. :) Oh and it seems I finally hit post number 1000.
 
Thanks Bill, and congrats on making the first thousand!
The 'dirty' panel joint and access panel shading was done with the point of a No.3 sable brush, using what I call the 'damp brush' technique, as was some of the patchy, streaky areas, and the basic 'uneven' finish was done when spraying, building varying densities with repeated thin coats, in one go. The light grey base-coat helps here, as it can be used to just 'show through', giving a worn, or faded look to the colour(s) being applied.
 
Thanks very much Karl and Glenn. That's a great painting of RAF Mitchells in your 'siggy' Glenn - got a 1/48th scale Mitchell III (B25J) to do, which I might start after this GB, once some other bits and bobs are finished, like that blasted Buccaneer !
EDIT: Thanks Andy. We must have been posting at the same time, as i missed your post.
 
Last edited:
Thanks for the compliments guys, very much appreciated.
I've got a bit of the re-touching done, and some of the detail painting, and about to apply the gloss clear coat. Having another problem with my hands and wrists (and the rest of my body!) being stiff - I think the arthritis is either getting worse, or in flare-up, as I can't seem to get more than a day or two of any form of exertion without being floored for another day! Roll on summer - if we get one!
I'll post some more progress shots soon.
 
Thanks Chris. It needed a bit of a re-touch here and there, and one stroke is thinner in one part on one letter. I guess that's due to the tape wanting to lift, being so narrow.
 
Thanks again Chris, I reckon it should look OK once the decals are in place, the final matt coat is on, and a bit of 'dust' applied ! Just working on the final painting details now, then off to make some stencil decals. Further up-dates as soon as possible.
 
So, whilst the gloss varnish is drying (Humbrol enamel this time - want a good, smooth surface to work with), I got to work making the numerous small stencil decals.
Artwork from the original Air Ministry (DTD) drawings was scanned, and then re-sized as required, after clean-up, and then a 'master sheet' assembled, using step and repeat to duplicate those markings where more than one example is required. (Thanks heavens for computers, as this would have taken a long time using old-fashioned, traditional methods!)
The whole lot, including printing onto clear decal sheet, took a touch over an hour, and they seem to have turned out alright - just hope they work well now!
The attached pic shows part of the finished decal sheet, awaiting a clear sealer coat.
 

Attachments

  • Bob Cross build 176.jpg
    Bob Cross build 176.jpg
    60.8 KB · Views: 92

Users who are viewing this thread

Back