Duel 1/48 Airfix (Sows Ear) F.3 Tornado

Ad: This forum contains affiliate links to products on Amazon and eBay. More information in Terms and rules

Vic Balshaw

Major General
20,238
6,549
Jul 20, 2009
Canberra
For a number of years I have been slowly constructing all the aircraft related to on particular squadron from their founding in the Royal Flying Corp in 1917. 56 Sqn, known as the 'Firebirds' (a name conceived in 1963 when the were selected as the RAF display team), the squadron badge is a phoenix and derives from the squadron being disbanded and regrouped a number of times in it's history, hence the "Phoenix" rising from the ashes.

The squadron flight line can be seen on thread
http://www.ww2aircraft.net/forum/modeling/56-firebirds-squadron-raf-20403-3.html


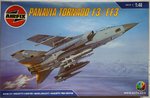
In continuation of this theme I have two Airfix 1/48 F.3 Tornado's which will complete the top end of the flight line up to 2005. Sadly since April 2008 this great fighter squadron which has served on the front line in England and overseas since 1917 has been re designated 56(R) Sqn and places on Surveillance and Reconnaissance Operational Evaluation at RAF Waddington.

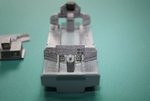
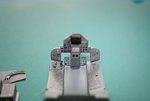
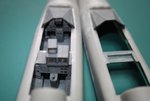
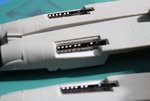
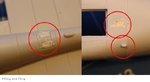
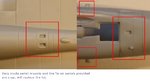
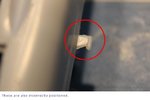
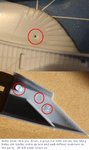
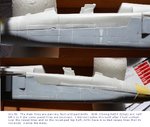
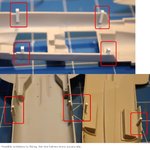
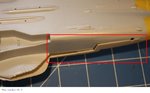
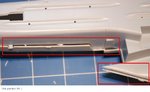
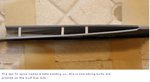
In the past my model building has usually been straight out of the box, with no enhancements or weathering, the only deviation being the decals used in the aircraft livery so that the models to match that of the squadron theme. With these two Tornado's I've decided to stretch my wings a bit and try my hand at using photo etched, resin and scratch built parts in an effort to improve my skills and my models.

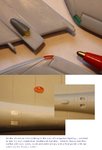
With the use of my limited camera skills I hope to provide a pictorial history of my progress with written comments. I also invite the more skilled operators in this forum to pass comment and criticism on my work, believe me, your advice and suggestions will be appreciated and very welcome.

So, lets get modelling.
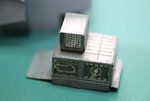
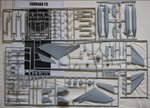
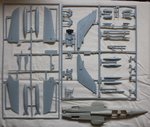
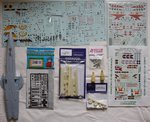
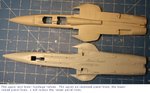
The kit.
 

Attachments

  • F3 T 1.JPG
    F3 T 1.JPG
    83.7 KB · Views: 248
  • F3 T 2.JPG
    F3 T 2.JPG
    78.1 KB · Views: 251
  • F3 T 3.JPG
    F3 T 3.JPG
    56.5 KB · Views: 241
  • F3 T 4.JPG
    F3 T 4.JPG
    81.5 KB · Views: 245
Initial stages.

Knowing that this is a bit of a botched kit, I thought the best thing to do was check out fuselage fitting and panel lines.
 

Attachments

  • Tornado Construct 5.JPG
    Tornado Construct 5.JPG
    25.5 KB · Views: 247
  • Tornado Construct 4.JPG
    Tornado Construct 4.JPG
    29.3 KB · Views: 245
  • Tornado Construct 3.JPG
    Tornado Construct 3.JPG
    19.4 KB · Views: 240
  • Tornado Construct 2.JPG
    Tornado Construct 2.JPG
    63.3 KB · Views: 247
  • Tornado Construct 1.JPG
    Tornado Construct 1.JPG
    66 KB · Views: 263
  • Tornado Construct 9.JPG
    Tornado Construct 9.JPG
    73.1 KB · Views: 254
  • Tornado Construct 8.JPG
    Tornado Construct 8.JPG
    64.9 KB · Views: 249
  • Tornado Construct 7.JPG
    Tornado Construct 7.JPG
    37.5 KB · Views: 248
  • Tornado Construct 6.JPG
    Tornado Construct 6.JPG
    43 KB · Views: 257
Fixing the tail fin and navigation lights
 

Attachments

  • Tornado Construct 10.JPG
    Tornado Construct 10.JPG
    26.8 KB · Views: 246
  • Tornado Construct 11.JPG
    Tornado Construct 11.JPG
    21.7 KB · Views: 255
  • Tornado Construct 12.JPG
    Tornado Construct 12.JPG
    60.7 KB · Views: 255
Good luck Vic, I will watch this with interst.

I only ever saw a Tornado once at an airshow in Richmond, I think back in 1993. I have the photo somewhere. It was an RAF unit, but other details are unkown
 
Been waiting for this Vic, great stuff! Just what I need in the way of 'warnings' when I come to do my Tornado. Now that I've seen the major problem areas, it doesn't look as bad as some of the horror stories I've heard in the past. Still not a 'walk in the park' though, but I'm sure you'll get it sorted.
BTW, if it isn't too late, in addition to the extra 'lugs' you've used to help locate the fuselage sections, how about using 'spreaders' to push out the sidewalls, so that they align better, and take some of the strain off the 'spring' of the parts? Cut some lengths of sprue to fit cross ways inside the fuselage bottom half, just enough to 'spread' the walls so that they meet, and stop them wanting to spring back inwards. These, together with the vertical 'lugs' you've cemented in place, should give a better joint which, although it still won't be perfect, will be easier to fill, and won't 'cave in' when sanded.
Looking forward to the next installment mate, and I wouldn't mind some info on the decal sheets you've got there when you have the time.
 
Vic' i'm with you 100% that the Airfix kit is a load of :pottytrain1:.... crap, i had one two years ago and because it was that poor i couldn't even be bothered to try and put it together, so i gave it away :lol:

this will be a nice addition to your collection.

ian.
 
Thanks guys. Am a bit stuck in the cockpit tube at the moment, haven't quite made up my mind which way to tackle it and I'm not to bright today with a nasty head cold and not much sleep last nigh.
:|:|:|

BTW, if it isn't too late, in addition to the extra 'lugs' you've used to help locate the fuselage sections, how about using 'spreaders' to push out the sidewalls, so that they align better, and take some of the strain off the 'spring' of the parts? Cut some lengths of sprue to fit cross ways inside the fuselage bottom half, just enough to 'spread' the walls so that they meet, and stop them wanting to spring back inwards. These, together with the vertical 'lugs' you've cemented in place, should give a better joint which, although it still won't be perfect, will be easier to fill, and won't 'cave in' when sanded.
Looking forward to the next installment mate, and I wouldn't mind some info on the decal sheets you've got there when you have the time.

No Terry. it's not to late and I had given spreaders some thought, the problem is the upper half that's been remolded to big, the resin is quite thick but can be pulled in a little. Re thinking the problem, I can put spreaders in the bottom so that the top is not only pulled in a little by the pegs, but the bottom pushes out a little as well. I'll give it a try and thanks you spawned a brainstorm. As for the decals, I'll scan them and send them to you, as I believe you can make your own, it could save you a bob or two.
:D:D:D

Have a question.....what sort of beads are you using in your Nav Light mods?

Thank Parsifal. The tail fin navigation lights my friend are the tips from some LED lights in red, green, orange and yellow that I picked up out of an RS Catalogue many years ago, the lens tip is about 1mm dia and deep, I just cut it off. I've only positioned the lens for the photo, it will not go back on until the build is almost finished. The spine light has been made fro a bit of toothbrush handle, and filed down.
:hotsun: :hotsun:
 
Had a little spurt of activity over the past week prior to joining a group build. Spent most of today fiddling with resin ejector seats (all four of them) hope to post pics tomorrow.

:hotsun: :hotsun:
 

Attachments

  • Tornado Construct 2h.JPG
    Tornado Construct 2h.JPG
    22.5 KB · Views: 229
  • Tornado Construct 2g.JPG
    Tornado Construct 2g.JPG
    20.9 KB · Views: 241
  • Tornado Construct 2f.JPG
    Tornado Construct 2f.JPG
    20 KB · Views: 238
  • Tornado Construct 2e.JPG
    Tornado Construct 2e.JPG
    23.9 KB · Views: 212
  • Tornado Construct 2i.JPG
    Tornado Construct 2i.JPG
    24.3 KB · Views: 226
Nice work old boy! The resin seats have got to better than the inaccurate lumps in the kit!! Going to do some major surgery on mine when I get around to that build.
 

Users who are viewing this thread

Back