Crimea_River
Marshal
No regrets. Got lots to keep me busy.
Follow along with the video below to see how to install our site as a web app on your home screen.
Note: This feature may not be available in some browsers.
Ad: This forum contains affiliate links to products on Amazon and eBay. More information in Terms and rules
") I tried to look it up quickly myself, but couldn't get a decent pic of the full thing, so went on to do as I saw fit.
I tried to look it up quickly myself, but couldn't get a decent pic of the full thing, so went on to do as I saw fit.Good stuff Jelmer.
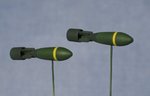
Depending on the type of casing and the factory which produced it, some British bombs had a rough-cast finish, hence the 'texture'. However, in many cases, what appears to be a textured finish in wartime photos, is often dust, dried mud and so on, as the bombs were stored outside, on the ground, and rolled around when moved.
Colours varied, with early war weapons being yellow, changed to dark green when it was realised that an open-air dump full of yellow things was highly visible from the air!
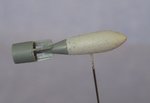
I have seen B&W and colour pics where the main outer casing (not the tail cone and fins) has been coated in a rough, white finish, for weapons used on fighter bombers, such as the Typhoon, but, to date, I haven't found a reason or explanation for this. Possibly for quick, visual I.D. of the type?
Apparently the white bombs were inert dummies used for practice - they were filled with concrete and painted white to ensure they weren't used on live missions.