Hawker Typhoon IB "Nicky" 439 Squadron RCAF 1/48

Ad: This forum contains affiliate links to products on Amazon and eBay. More information in Terms and rules

The harness Fraser is wearing is the Irving seat-type parachute harness, with 'turn and press' quick release box. The seat harness is the latter Sutton harness, with the round, lever-action, quick release box, but without the 'grommet' holes, as shown in the cockpit photos and the pic of the harness I posted.
I think Eduard do a late Sutton, as do HGW, in their micro-fabric range.
I'll see what I can find showing where the hydraulic hand pump handle attaches, but to be honest, the attachment area will be very low down, and out of view on the model.
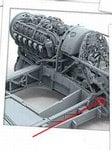
EDIT: I had a look at one of the cutaway drawings I have, and the scale plans, but they aren't very clear in showing the attachment point, especially when enlarged. However, this pic of the forthcoming Airfix 1/24th scale kit shows the lever, although again the actual attachment to the pump operating crank can't be seen, so I've marked the approximate area with the red arrow.
 

Attachments

  • Typhoon model cpit.jpg
    Typhoon model cpit.jpg
    28 KB · Views: 236
Last edited:
Great stuff Andy. That looks like the Duxford cockpit, which I tried to photograph from that angle but, due to reflection from the lighting of an exhibition at the time, I wasn't successful.
I've arrowed what I believe is the attachment point to the pump crank.
 

Attachments

  • Typhoon cpit Andy's pic..jpg
    Typhoon cpit Andy's pic..jpg
    95 KB · Views: 200
This is the setup in the Tempest, which I assume to be similar if not identical.

View attachment 251359

Source: The Hawker Tempest Page


Terry and Andy,

Thanks for the references on the pump and harness.

Based on the image Andy posted the pump looks like it goes down through the cockpit frame. If this is the case I can put it there.

This cockpit is very tight and based on some dry fits its not possible to accomodate the pump and seat adjustment handle on either side of the seat if trying to completely assemble the cockpt before attaching to the airframe. I think I am going to have to assemble three sides of the cockpit i.e. left side panel, floor and rear and front panel and mount it to the airframe then add the seat and armour plate then attach the right side panel to get everything to fit. I intend to add the instrument panel last. Airies does not provide any mounting reference points on the cockpit nor do they have a diagram showing how to attach it to the airframe once assembled. Very poor references here so I have to eye everything in place. If I were to asemble everthying together then glue it to the airframe I could have a mismatch with the armour panel and the airframe or the intrument panel could not fit properly leaving gaps in both instances after mounting. I am by no means an advanced aircraft modeler so things could be interesting. I just hope Airies got the cockpit dimensions right and that the two halves of the airframe will fit together as they are supposed to once the cockpit is in place. LOL....nervously.

Need to check on harness sources now.

Cheers,
 
Last edited:
Nice work Dave. First I heard of those rivets.


Andy,

These rivets are really it for me for detailing. You can get hex bolts, hex bolts with washer, flat rivets, raised round rivets in many different sizes.
I source mine from Hobby easy but they are available in Europe as they are a russian manufacturer.

Here's what they look like. In this case a slotted hex nut with washer.

slotted hex.jpg
 
Last edited:
The Typhoon (and Tempest) didn't have a floor. The tubular space-frame construction supported all the fittings, with the only 'floor' being the ribbed heel boards. The pump handle, shown in the vertical position in the simplified drawing Andy posted, connected to the pump's crank pivot point as shown by the red arrow in the photo of the Duxford cockpit, and the pump itself was attached to the space-frame also.
But, as Hasegawa have incorrectly provided a floor which, to be fair, would be to simplify moulding tool production, and construction, you'll need to attach the pump handle out of sight, behind the level of the seat, to the kit floor part.
 
For the seat belts, AFAIK from my research this whole harness issue can be a minefield. I am sure it could be a whole different thread on its own.

Here is the sutton type harness that came with the Airies Kit.

sutton3.gif


and in action:

SuttonHarness.jpg


And the QS type or as Edgar over on Britmodeller states a QL type harness that made a brief appearance near the end of the war.

Spitfireseatharness1.jpg


And in a spitfire.

DSC06639-1.JPG


I have read that the Q type did not come into use until after the war but I also read that it was in use just before the end of the war with only the Tempest and perhaps a few MK XIV's but was not issued in any large numbers. The sutton being the predominant type harness for RAF aircraft.


Here's what I found thus far. These look like the Q type.

For eduard could I use either of these sets?

FE203 spitfire IXc
FE142 Spitfire IX

For HGW

148523 RAF QS Type
148005 Late Spitfire
 
Last edited:
The pre-war type Sutton harness, in use with most British aircraft, and also fitted to some US aircraft in British service, up until roughly 1944, was not fitted to the Typhoon at the period being depicted.
By that period, the QL, or a very similar harness with the same type of release box, was fitted to the Typhoon, Tempest, late production MkIX, XVI and XIV Spitfires, Mosquitos, and a number of other aircraft.
Obviously, it's personal choice, but in this scale I always think that PE harnesses never look quite right and, even if annealed before use, to allow some semblance of a 'natural drape' of fabric (something which can't be done with a pre-painted item), they still look stiff and un-natural. As this is a fairly simple harness, you could, if you wish, make one from thin paper or metal foil, with a slice of plastic rod of the required diameter for the turn-buckle release box.

Yes, I don't see these as being too difficult to do. The only complication would be
The metal clasps but I could use some from one of
The PE sets I mentioned above.
 

Users who are viewing this thread

Back