B-17engineer
Colonel
Way to go KG!!
Follow along with the video below to see how to install our site as a web app on your home screen.
Note: This feature may not be available in some browsers.
Ad: This forum contains affiliate links to products on Amazon and eBay. More information in Terms and rules
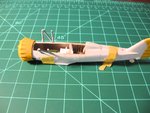
The overall colour balance is close, but the colour of the cockpit looks strange, assuming it's either RLM 02 or 66 grey. The flash alone will certainly alter some colours at such a relatively short range, and the combination of lighting is being thrown off by the green background. If you can take a focus reading on something white, then fully depress the shutter button, it might help. Other than that, I'd suggest using a neutral background - pale grey, pale blue or white - as these colours won't cause anomalous reflection. The cockpit/internal colours are showing as a warm, almost pink colour, a sign that the flash and/or artificial light is causing a colour temperature shift - basically, the 'warm' tones in the lighting, and the dye pigments in the paint, are being recorded instantly. This can be overcome easily with film, but digital recording is so rapid, that the high-spot of the lighting is retained, i.e. the highest intensity of the flash or lamp, just as the 'shutter' is closing. It's a bit like looking at a light bulb, then closing your eyes - the retina retains the image as a slightly 'cooler' silhouette image, and a similar thing is happening here. Normally, a 80B blue filter would control the colour balance (or a 'daylight' bulb), but some digital camera systems by-pass this, trying to correct what it thinks is the 'wrong' colour!!
Sorry to go all 'techy' on you - just trying to help!!


Coming along nicely Dwight, sure is hard though getting the right colour with flash or natural light inside. Cant beat a sunny day.
What's "a sunny day"? Are these available for sale in the UK, or do they need to be imported, incurring landed charges and import duty?!!
Darn! Looks like I'll have to make do with 'clag to the deck, and it's not much better further south'!
Something you only see in holiday brochures, even we are on ration these days!!!What's "a sunny day"? Are these available for sale in the UK, or do they need to be imported, incurring landed charges and import duty?!!
These are freeUpdate:
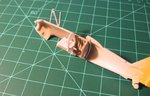
FINALLY getting around to adding all the detail in the cockpit. Side framing is in place, forward bulkhead in place, control yoke in place and side door hatch cut out. Ready to be resprayed in RLM02. Then the oxygen unit, oxygen bottle, main instrument panel and side panel controls, and the pilot seat get added. Positioning on the starboard oxygen unit and bottle is going to be a TIGHT fit.
Pictures to follow.