I'm Finally Back

Ad: This forum contains affiliate links to products on Amazon and eBay. More information in Terms and rules

If I had a wifey I would.:lol: I forgot that I had purchased some small sanding boards, 120/180, 180/240, 240/320, so I need some 400 and some 600 to finish it out.
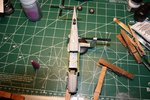
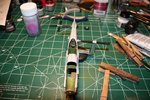
 
Looking good there Aaron. If you can, to finish off the sanding, use either 800 or 1000 wet n dry, used wet. If you haven't got this grade, use a well worn lower grade, wet, maybe with a little hand soap - just like finishing a car body. If you want a really smooth finish, once that's done, give it a rub-over with 'T Cut' (Don't know if that's what it's called in the 'States, but it's the liquid colour restorer / scratch remover - again for car bodies.)
 
Terry I have got access to 24 grit all the way up to 3,000 grit so if you think the 1000 will work I that's what I will stop at. Thank you for the suggestion to. I have also got a lot of different buffing compounds to. I do have 3M Handglaze which is excellent on paint for filling in fine scratches and it has no silicone in it.
 
I progressed through the sand paper this evening 180,240,320,400,800,1000. and fit the wings together. Getting closer to the first coat of aluminum metalizer.:) 
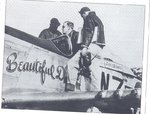
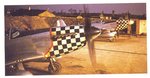
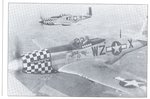
I am s------l------o------w-------l------y getting there.:lol:
 

Attachments

  • IMG_1139 P-51D model resized 20.jpg
    IMG_1139 P-51D model resized 20.jpg
    109 KB · Views: 93
  • IMG_1140 P-51D resized 20.jpg
    IMG_1140 P-51D resized 20.jpg
    104.2 KB · Views: 90
Looking good Aaron. Once the wings and tail planes are fitted, and the cowling, don't forget to paint any solid' colours first. (After first ensuring all joints are as smooth as a baby's bum!) These can then be masked ready for the metal coat, and will prevent any reaction with the metallizer and other paints.
 
Generally, any metallic paint may, and normally does, affect 'solid' colours, for example, white, if the 'solid' is applied over the metallic. This is due to the metallic particles 'migrating' from the surface, into the base of the 'solid' colour when it is wet. With white paint, this gives a greyish, specular effect. OK, it can be re-coated, but it can take time to cover effectively, and can end up looking 'lumpy'.
Also, it is far easier to mask a 'solid' colour, without risk of staining, 'picking' or other contamination (from the tape), than it is the other way around.
However, some gloss colours, such as red, for lettering for example, can sometimes be brush-painted onto a metallic finish which has had a few days to harden and settle, and has then been 'rubbed over' with a soft cloth, to remove the 'loose', top surface metallic particles. Remember, we are talking about a small scale area here, where any teeny weeny imperfection will seem magnified. The same 'fault' on the full-sized object - car, aircraft whatever - would harfly be noticed, if at all.
 
Ok, I think I know how to fix that problem. To keep the metalics from bleeding back up through the solid color I can dry shoot the solid color until it is covered. I had forgotten about what you are talking about and it makes sense. I have seen people fight this on cars and custom motorcycle paint jobs. Thank you for reminding me. One more question. Is the anti-glare patch on the top of the cowl dark green or flat black on this craft? (Big Beautiful Doll)
 
Terry, I have been rethinking and reading your instructions and you are so right about the solid darker color going on first. It would be extremely difficult to keep the darker color from running onto the aluminum in the seems. Thank you sir. I have to keep reminding myself that I am new at this and you folks know more about this than I do. Sometimes I can be a little headstrong. I apologize sir.

Thank you Glenn for the photo. It answers some questions and raises some others.:thumbright:
 
No problem Aaron, and no need to apologise.
The anti-glare panel was Olive Drab, and the real 'Doll' didn't have the anti-slip wing walk panels. Here's some colour pics of the real aircraft, at Duxford in early 1945, from Roger Freeman's 'Mighty Eighth in Colour', and a profile from Osprey's 'Mustang Aces'.
 

Attachments

  • BBD 2.jpg
    BBD 2.jpg
    40 KB · Views: 99
  • BBD 2 003.jpg
    BBD 2 003.jpg
    145.9 KB · Views: 113
  • Chook 002.jpg
    Chook 002.jpg
    96.2 KB · Views: 122
  • Chook 001.jpg
    Chook 001.jpg
    83.3 KB · Views: 106
  • Chook.jpg
    Chook.jpg
    114.7 KB · Views: 121
  • BBD 2 001.jpg
    BBD 2 001.jpg
    119.7 KB · Views: 110
Oops! Lost connection whilst posting!
Note that the colour pics are an earlier aircraft, and are shown to give an idea of the colours, as are the others. The profile shows the scheme later, with the red - outlined codes and red cheat lines below the OD anti- glare panel, plus the black rudder. Notice these are not present in the colour pics, or the close-up of Landers in the cockpit. As far as i recall, the red and the black rudder were from march 1945 onwards, but I can check this if need be.
 
I guess I will have to pick a time for the aircraft to do, if that makes sense.:confused: There are a lot of different small markings that do and don't show up at different times of this crafts life. OH, and thank you for the photos sir. And I am up for suggestions on what scheme to do.:dontknow:I'm in the process of sanding wing roots at the moment so I am getting there Wayne.:)
 
Last edited:
Ok, been sanding wingroot seems for a couple of hours and I thing I've got them smoothed out but will definitely know once I shoot some paint. still have some pieces left to put on but am getting closer. I did loose some of the rivets whilst I was sanding.:oops:
IMG_1141 P-51D model resized 20.jpg


IMG_1142 P-51D model resized 20.jpg
 

Users who are viewing this thread

Back