Looking good!
Navigation
Install the app
How to install the app on iOS
Follow along with the video below to see how to install our site as a web app on your home screen.
Note: This feature may not be available in some browsers.
More options
You are using an out of date browser. It may not display this or other websites correctly.
You should upgrade or use an alternative browser.
You should upgrade or use an alternative browser.
lord help my Mk-22 how shakey can one get (1 Viewer)
- Thread starter N4521U
- Start date
Ad: This forum contains affiliate links to products on Amazon and eBay. More information in Terms and rules
More options
Who Replied?Crimea_River
Marshal
Crimea, the PE parts are Gone! Have not one clue as to when they departed or where they could be.
There's a place somewhere in the universe where all lost PE parts gather along with single socks from dryers around the world.
- Thread starter
- #23
N4521U
Plastic Pirate
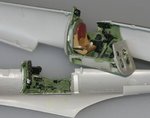
Crimea, that place is just CHOCK full of socks too!!!!!!!!! So, my build goes on. I guess I was counting on a better scale and fit of these cast parts. Seems the seat is a bit too wide, or I have done something wrong. Just about 1mm only. The seat support frame at the back of the seat must be for a 32 scale coz when I tried putting it in the control stick would have been IN the seat itself and the pilot would be climbing over the seat to get in. Had to trim all around the bulkhead frame behind the seat, didn't expect that. So I guess I will be the only one to know coz only a limited number of people will see the finished plane. The pics attached are of the first dry fit before the fuselage halves are galude together! cheers, Bill
Attachments
Tony Hill
Tech Sergeant
Looking very nice, I love the cockpit detail.
Darryl
Darryl
Crimea_River
Marshal
Nice!
djos
Airman 1st Class
I would like to build this beast in 1:72 
It looks very nice
It looks very nice
otftch
Staff Sergeant
Very nice work.
Ed
Ed
Airframes
Benevolens Magister
Looking neat.
- Thread starter
- #29
N4521U
Plastic Pirate
Thanks for your codos. However I am Not all that excited about how this cockpit detail stuff fits, it is giving me the s*its. I'm not too sure if I will go this way again. I may just go for scratch adding. The cost of these detail assemblies is just out of sight. Has anyone else experienced this fit problems? Never the less, now the floor framing has been attached, and "my nerves are a shambles" as my mother used to say, but then she had 7 children! cheers, Bill
Attachments
Heinz
Captain
Looking great!
Vic Balshaw
Major General
For someone who has been out of the game for 13 years, you have not lost any of your skills. This is 1st class work


Njaco
The Pop-Tart Whisperer
I found my brother in Botany Bay!! Sausage fingers, shakes, eyesight and how many years since the last plastic meltdown?! 
Looking good!!
Some hints: I compensate my shaky fingers by painting the model on a working washing machine. Kinda cancels out the shakes.
Always build over 200 square feet of tacky wallpaper placed sticky side up - hard to move but nothing ever bounces to Sock World.
and never, ever build anything smaller than 1/24. Of cource that comes with a new mortgage as I'm always trying to find room to put the bloody things!!
Looking good all the same, Bill!!
vikingBerserker
Lieutenant General
Looking pretty nice Bill!
Airframes
Benevolens Magister
Coming along nicely Bill. I read a magazine feature some time ago, where the same kit was used, and the builder did mention some fit problems.
- Thread starter
- #38
N4521U
Plastic Pirate
I guess there i a family of fat fingered shaky and nearly blind builders here then, I feel re-united. Thanks Vic, I felt I was nearing melt down till Airframes post above. The cockpit seemed to fit together nicely out of the kit, but then when openings were aligned like the door and right sill, it just seemed to go south on me. I think if I had it to do over again I would take the outsides down until just the ribbing was intact and use the kit as sidewalls. If you get my drift, or even just cut the components out and put in my own ribbing. If you get my drift. Krikey, I seem to be drifting off course. cheers, Bill
Njaco
The Pop-Tart Whisperer
You are not alone! Check my 410 thread where the fit was a,.. uummmm, wonderful addition to the modeling experience.
But its looking real good for such a long vacation from the fun.
But its looking real good for such a long vacation from the fun.
- Thread starter
- #40
N4521U
Plastic Pirate
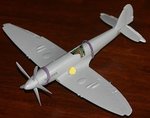
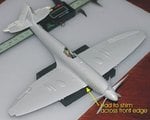
gadzooks, fuselage together and the wings are finally ON................ very traumatic tho. I fit the two halves together, and just to make sure I looked at the instruction sheet, then the PE to see if I had forgotten anything, and there it was, the shoulder straps still not in............ So, after installing them, I was finally ready to stick it up. So now I am past the point of no return. I just have to attach the rudder. Kindly a member nearby has come to my aid and offered the use of a compressor, so I may start overall painting soon. Wish me luck. cheers, Bill
Attachments
Users who are viewing this thread
Total: 2 (members: 0, guests: 2)


