Navigation
Install the app
How to install the app on iOS
Follow along with the video below to see how to install our site as a web app on your home screen.
Note: This feature may not be available in some browsers.
More options
You are using an out of date browser. It may not display this or other websites correctly.
You should upgrade or use an alternative browser.
You should upgrade or use an alternative browser.
Me 262 from the Trumpeter kit in 1/32
- Thread starter al49
- Start date
Ad: This forum contains affiliate links to products on Amazon and eBay. More information in Terms and rules
More options
Who Replied?Airframes
Benevolens Magister
Nice work Alberto, but I agree with Andy - the pics are taking a long time to load, slowing down the forum. If you re-size to no larger than 800 x 600 pixels, and upload direct to the forum from your files, they'll be quicker to view, and not cause forum problems.
Lovely work so far!
- Thread starter
- #44
al49
Tech Sergeant
Gone further with the pilot office:


Then, if you the fuselage upside-down ...


I also added some details in the radio compartment, besides I new the will almost impossible to be seen:

About engines, one sits already in its nacelle, so no detail is needed:

For the other one, I will do my best to add piping and cabling.


More to follow soon.
Alberto
Then, if you the fuselage upside-down ...
I also added some details in the radio compartment, besides I new the will almost impossible to be seen:
About engines, one sits already in its nacelle, so no detail is needed:
For the other one, I will do my best to add piping and cabling.
More to follow soon.
Alberto
Crimea_River
Marshal
Real nice Alberto. I really like those belts and am intrigued by the numbers on he shoulder belts.
- Thread starter
- #46
al49
Tech Sergeant
Hi,
these are the shoulder belts I've used

The only required actions are to paint the back-side in similar colour and add some weathering.
Alberto
these are the shoulder belts I've used
The only required actions are to paint the back-side in similar colour and add some weathering.
Alberto
Excellent work so far!
Crimea_River
Marshal
Thanks Alberto. First I heard of those but they're quite good looking belts.
That's real nice, new to me also...
Hotntot
Senior Airman
Good progress so far. Plenty to do on this one...
meatloaf109
1st Lieutenant
Those are some cool belts, the whole model is looking good, too!
- Thread starter
- #53
al49
Tech Sergeant
I'm here again with some pictures of the engine and some questions for the experts.
Th engine first


It sounds good to me and I hope you will like it but I also think it will be a real pity to enclose it inside the nacelle, so the are three options:
1) Use transparent nacelles, but I don't like them very much because my model will resemble a toy
2) Just cut an opening, like I did already:


but only a minor portion of the engine will be visible
3) The third option is to show the engine completely exposed, like in this photo:

but here comes the firs question for the experts, does anybody know how the engine was attached to the wing? Any picture may be also showing the wing structure?
The other question I have for the experts concerns landing gear covers.
I read that those covers were made in wood and plywood with only some parts in metal, therefore I deduce that those parts were painted RM02 gray, is it correct?
Many thanks in advance for any comment and/or help.
Alberto
Th engine first
It sounds good to me and I hope you will like it but I also think it will be a real pity to enclose it inside the nacelle, so the are three options:
1) Use transparent nacelles, but I don't like them very much because my model will resemble a toy
2) Just cut an opening, like I did already:
but only a minor portion of the engine will be visible
3) The third option is to show the engine completely exposed, like in this photo:
but here comes the firs question for the experts, does anybody know how the engine was attached to the wing? Any picture may be also showing the wing structure?
The other question I have for the experts concerns landing gear covers.
I read that those covers were made in wood and plywood with only some parts in metal, therefore I deduce that those parts were painted RM02 gray, is it correct?
Many thanks in advance for any comment and/or help.
Alberto
Excellent work so far!
](/forum/images/smilies/eusa_wall.gif "Brick wall ](*,)") Luv the belts and engine
Luv the belts and engine Crimea_River
Marshal
Love the engine detailing Alberto. The only thing I noticed was that the starter pull ring is sticking out a bit far.
Let me flip though my references for a bit and I'll see if I can answer your questions unless someone beats me to it.
Let me flip though my references for a bit and I'll see if I can answer your questions unless someone beats me to it.
Crimea_River
Marshal
OK, I guess no-one beat me to it. For such a nice detail job, I would consider your option 3. The real aircraft's cowls were designed to be completely removable, exposing the whole engine
1) The engine attaches to the wing at 3 mounting points. I have pointed to them in your picture here.

The single one on the ring flange to the rear does not seem to have been replicated on your model. Attachment was by bolts. Here are two pictures (source Squadron Me262 Walkaround) showing the mounting to the wing:


Note the bare aluminum delineation with the RLM 76 where the missing cowl meets the wing.
2) Not sure about the wood components. Of course this was possible as this became a more common practice on late war LW aircraft. True or not, I would paint the insides of the gear doors RLM 02. Others may have better info on this though.
1) The engine attaches to the wing at 3 mounting points. I have pointed to them in your picture here.
The single one on the ring flange to the rear does not seem to have been replicated on your model. Attachment was by bolts. Here are two pictures (source Squadron Me262 Walkaround) showing the mounting to the wing:
Note the bare aluminum delineation with the RLM 76 where the missing cowl meets the wing.
2) Not sure about the wood components. Of course this was possible as this became a more common practice on late war LW aircraft. True or not, I would paint the insides of the gear doors RLM 02. Others may have better info on this though.
Last edited:
Airframes
Benevolens Magister
Good stuff Alberto. I've seen those belts advertised, and wondered what they looked like - nice!
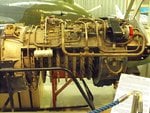
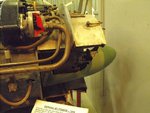
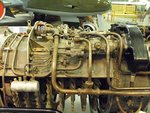
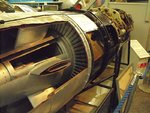
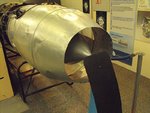
Here's a few pics of a partially sectioned Jumo, at the Midland Air Museum - don't know if they'll help for some details?
Here's a few pics of a partially sectioned Jumo, at the Midland Air Museum - don't know if they'll help for some details?
Attachments
- Thread starter
- #60
al49
Tech Sergeant
Many thanks, your pictures are just great!
I found that a Spanish modeller (Francisco Soldan Alfaro) did already something similar


so, inspired by that I started already working on the new under-wing panel.
About the starter ring, isn't yet fixed and I will try to make a smaller ring that will look better.
Thanks again.
Alberto
I found that a Spanish modeller (Francisco Soldan Alfaro) did already something similar
so, inspired by that I started already working on the new under-wing panel.
About the starter ring, isn't yet fixed and I will try to make a smaller ring that will look better.
Thanks again.
Alberto
Users who are viewing this thread
Total: 1 (members: 0, guests: 1)