Navigation
Install the app
How to install the app on iOS
Follow along with the video below to see how to install our site as a web app on your home screen.
Note: This feature may not be available in some browsers.
More options
You are using an out of date browser. It may not display this or other websites correctly.
You should upgrade or use an alternative browser.
You should upgrade or use an alternative browser.
Ad: This forum contains affiliate links to products on Amazon and eBay. More information in Terms and rules
More options
Who Replied?Crimea_River
Marshal
Ditto on the thumbs up.
Nicely done so far!
- Thread starter
- #44
dneid
Staff Sergeant
I have re-scribed the lost panel lines and added the "fastners" back that were lost in getting the joint cleared up. Forgive the picture, I tried to get it as clear as I could. You can just make out the fastners. I punched out a dozen 0.6mm discs from some 0.01" card stock. I dabbed a wee bit of glue and dropped 5 of these in place. I then let them settle into place and then came back with my dubbing needle to establish a center point. Out came a fine drill and I lightly drilled out the centers.
I also re-scribed the panel lines. The black smears are my attempt to free hand a guide line with a pencil. I did reduce the joints on the wing root as they swept down to the lower fuse. Still more to go, I will get to those tomorrow. So far, I am happy with the look. Perfect? Of course not, but it sure looks ok to me.

I also re-scribed the panel lines. The black smears are my attempt to free hand a guide line with a pencil. I did reduce the joints on the wing root as they swept down to the lower fuse. Still more to go, I will get to those tomorrow. So far, I am happy with the look. Perfect? Of course not, but it sure looks ok to me.
Last edited:
fubar57
General
Coming right along Dale and I agree with Wojtek. Don't know what you use for a photo editor, I use Paint.net. This is what I do as per Wojtek's advice and I'm sure it works with all editors. Upload your uneditted pic into the editor (these have been resized for the forum)...

In the tool section, pick "Rectangle Select" and hi-lite the area you want...

Then from the "Image" drop box I select "Crop to Selection"

....et voila, pic is magnified without the blur

After this, you can resize the photos for posting. Hope this helps
In the tool section, pick "Rectangle Select" and hi-lite the area you want...
Then from the "Image" drop box I select "Crop to Selection"
....et voila, pic is magnified without the blur
After this, you can resize the photos for posting. Hope this helps
Exactly I have meant that way. However I use the Irfanvew browser of images. It is a freeware and all you need to resize a picture with that soft is a clear general image taken.
The general shot taken from a distance ...

And here the enlarged and clipped one...

The general shot taken from a distance ...
And here the enlarged and clipped one...
- Thread starter
- #48
dneid
Staff Sergeant
Yeah, what you both describe is how I shoot and edit (using Preview on a mac). I think I need to play with lighting and I need to check F stop as well. Thanks for all the help though.
Airframes
Benevolens Magister
Tripod or 'desk top' tripod / mount, minimum of 100 Watt lighting, preferably 500 W, and an aperture of at least f16 or less, preferably around f22 or f32. Switch Image Stabilisation 'Off', and use a remote shutter release, or the camera timer.
Alternatively, if using a compact or 'bridge' camera, set to 'Normal' lighting, flash 'Off'', Macro 'On'. and shoot, hand-held, at around 8 inches or more from the subject, then select and crop as required.
Alternatively, if using a compact or 'bridge' camera, set to 'Normal' lighting, flash 'Off'', Macro 'On'. and shoot, hand-held, at around 8 inches or more from the subject, then select and crop as required.
The Kohler
Airman
Hey, Hansjurg!!!
How are you doing?! Where did you land?
I have not started on the Tiffy yet. I want to get the Hurricane done then move back to the 109 G-6 now that the new clear sprue came in. After these are done, I need to decide what is next. I am leaning towards getting back to the F-16 that I started earlier last year. However, the idea of the Tiffy is still on the table. I am thinking it will be after the F-16 is done.
What are you working on?
Hey Dale,
I guess, I need to update my LinkedIn page
")
As usual, I'm working on several (too many) models; a Shahak (Mirage IIICJ), a Super Etendard, a Kittyhawk Mk. III (almost done) and a Warhawk Mk. IIB. And a lot of ideas about new projects.
Cheers,
Hansjurg
Good work so far!
Doing good..!
Donivanp
Lieutenant Colonel
Dale the photo looks blurry because you had too much port. Knock it off will yeah.
- Thread starter
- #54
dneid
Staff Sergeant
Ok, I have been working on the hurricane. I do have the fuse halves joined and the wing mounted as you all can see. Horizontal stab is on as well. I have the radiator on and needed to do more filling than I cared for. I have just about finished that up. I needed to rescribe a few panel lines and that is about done. Pics to follow tomorrow or Saturday. All in all a nice kit. Just be slow and careful with the radiator assembly to minimize any challenges there.
Tony Hill
Tech Sergeant
Nice work so far.
- Thread starter
- #56
dneid
Staff Sergeant
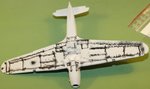
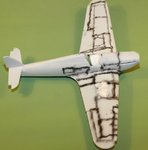
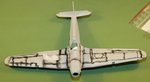
Ok, a bit of an update and some pictures. I have the plane cleaned up and primed. I decided to try the hightlighting of the panel lines with a thinned out black acrylic. I am not entirely happy. But, this is my first time using acrylics for an exterior finish. I am still learning. It seems that the airbrush needle/nozzle require a periodic wiping while spraying.
Bad news.... the carpet monster ate the front windscreen. I have checked and checked and checked and I just cannot find it. I posted an enquiry to the Airfix website about a spare. No answer back yet, but it was just yesterday I posted. I will let you all know what I hear back.
Pics:
Bad news.... the carpet monster ate the front windscreen. I have checked and checked and checked and I just cannot find it. I posted an enquiry to the Airfix website about a spare. No answer back yet, but it was just yesterday I posted. I will let you all know what I hear back.
Pics:
Attachments
Crimea_River
Marshal
Looks like your paint is a bit too thin Dale or you are blowing it too hard.
Let me know if you get stuck for that part as I have a couple of spare vac-formed ones available.
Let me know if you get stuck for that part as I have a couple of spare vac-formed ones available.
Yep, practice on some paper, different pressures and mixs....you will get the hang of it...
Looks good so far!
- Thread starter
- #60
dneid
Staff Sergeant
I took some time this weekend to experiment with acrylics. I used both Model Air and Model Color (thinned by 20%). I experimented with all of my airbrushes and started at 15 psi and worked up to 20 or 25 psi. I will post a couple of shots tomorrow. I was very pleased with the model air across almost all of my airbrushes. Not so much with the Model Colors. Two airbrushes worked good to very good with the Model Colors. Anyone have any recommendations on thinning/air pressures with Model Colors?
Users who are viewing this thread
Total: 1 (members: 0, guests: 1)