looks pretty good to me Dogsbody, might have to get another myself, alsways fancied doing the one from your painting !
Navigation
Install the app
How to install the app on iOS
Follow along with the video below to see how to install our site as a web app on your home screen.
Note: This feature may not be available in some browsers.
More options
You are using an out of date browser. It may not display this or other websites correctly.
You should upgrade or use an alternative browser.
You should upgrade or use an alternative browser.
P-47 'Bridge Buster', 1/48th scale, 9th Air Force Diorama. (1 Viewer)
- Thread starter Airframes
- Start date
Ad: This forum contains affiliate links to products on Amazon and eBay. More information in Terms and rules
More options
Who Replied?Angels one-five
Airman 1st Class
That's looking superb Terry. Great weathering8)
T Bolt
Colonel
Beautiful job Terry. As far as the pilot, I think your thinking of John Belushi's character "Wild Bill Kelso" in the Spielberg comedy film "1941"
View: https://www.youtube.com/watch?v=6DVmfd1x5L8
View: https://www.youtube.com/watch?v=6DVmfd1x5L8
- Thread starter
- #124
Airframes
Benevolens Magister
Thanks very much chaps!
Karl, if you want to do Goodson's aircraft, I've got the 1/32nd scale nose art decals, which I think should reduce and print as 1/48th scale fairy well. Thing is, it's either a 'C' or an early 'D' (I'd need to check the serial number), so you'd have to modify whatever 'razorback' kit you got - which would probably have to be either Hasegawa or Tamiya, as the Revell re-release of the Monogram kit doesn't seem to be around in the UK, and surprisingly, there aren't any 'pre owned' examples around either - and I've just grabbed the second, and last, Arii kit from King Kit!
Glenn, it might be that character, but as I've never seen that movie, I don't think it's 'him' I'm thinking of. I'm fairly sure I've read about a Kelso fairly recently, but could be RAF/RAAF/RNZAF or RCAF !
The model has now been gloss coated, and some of the decals are on, although it's taking a lot of time.
I'm not that happy about the gloss coat either - it's the relatively new Klear (Future) which, despite evidence to say it's no different to the original, does not dry as glossy, and it's also not as 'smooth', with dull patches and a slight 'grainy' look in some areas too. Hopefully though, it'll be OK once the clear matt finishing coat has been applied.
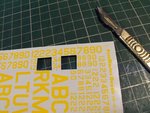
There weren't any decals with this kit, so I've cobbled together virtually everything that's required, from the spare decals files ,plus old Microscale code letters. Almost all of the decals are at least 25 years old, and some more than 30 years old, with the exception of a brand new sheet of Aeromaster yellow serial numbers, and a couple of Academy items which were included with the Arii kit I've just received. I actually found an original decal sheet from the Monogram kit I built in 1978, from where most of the stencils will be sourced!
I'll try to post some progress pics later, and indicate where the 'mix n' match' decals came from - if I can remember which are which, as there are around eight different sources!
So far, the only 'problem' decals have been the Microscale letters which, being so thin, are prone to breaking up, even after spraying with a sealing clear gloss varnish - not Future - but more of this later.
Karl, if you want to do Goodson's aircraft, I've got the 1/32nd scale nose art decals, which I think should reduce and print as 1/48th scale fairy well. Thing is, it's either a 'C' or an early 'D' (I'd need to check the serial number), so you'd have to modify whatever 'razorback' kit you got - which would probably have to be either Hasegawa or Tamiya, as the Revell re-release of the Monogram kit doesn't seem to be around in the UK, and surprisingly, there aren't any 'pre owned' examples around either - and I've just grabbed the second, and last, Arii kit from King Kit!
Glenn, it might be that character, but as I've never seen that movie, I don't think it's 'him' I'm thinking of. I'm fairly sure I've read about a Kelso fairly recently, but could be RAF/RAAF/RNZAF or RCAF !
The model has now been gloss coated, and some of the decals are on, although it's taking a lot of time.
I'm not that happy about the gloss coat either - it's the relatively new Klear (Future) which, despite evidence to say it's no different to the original, does not dry as glossy, and it's also not as 'smooth', with dull patches and a slight 'grainy' look in some areas too. Hopefully though, it'll be OK once the clear matt finishing coat has been applied.
There weren't any decals with this kit, so I've cobbled together virtually everything that's required, from the spare decals files ,plus old Microscale code letters. Almost all of the decals are at least 25 years old, and some more than 30 years old, with the exception of a brand new sheet of Aeromaster yellow serial numbers, and a couple of Academy items which were included with the Arii kit I've just received. I actually found an original decal sheet from the Monogram kit I built in 1978, from where most of the stencils will be sourced!
I'll try to post some progress pics later, and indicate where the 'mix n' match' decals came from - if I can remember which are which, as there are around eight different sources!
So far, the only 'problem' decals have been the Microscale letters which, being so thin, are prone to breaking up, even after spraying with a sealing clear gloss varnish - not Future - but more of this later.
Nicely done so far Terry!
Crimea_River
Marshal
Terry, I've been running into that problem with my bottle of Future but had recent success on "Fireball" by using a larger nozzle (Paasche #3) and low pressure so the stuff sprays on wetter. The gloss came out really nice but care was needed to ensure there were no runs. I think your spray is drying in the air on the way to the model, hence the grainy texture.
- Thread starter
- #127
Airframes
Benevolens Magister
Andy, I brushed it on, which normally gives a really good gloss finish, even with just one coat, and a glass-like finish with two or more coats. You'll be able to see what I mean in the pics. I also noticed that it 'blooms' at the slightest touch of even a drop of Micro Sol, which can be seen around the 'R' on the rear, port fuselage. Fortunately, this seems to fade when rinsed with clean water, and will disappear once a sealing coat is applied, and then the final, matt, clear coat.
So, on with the progress report.
All of the main decals are on, which is described below, and the main stencils will be added, using some spare Academy P-47 decals, including some that came with the first of the Arii kits I bought. I'll also try to use some of the Monogram stencils, from the decal sheet left over from a P-47 I built around about 1978 or '79!
Once that's all done, some of the 'paint wear' and weathering will be toned down, as will the yellow 'mission tally' markings, and further 'surface work' will be done after the matt clear coat.
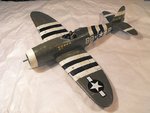
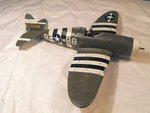
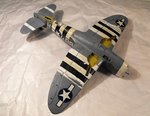
PICS 1 to 3 Show how the model looks so far, and the uneven finish of the Klear (Future) is quite evident, making it look somewhat rough. Fortunately, experience has shown that this should be rectified, once sealed and then topped with the matt clear coat.
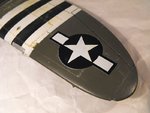
PIC 4. First thing to notice is that the moulded-on pitot tube finally succumbed, a victim of another bl**dy shoulder spasm! This 'star and bar' is from the 1976 kit and. although it eventually settled down, not only is there a register problem, which will need to be re-touched, but there's also a flaw in the printing, showing as a 'lump', which is actually an area of heavier ink. Hopefully, this won't be as noticeable once matt coated.
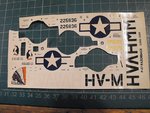
PIC 5. That Monogram decal sheet from all those years ago. The decals are still usable, but they're from an era when they were thick, and with a cloudy carrier film. I tried using the over-sized 'stars and bars' for the underside of the wing, but they would not lie down, so I had to resort to the 'standard' size, often seen, sometimes with a mix of these and 'over sized', and these were sourced from an Otaki Corsair kit sheet, from the early 1980's. Surprisingly, they were the best of the lot, and lay down and conformed without problems and without using Midcro Sol.
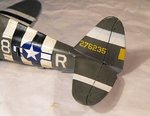
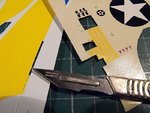
I had planned to use the Monogram fuselage decals, or some spare Academy P-47 fuselage decals, both of which have the 'cut out' and separate, small bar section, to fit around the intercooler doors, but, having checked the positioning of the bars, in relation to the AEAF stripes in the photos of the actual aircraft, it transpired that whoever painted the stripes on B8-R, appears to have painted the rear, white stripe, slightly wider than normal, aligning it's aft edge with the rear of the bar to the star. If I'd used the available decals, the aft bar would have protruded beyond the white strip, as seen on most (but not all) P-47s. Consequently, I had to use some decals of the correct diameter, from an ICM Mustang kit, and cut the forward bar to fit as per the photos, whilst aligning the rear bar accordingly, and this will mean painting-in the 'missing' bits once the decals are set and sealed.
PICS 6 and 7. The tail numbers were applied individually, referring to the photos for exact positioning, and were from a brand new Aeromaster sheet. Excellent decals, which came of the carrier sheet and positioned without hassle, this being done by brushing each individual letter with water, then transporting to the model on the tip of a scalpel blade, and sliding into position with a wet paint brush.
Note the angle of the 'R' code letter - this being the first decal applied, and from a Microscale sheet I've had for at least 25 years, probably longer. It immediately stuck like sh*t to a blanket, and the slightest touch was causing it to tear, as it would not move on the 'Futured' surface. I had to leave it as is, as I only had two letter R's left, including this one. The only other alternative would be to remove it, and try to fabricate the letter from a letter 'P', and a piece of white decal from another letter. However, in the photo of this aircraft, it looks like the letter is actually slightly out of true, and also not exactly pristine in shape and appearance, although I'll admit, some of the effect is the angle, and quality, of the photo.
What do you think guys - leave it, or fabricate a new letter?
What looks like slight silvering around the letter seems to have been 'bloom' from the Micro Sol, as it rinsed off, and it might have been a reaction to this and the Future, which caused the decal to 'grab' and stick fast. I din't use any more Sol on the other lettering, but did under the fuselage and upper wing stars and bars, where any clouding can't be seen.
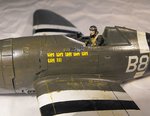
PICS 8 and 9. Research showed that the 'Mission Tallies' on this Squadron's aircraft were painted in the form of 'five bar gates', with four vertical bars and a diagonal 'hatch' denoting five missions. One photo of one aircraft showed these in what appeared to be white, as did a colour profile, although this could well have been the lighting. However, a closer inspection of a couple of other photos of different aircraft, suggested a darker colour, possibly yellow, which was common on bombers, at least. These pics included the subject of the profile mentioned, where the bars and stroke were definitely a darker colour than white, and showed a marked contrast against other white markings on this aircraft. Also, I noticed that the same profile artist seemed to have a couple of other details wrong, including the colour of the rudder trim tab - which was painted in the colour of a different squadron!
As a result, I decided to go with yellow, and trimmed some 'straight' yellow bars from an old B-25 decal sheet - again at least 20 years old. The diagonal 'hatches' were added from thin slivers trimmed from large yellow panels from a Luftwaffe F-4 Phantom sheet, yet again, around 20 or more years old!
The black panel with pilot and ground crew details, fortunately only partly legible, but effective enough, came from the spares box.
So, next step is to tackle the stencils, and touch-up and small detail painting
Although it doesn't look as harsh 'in real life', the gloss coat has really emphasised some areas of paint fade, chipping and dirt, so this will be subdued after the clear, sealing coat, and further subtle weathering/wear added later.
Thanks once again for your complimentary remarks and encouragement, and I hope you all have a great Christmas, wherever you are, and whatever you're dong (Jan, get out of the pub - the Turkey's burning!).
Next up-date will probably be in a couple of days, as I'm going to the pub tonight, and I've also been invited to the pub Landlord's place for Christmas dinner - so no sense from me for a day or two!
So, on with the progress report.
All of the main decals are on, which is described below, and the main stencils will be added, using some spare Academy P-47 decals, including some that came with the first of the Arii kits I bought. I'll also try to use some of the Monogram stencils, from the decal sheet left over from a P-47 I built around about 1978 or '79!
Once that's all done, some of the 'paint wear' and weathering will be toned down, as will the yellow 'mission tally' markings, and further 'surface work' will be done after the matt clear coat.
PICS 1 to 3 Show how the model looks so far, and the uneven finish of the Klear (Future) is quite evident, making it look somewhat rough. Fortunately, experience has shown that this should be rectified, once sealed and then topped with the matt clear coat.
PIC 4. First thing to notice is that the moulded-on pitot tube finally succumbed, a victim of another bl**dy shoulder spasm! This 'star and bar' is from the 1976 kit and. although it eventually settled down, not only is there a register problem, which will need to be re-touched, but there's also a flaw in the printing, showing as a 'lump', which is actually an area of heavier ink. Hopefully, this won't be as noticeable once matt coated.
PIC 5. That Monogram decal sheet from all those years ago. The decals are still usable, but they're from an era when they were thick, and with a cloudy carrier film. I tried using the over-sized 'stars and bars' for the underside of the wing, but they would not lie down, so I had to resort to the 'standard' size, often seen, sometimes with a mix of these and 'over sized', and these were sourced from an Otaki Corsair kit sheet, from the early 1980's. Surprisingly, they were the best of the lot, and lay down and conformed without problems and without using Midcro Sol.
I had planned to use the Monogram fuselage decals, or some spare Academy P-47 fuselage decals, both of which have the 'cut out' and separate, small bar section, to fit around the intercooler doors, but, having checked the positioning of the bars, in relation to the AEAF stripes in the photos of the actual aircraft, it transpired that whoever painted the stripes on B8-R, appears to have painted the rear, white stripe, slightly wider than normal, aligning it's aft edge with the rear of the bar to the star. If I'd used the available decals, the aft bar would have protruded beyond the white strip, as seen on most (but not all) P-47s. Consequently, I had to use some decals of the correct diameter, from an ICM Mustang kit, and cut the forward bar to fit as per the photos, whilst aligning the rear bar accordingly, and this will mean painting-in the 'missing' bits once the decals are set and sealed.
PICS 6 and 7. The tail numbers were applied individually, referring to the photos for exact positioning, and were from a brand new Aeromaster sheet. Excellent decals, which came of the carrier sheet and positioned without hassle, this being done by brushing each individual letter with water, then transporting to the model on the tip of a scalpel blade, and sliding into position with a wet paint brush.
Note the angle of the 'R' code letter - this being the first decal applied, and from a Microscale sheet I've had for at least 25 years, probably longer. It immediately stuck like sh*t to a blanket, and the slightest touch was causing it to tear, as it would not move on the 'Futured' surface. I had to leave it as is, as I only had two letter R's left, including this one. The only other alternative would be to remove it, and try to fabricate the letter from a letter 'P', and a piece of white decal from another letter. However, in the photo of this aircraft, it looks like the letter is actually slightly out of true, and also not exactly pristine in shape and appearance, although I'll admit, some of the effect is the angle, and quality, of the photo.
What do you think guys - leave it, or fabricate a new letter?
What looks like slight silvering around the letter seems to have been 'bloom' from the Micro Sol, as it rinsed off, and it might have been a reaction to this and the Future, which caused the decal to 'grab' and stick fast. I din't use any more Sol on the other lettering, but did under the fuselage and upper wing stars and bars, where any clouding can't be seen.
PICS 8 and 9. Research showed that the 'Mission Tallies' on this Squadron's aircraft were painted in the form of 'five bar gates', with four vertical bars and a diagonal 'hatch' denoting five missions. One photo of one aircraft showed these in what appeared to be white, as did a colour profile, although this could well have been the lighting. However, a closer inspection of a couple of other photos of different aircraft, suggested a darker colour, possibly yellow, which was common on bombers, at least. These pics included the subject of the profile mentioned, where the bars and stroke were definitely a darker colour than white, and showed a marked contrast against other white markings on this aircraft. Also, I noticed that the same profile artist seemed to have a couple of other details wrong, including the colour of the rudder trim tab - which was painted in the colour of a different squadron!
As a result, I decided to go with yellow, and trimmed some 'straight' yellow bars from an old B-25 decal sheet - again at least 20 years old. The diagonal 'hatches' were added from thin slivers trimmed from large yellow panels from a Luftwaffe F-4 Phantom sheet, yet again, around 20 or more years old!
The black panel with pilot and ground crew details, fortunately only partly legible, but effective enough, came from the spares box.
So, next step is to tackle the stencils, and touch-up and small detail painting
Although it doesn't look as harsh 'in real life', the gloss coat has really emphasised some areas of paint fade, chipping and dirt, so this will be subdued after the clear, sealing coat, and further subtle weathering/wear added later.
Thanks once again for your complimentary remarks and encouragement, and I hope you all have a great Christmas, wherever you are, and whatever you're dong (Jan, get out of the pub - the Turkey's burning!).
Next up-date will probably be in a couple of days, as I'm going to the pub tonight, and I've also been invited to the pub Landlord's place for Christmas dinner - so no sense from me for a day or two!
Attachments
-
 P-47 Build 158.jpg80.6 KB · Views: 205
 -
 P-47 Build 159.jpg73.4 KB · Views: 199
 -
 P-47 Build 160.jpg85.8 KB · Views: 205
 -
 P-47 Build 164.jpg67.7 KB · Views: 207
 -
 P-47 Build 157.jpg117.7 KB · Views: 217
 -
 P-47 Build 162.jpg76.2 KB · Views: 198
 -
 P-47 Build 154.jpg100.1 KB · Views: 207
 -
 P-47 Build 163.jpg86.1 KB · Views: 214
 -
 P-47 Build 156.jpg123.8 KB · Views: 208
- Thread starter
- #129
Airframes
Benevolens Magister
Thanks my friend, and yes, there are differences in the shades of blue in the 'stars and bars', a result of having to use a mixture of decals. Had the fuselage decals worked for the required size, in relation to the AEAF stripes, they would all have been the same shade. Once the decals have been sealed, I'll have a go at making the blue on the fuselage examples a bit darker. I need to paint over the stars anyway, as there edge of the black stripe is showing through.
T Bolt
Colonel
That R doesn't look bad where it is Terry and the rest look just fine. I've had the same problems with the new Future, especially when putting it over paint that is pretty flat. In the last few builds I've done I haven't trusted it to not make the decals silver so where I can't trim off the carrier film such as serial numbers and stencils I've been applying them by first wetting the surface with Future to insure there is no airspace underneath, using the overall Future coat more as a sealer for my washes that as gloss for the decals
- Thread starter
- #131
Airframes
Benevolens Magister
Thanks Glenn, I think I'll just leave that letter 'R' as it is.
I've been doing a similar thing with the decals too. I think I'm going to have to find a good gloss varnish that I can use in the airbrush, as the Future is definitely not as good as it used to be, although I'll still use it for small areas, and for mixing with Tamiya Flat Base to obtain various matt coats. Unfortunately, my LHS only stocks acrylic gloss clear in spray cans, which is a 'No No' due to lack of sprat control, or enamel gloss clear, but the latter tends to yellow with age and is a bit 'heavy' when brushed on. If thinned for spraying, then it can go patchy, or at least not full gloss, which defeats the object.
I've been doing a similar thing with the decals too. I think I'm going to have to find a good gloss varnish that I can use in the airbrush, as the Future is definitely not as good as it used to be, although I'll still use it for small areas, and for mixing with Tamiya Flat Base to obtain various matt coats. Unfortunately, my LHS only stocks acrylic gloss clear in spray cans, which is a 'No No' due to lack of sprat control, or enamel gloss clear, but the latter tends to yellow with age and is a bit 'heavy' when brushed on. If thinned for spraying, then it can go patchy, or at least not full gloss, which defeats the object.
looks better with every update Terry
Good work so far Terry!
Aaron Brooks Wolters
Brigadier General
Really starting to look the part sir! Keep up the stupendous work.
meatloaf109
1st Lieutenant
I really can't add anything to what the guys have said already....
Except that I am glad I have several bottles of the old "Future" in reserve.
All the same, she's looking good!
Except that I am glad I have several bottles of the old "Future" in reserve.
All the same, she's looking good!
Crimea_River
Marshal
Looks great Terry. If you hadn't mentioned the R, I would have barely noticed so leaving it alone is the right thing to do.
Agree with all the comments, scrubbing up real nice Terry!
- Thread starter
- #138
Airframes
Benevolens Magister
Thanks very much chaps. Just about to start on the stencils, using the old, original Monogram sheet, and some left over from the Academy kit. If the former don't work, then I might make my own, if the resolution will hold up at that small size. Another up-date as soon as possible.
Look forward to it! 
ozhawk40
Master Sergeant
Yes, me too! Great build Terry!
Cheers
Peter
Cheers
Peter
Users who are viewing this thread
Total: 2 (members: 0, guests: 2)