Navigation
Install the app
How to install the app on iOS
Follow along with the video below to see how to install our site as a web app on your home screen.
Note: This feature may not be available in some browsers.
More options
You are using an out of date browser. It may not display this or other websites correctly.
You should upgrade or use an alternative browser.
You should upgrade or use an alternative browser.
P-47D RAZORBACK, 1/48 Monogram " DONE! "
Ad: This forum contains affiliate links to products on Amazon and eBay. More information in Terms and rules
More options
Who Replied?Lucky13
Forum Mascot
Beautiful work Luis!
- Thread starter
- #123
SANCER
Senior Master Sergeant
I appreciate your compliments and visit my friends Brian, Javlin Jan. 
Today I hope to get to work on my bird, and even able to follow my Nakajima .
.
Yet I do not carry my cell to service (because I have relied heavily on him in matters of street work).
And to top ; ... accidentally hit without breaking the screen but I can not see anything !!, and the touchscreen works without problem !!
So now I do give me time to take it to service Samsung.
A little inconvenience ... I personally do not believe in bad luck.
Finally, keep in touch and enjoying the modeling !!
Saludos a todos!!
Today I hope to get to work on my bird, and even able to follow my Nakajima
Yet I do not carry my cell to service (because I have relied heavily on him in matters of street work).
And to top
; ... accidentally hit without breaking the screen but I can not see anything !!, and the touchscreen works without problem !!So now I do give me time to take it to service Samsung.
A little inconvenience
... I personally do not believe in bad luck.Finally, keep in touch and enjoying the modeling !!
Saludos a todos!!
Hola hermano...
Being originally from the Philippines myself, I've always wanted to do this build of the 201st P-47s who were stationed there during the liberation of the islands. Maybe I could do a mirror build, but only in 1/72 scale.
Viva Mexico and muchas gracias to the Mexican heroes who flew, fought and gave their lives to free my country back then.
- Thread starter
- #125
SANCER
Senior Master Sergeant
Aking mahal na kaibigan at kapatid Wingnutz
I thank those words a lot. Never happened to me receive a thank you for Squadron 201 pilots. I was touched by your message; I would love to see the process of your "Aztec Eagle" (Aguila Azteca).
Now that my turn to do mine, I will remember you and then we can comment.
A hug and best regards.
Luis Carlos
- Thread starter
- #126
SANCER
Senior Master Sergeant
Hello friends, I could get my phone and everything returns to normal. 

In the inter I could make some headway on my P-47, but this time to upload the photos to the forum (after a while "trial and error"), the tip of Hugh "Image Sizing Guidelines" and the necessary clarifications T Bold, I have been able to significantly decrease the time to post my photos THROUGH Irfanview
I held up the recommendation of groups of 5 pictures, so in this first test and I share the comment ...
 With pieces included in disposable lighters I found a very similarity to landing gear dampers (in the first picture I have several pieces of different lighters, the 2 on the right were the most suitable), only had to cut a part and modify their place in the corresponding place.
... speaking the photos !!


That hole in the piece is perfect, I will put there a hydraulic cable I can see from the photos reference (thanks Terry, Andy and Wojtek)


See you soon with more...
Gracias por sus visitas y comentarios!!
Regards
Luis Carlos
In the inter I could make some headway on my P-47, but this time to upload the photos to the forum (after a while "trial and error"), the tip of Hugh "Image Sizing Guidelines" and the necessary clarifications T Bold, I have been able to significantly decrease the time to post my photos THROUGH Irfanview
I held up the recommendation of groups of 5 pictures, so in this first test and I share the comment ...
... speaking the photos !!
That hole in the piece is perfect, I will put there a hydraulic cable I can see from the photos reference (thanks Terry, Andy and Wojtek)
See you soon with more...
Gracias por sus visitas y comentarios!!
Regards
Luis Carlos
- Thread starter
- #127
SANCER
Senior Master Sergeant
Well! ... So will these dampers. Later those be detailed. Now I have the hydraulic cables ...


Finally I will go in painting !!
On this occasion I put the closed and tightly sealed with tape and white glue cockpit. I've had the bad experience that I snuck painting on the inside.

My intention is to exhibit it with an open cockpit.
I hope it turns out as I hope.

Liquid mask covered the indicator lights ...


...to be continued...
Finally I will go in painting !!
On this occasion I put the closed and tightly sealed with tape and white glue cockpit. I've had the bad experience that I snuck painting on the inside.
My intention is to exhibit it with an open cockpit.
I hope it turns out as I hope.
Liquid mask covered the indicator lights ...
...to be continued...
Airframes
Benevolens Magister
Great stuff Luis, and good thinking using the lighter parts.
- Thread starter
- #129
SANCER
Senior Master Sergeant
Thank you very much Terry, those photos you shared me served me well for reference.
Un abrazo
LC
Un abrazo
LC
like it!
Nicely done so far!
at6
1st Sergeant
Excellent work. You've shown that even an older model can become a work of art.
- Thread starter
- #134
SANCER
Senior Master Sergeant
My dear friends !!, I appreciate their batons.
I am immersed in the stage of chipping with hairspray. It is something totally new for me, but I am documenting with photos that soon I hope to share with you. 
I think I'm far from a masterpiece, but with mentors like you, I know I am well supported and learning on track.
I appreciate your motivating words my dear at6, and share with you that with imagination, patience and refined techniques can capitalize on an old or simple model.
(There is enough evidence of it in this forum)


Goodnight from here in Mexico and always thank you for your visits and comments.
Hasta pronto!!
Luis Carlos
I am immersed in the stage of chipping with hairspray
I think I'm far from a masterpiece, but with mentors like you, I know I am well supported and learning on track.
I appreciate your motivating words my dear at6, and share with you that with imagination, patience and refined techniques can capitalize on an old or simple model.
(There is enough evidence of it in this forum)
Goodnight from here in Mexico and always thank you for your visits and comments.
Hasta pronto!!
Luis Carlos
- Thread starter
- #135
SANCER
Senior Master Sergeant
Hola de nuevo...
For the lids in landing gear I will test with white glue to mask the back of them. (One with white tak - as I always -)


The inner layer of the cockpit, ... painted!


After applying PRIMER, according to a new suggestion of a colleague in the forum, 50% Mr.Surfacer 1200 and 50% isopropyl alcohol, a couple of very thin layers.
I must say that is very easily applied and I liked the result.
Was minimal so I had to sand to make the polished surface to apply the glossy black background ...


Let it dry and then I applied Duraluminium of Alclad II
It will be the approximate area where chipped will apply ...


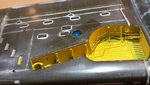
This last photo in landing gear, I did not know how to remove it and an error was within Manage Attachments without first reducing the pixels ... but taking advantage shows the hole I made for wiring hydraulic dampers ... !!
... and I could not write after her ....

So I continue in a moment ....
For the lids in landing gear I will test with white glue to mask the back of them. (One with white tak - as I always -)
The inner layer of the cockpit, ... painted!
After applying PRIMER, according to a new suggestion of a colleague in the forum
I must say that is very easily applied and I liked the result.
Was minimal so I had to sand to make the polished surface to apply the glossy black background ...
Let it dry and then I applied Duraluminium of Alclad II
It will be the approximate area where chipped will apply ...
This last photo in landing gear, I did not know how to remove it and an error was within Manage Attachments without first reducing the pixels ... but taking advantage shows the hole I made for wiring hydraulic dampers ... !!
... and I could not write after her ....
So I continue in a moment ....
Attachments
CommanderBounds
Airman 1st Class
Beautiful Work SANCER!!! I love how this is turning out and I look forward to seeing more!
- Thread starter
- #137
SANCER
Senior Master Sergeant
You are very kind to your comment CommanderBounds, "hit the wine glasses"
I continue with my new technique into practice !! ... well I'm excited because no proof or circulation on !!
I follow "literally" the presentation of JKim (John) where also started in this technique. (1/48 Republic P-47D - Mediterranean Theater of Operations ... worth the recognition wonderful job)
Apply 2 or 3 light coats of hairspray, previously decanted into a small bowl and then to airbrush. I let it dry long it took me to clean the airbrush to apply the chrome yellow


I let the paint dry about 30 minutes and then came the interesting ... in a bowl of water I put a flat brush and moistened the surface a bit to get started.
With gentle movements in the same direction and I spent the wet brush and slowly began to lift the paint ... I started from the bottom of the fuselage ...


... After I show you how was the upper part !!
Es todo por ahora, ...hasta pronto amigos
I continue with my new technique into practice !! ... well I'm excited because no proof or circulation on !!
I follow "literally" the presentation of JKim (John) where also started in this technique. (1/48 Republic P-47D - Mediterranean Theater of Operations ... worth the recognition wonderful job)
Apply 2 or 3 light coats of hairspray, previously decanted into a small bowl and then to airbrush. I let it dry long it took me to clean the airbrush to apply the chrome yellow
I let the paint dry about 30 minutes and then came the interesting
With gentle movements in the same direction and I spent the wet brush and slowly began to lift the paint ... I started from the bottom of the fuselage ...
... After I show you how was the upper part !!
Es todo por ahora, ...hasta pronto amigos
Airframes
Benevolens Magister
Yep, it's looking good.
fubar57
General
Nice work on the landing gear, Luis. Awaiting your paint trials.
Geo
Geo
Users who are viewing this thread
Total: 1 (members: 0, guests: 1)