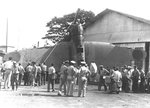
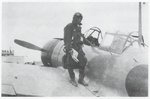
Pearl harbor Type 99 Bomber..Val (1 Viewer)

Ad: This forum contains affiliate links to products on Amazon and eBay. More information in Terms and rules

Absolutely brilliant Wayne!:cool: I came across this pic on the net of a crashed Val at Pearl, most likely the same one you posted but from a different angle. Obviously no help to you now, but I thought I would post it in case you hadn't seen it before. May help on a future project.
 

Attachments

  • val.jpg
    val.jpg
    73 KB · Views: 148
Is that the surface you use to work on? If so, it looks really interesting. I would have to use tweezers and a magnifying glass to put those decals on!
 
Thanks for your comments guys, and yes wildcat I do have that image, if you look closely at the port wing next to the deployed flotation bag you can see the small red stripes that I added to the wing markings for the flap positions.

Ok next image 10 o'clock high this time!
 

Attachments

  • IMGP5744_wa.JPG
    IMGP5744_wa.JPG
    68.5 KB · Views: 149
Looking impressive Wayne.:thumbleft: And you are right the small red stripes are clearly visible there.Many authors of books about Val don't remember of them in their profiles.You did a good piece of historical work also. :D.
 
Wayne.... How did you do the panel lines. Absolutely fantastic looking craftsmanship. What kit?
 
Thanks guys.
tpicdave if you go back a few pages you will see how I do the panel lines and just what I use!

Next shot from 1 o'clock....
 

Attachments

  • Aichi D3A1 Val_1 o'clock.JPG
    Aichi D3A1 Val_1 o'clock.JPG
    82.3 KB · Views: 114
Hi Guys, to answer your questions....

Gnomey, can't say for sure exactly how many hours spent but would estimate 30-40 hours.

Heinz, I use the stretched sprue method for the aerial wires, that is a short length of the plastic sprue about 100-120mm, carefully held over a flame on the stove, when a small section 3-5mm is suitably softened and flexible I then stretch it to create a very thin section, this sometimes takes a few tries as it can easily be broken if you dont get it right, if you get itright you can stretch it out to about 400-500mm. i then cut a piece from this length to do the aerial wire. The Val required a piece about 120mm so I cut it to about 150mm. I carefully cut a very small step in the top of the fin, put a small drop of superglue on the step and attach one end of the "wiring'"to this point.
I then let it cure naturally or if I'm impatient add a bit of accelerator to the glue to set it off immediately. The "wiring" is simply laid down on top of the fuselage or wing to keep it straight and aligned in the right direction and angle.
Once the glue is set you add a small drop of glue to the aerial mast and with a steady hand lightly pull the wiring straight and sit it on top of the mast in the super glue to set, again a bit of accelerator is good here but steady hands are the most important. Once set cut off the excess with a sharp blade. I then paint the "wiring" a dark grey again very carefully, YOU should do this before you attach it though, IT is easier that way.
Now if you break the wire, well you remove the broken piece and start again
Hope I haven't rambled on too much...
 
The method Wayne has described is also suitable to obtain other elements that have a circle cross-section.Not only thin but thicker,it depends on you only.If you use sandpaper you can make sticks of other cross-section in shape.Personally for the aerial wires I use threads that you can easly rip from your wife's or girl's tights.The main advantage of this is that the threads are available as black or grey ones and you don't have to paint them.If you need thick ones you can rip these from the lower or upper parts where they are thicker or you can take two or three together.The threads are very flexible (elastic) and easy glued.There some pics of aerial wires and a pic of PZL P-24 where I've marked with arrows pieces I made using the Wayne method ( Pitot,tail skid,MGs barrels and struts ) and using the thread ( gunsight cross )
 

Attachments

  • _Yak23_1a.jpg
    _Yak23_1a.jpg
    11.6 KB · Views: 120
  • _Spitfire_MkIIa_3.jpg
    _Spitfire_MkIIa_3.jpg
    12.2 KB · Views: 140
  • _PZL P-37B Los.jpg
    _PZL P-37B Los.jpg
    13.7 KB · Views: 117
  • _PZL P24G_6.jpg
    _PZL P24G_6.jpg
    43.5 KB · Views: 92
  • _Hellcat.jpg
    _Hellcat.jpg
    19 KB · Views: 106
Wayne.... I did go back and look to see your method for panel lines. Excellent, but it brings another question to mind. Almost every model I have done has been finished in a flat air brushed finish which I believe was done the same on the "real" planes for a no-shine/glint/glare purpose when in combat.

Any ideas on how to do panel lines when using a flat finish? I also like the "factory new" finish as if the plane were just delivered.

More about finishes, I believe some pilots "waxed up" their planes for speed but don't know if this was ever used in combat. So many questions!!!:lol:
 
tpicdave, my panel line method is best used on the "rough" flat painted surface BEFORE you apply the gloss. The pencil lead does not work as well on the smooth gloss finish. Once you apply the gloss the silvery metalic finish of the lead disappears to a dark grey/black. Apply your decals then gloss again then apply your flat coat(s) depending on the sheen you require.You can still do touch ups on your final flat finish, I also do most of the staining from guns, exhausts, etc before the gloss coat also and touch ups after as well.

I can't quote exact sources now but Luftwaffe fighter ground crews definately at times did wax and polish their pilots aircraft to gain that extra little bit of speed. i'm sure it must have happened in other airforces.
Early Japanese aircraft paints were gloss and then deteriorated at slow or fast rates depending on location. Early period photo's are almost always in black and white and many are not that great in reproductive quality or mostly the wrong angle to see the glossy finish. It is reported that a number of Pearl Harbor aircraft relics STILL retain their glossy finish, some have changed and dulled in appearance but a light buffing brings back the shiny finish.
The Japanese Carrier groups were the elite of the navy and took great pride in keeping their aircraft in top condition.
Even though it is not the best quality I have attached one shot of a Zero where you can clearly see the reflection of the pilot against the glossy fuselage.
 

Attachments

  • A6M2 Gloss Finisha.JPG
    A6M2 Gloss Finisha.JPG
    103.1 KB · Views: 126

Users who are viewing this thread

Back