Post Your Models!

Ad: This forum contains affiliate links to products on Amazon and eBay. More information in Terms and rules

thank you very much guys i'm begining to feel more confident with my painting now, next i'm gonna look at my building techniques.

funny you should ask dan i came home from work last night and my wife was looking a bit sheepish, was there a guy hiding in a cupboard somewhere ? had she killed my dog ? no she'd picked up my tempest and when she put it down she'd got half the decals stuck to her fingers, i had a look and it seems very few of them have stuck properly ! i was gonna ask is there a product i can use to help decals stick down !
 
Yeah you can use decal setting solution which beds the decal and can protect it somewhat. Best thing though is a clear flat/gloss coat depending to seal the decals completely. That however really needs an airbrush to apply with which is one reason why I really want an airbrush.
 
Hi Rochie. You can use decal solutions as mentioned, but first, even without these, it's best to have a gloss finish. If you follow the painting guide I sent, use the same technique to brush on Johnson's Klear (Future in the US and other places). One coat might do it, but two are better. When this is TOTALLY dry and set, then use the decal solution. You can use Humbrol DecalFix, but I find it a little bit too 'sticky', and it can leave a deposit which is sometimes hard to remove. It's better to use Microsol and / or Microset. If you can't get it locally, then mail order, such as modelhobbies .co.uk will supply it. But, FOLLOW THE INSTRUCTIONS, as you might be alarmed when, or if, you see the decals crinkle etc! That's normal! When the decals are totaly set, coat on the desired finish varnish, eg. matt, gloss or whatever. For brushing, I use Games Workshop acrylic, or Humbrol acrylic matt. You can thin these with water, or even Klear, and add, if required, a spot or two of Tamiya flat base. As this 'varnish' is thin, if brushed correctly with a wider (No 3 or No4) brush, it should dry without brush marks.
You can also use Micrsol/set to reposition and repair cracked or broken decals, then seal them as above.
 
Academy 1/48 La-7 finished.

SL381496.jpg


SL381497.jpg


SL381499.jpg


SL381501.jpg


Happy enough with it.
 
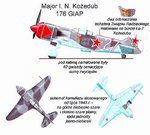
The La-7 looks very nice but unfortunately she is wearing incorrect camo scheme on upper surfaces.Unless the camera captured these colours wrongly.
It should have been made with two shades of grey ( AMT11 and AMT12 )
 

Attachments

  • La7 Kozedub.jpg
    La7 Kozedub.jpg
    56.5 KB · Views: 83
I used WEM colourcoats on this, both greys, AMT11 12. I took the pics with a lamp over the kit, this is probably why the dark grey looks green, will get some outdoor shots of it
 
I used WEM colourcoats on this, both greys, AMT11 12. I took the pics with a lamp over the kit, this is probably why the dark grey looks green, will get some outdoor shots of it


So she is painted correctly.:D
 
Thanks for the kind words fellas :) It's a nice little kit to build. I'll try and get another one to paint the other scheme option.
 
It is very nice, I always think that Academy make nice kits. If you want to get rid of the colour cast in your pics, a simple way to do so is use a Daylight Simulation bulb (blue). You can get them from art shops, up to 100 watts; in the U.K., they're about £3 to £4, and last quite long. Stick it in a desk lamp, and away you go! B****r, mine's just blown, I can't believe it!!!!
 

Users who are viewing this thread

Back