Loiner
Senior Airman
I finally got on to my Revell Mosquito BIV, and this is how I got on.
I was pleased with the look of the kit when opening the box, both with the complexity of parts and optional internal detail, and also the quality appearance of the parts, ie with surface finish detail etc. The kit has been advertised as new tooling, and that appears to be the case going on the finishes. The decal sheet looked good too. Below shows the array of parts provided.


The cockpit area was assembled first, which made up the structural heart of the aircraft, and the detail was pleasing and went together well. This portion included the bomb racks, and I rightly or wrongly finished and attached the four 500lb bombs at this stage.


The forward portion of fuselage is separated from the rear, and closes around the assembled and painted cockpit internal assembly. That is were the first problem started; the damned fuselage halves would not fit around the inner assembly ... nowhere near.

So I had to start carving the inner parts down to make the whole assembly slightly narrower, which was frustrating having done a nice paint job on it already. After much reworking the fuselage halves closed up, and the rest of the fuselage and wing assemblies went together fairly easily.
Next I assembled and painted the engines and other 'loose' parts (props, landing gear) and started to put the nacelles together. I went for all cowl panels off as I thought it would be a bit of a waste having the engines provided and not using them, and it would also give some of my RAF men something to occupy them.
The next problem was getting the nacelles to fit to the wings without cracks and gaps showing, and removing the seem along the fuselage centerline all took a fair amount of time, but all came together in the end, as below.
I read a review done in one of the modeling magazines of this kit, and it raised a couple of fairly major errors that needed correcting, one was the length of the undercarriage legs which were a bit short and needed about a 4mm extension, the other was the profile of the spinners which needed slimming down slightly, which I carefully sanded both equally to try to make some improvement, although they're probably still not quite accurate.

Following this the painting and decaling went fairly well without too many problems, panel lines highlighted and with overall finished with a satin varnish. I used my newly acquired micro set and micro sol with the decals, which definitely helped but didn't quite have the magical effect that I'd been told about with the decals sinking sharply into every recess and corner.
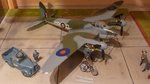
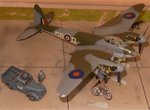
I made a new display base of concrete apron with a grass edge. I went to a display the day which was on a WWII bomber base so I spent a bit of time looking at and measuring up the concrete panels that the apron is made up of, as below.

And here we have the finished article, with my previously completed RAF ground crew and accessories:


I was pleased with the look of the kit when opening the box, both with the complexity of parts and optional internal detail, and also the quality appearance of the parts, ie with surface finish detail etc. The kit has been advertised as new tooling, and that appears to be the case going on the finishes. The decal sheet looked good too. Below shows the array of parts provided.
The cockpit area was assembled first, which made up the structural heart of the aircraft, and the detail was pleasing and went together well. This portion included the bomb racks, and I rightly or wrongly finished and attached the four 500lb bombs at this stage.
The forward portion of fuselage is separated from the rear, and closes around the assembled and painted cockpit internal assembly. That is were the first problem started; the damned fuselage halves would not fit around the inner assembly ... nowhere near.
So I had to start carving the inner parts down to make the whole assembly slightly narrower, which was frustrating having done a nice paint job on it already. After much reworking the fuselage halves closed up, and the rest of the fuselage and wing assemblies went together fairly easily.
Next I assembled and painted the engines and other 'loose' parts (props, landing gear) and started to put the nacelles together. I went for all cowl panels off as I thought it would be a bit of a waste having the engines provided and not using them, and it would also give some of my RAF men something to occupy them.
The next problem was getting the nacelles to fit to the wings without cracks and gaps showing, and removing the seem along the fuselage centerline all took a fair amount of time, but all came together in the end, as below.
I read a review done in one of the modeling magazines of this kit, and it raised a couple of fairly major errors that needed correcting, one was the length of the undercarriage legs which were a bit short and needed about a 4mm extension, the other was the profile of the spinners which needed slimming down slightly, which I carefully sanded both equally to try to make some improvement, although they're probably still not quite accurate.
Following this the painting and decaling went fairly well without too many problems, panel lines highlighted and with overall finished with a satin varnish. I used my newly acquired micro set and micro sol with the decals, which definitely helped but didn't quite have the magical effect that I'd been told about with the decals sinking sharply into every recess and corner.
I made a new display base of concrete apron with a grass edge. I went to a display the day which was on a WWII bomber base so I spent a bit of time looking at and measuring up the concrete panels that the apron is made up of, as below.
And here we have the finished article, with my previously completed RAF ground crew and accessories:
Last edited: