Revell 1/72nd SR-71 w/D-21 Drone

Ad: This forum contains affiliate links to products on Amazon and eBay. More information in Terms and rules

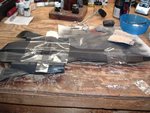
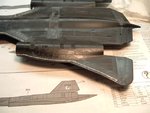
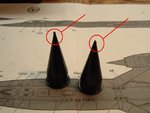
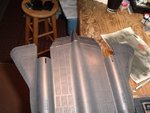
The aft fuselage and nose is glued and drying. [first photo]

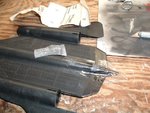
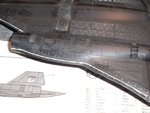
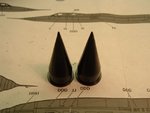
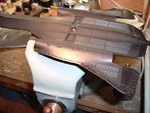
With both halves of the fuselage glued together, you can see the large gap along the glue line. [second photo] Not only is this a gap, but the lower fuselage is raised along the seam further complicating a proper fit. This is going to be my biggest challenge as my putty skills rank about a 2 on 10 scale. How I am gonna do this, not destroy the raised panel lines AND get a halfway decent putty job is worrying me.

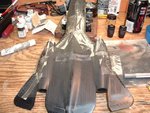
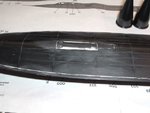
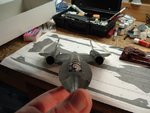
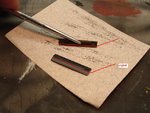
Next step is to dry fit the landing gear doors. Revell made the kit to depict the gear down, so the gear doors are outsized and include gear door actuators molded right into the doors themselves. The main gear doors fit nicely with only a little trimming. The nose gear doors are another matter. About 1/3 of the door needs to be removed. Using some forceps to help keep the doors parallel with the work surface, I used some 60grit sandpaper to remove the extra material to allow the doors to mate flush. Here you can see the amount of material that I needed to remove (redline) and a piece under work. [third photo]
 

Attachments

  • DSCF1663.JPG
    DSCF1663.JPG
    60 KB · Views: 92
  • DSCF1665.JPG
    DSCF1665.JPG
    60.2 KB · Views: 93
  • DSCF1666.JPG
    DSCF1666.JPG
    62.2 KB · Views: 83
Next, my dreaded putty work on the lower fuselage and chine where the model upper and lower halves join. Long join lines and lots of raised panel lines at stake. I also have to do lots of sanding to make the forward gear doors mesh properly.

Rough stuff done with 220grit. Buffed out with wet sanding with 1200grit. I find wet sanding is MUCH more effective in bringing back original model finish. But raised panel lines do suffer. :cry:

So... being the piss-poor putty master that I am, I like to use clear packing tape to mask off those areas that I don't want putty nor sanding to affect. I have found that paper masking tape when inadvertently sanded just becomes a messy glue. Clear masking tape is subject to the same offense, but I find it easier to clean it up with a freshly washed thumb. :thumbup: 
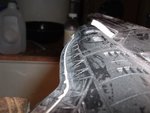
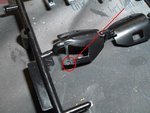
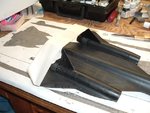
Just rub like an eraser and off she comes.
 

Attachments

  • DSCF1669.JPG
    DSCF1669.JPG
    82.7 KB · Views: 86
  • DSCF1670.JPG
    DSCF1670.JPG
    65.6 KB · Views: 96
  • DSCF1671.JPG
    DSCF1671.JPG
    93.2 KB · Views: 74
Doin' a good job so far Matt!

Matt, with regard to the fuselage join and gap(for future reference) plenty of dry fitting and lots of thinking on how to fix the gap and the step or raised seam, because once the glueing begins there's no way back!
A couple of possibilities....
First the gap.....could you have 'spread' the fuselage section just a bit? with a spacer of plastic?internally?
The raised seam would normally be a case of internal sanding to reduce the thickness to match the other half, this way you can get a good match without affecting the external surface too much...and hopefully this reduces the gap problem to a much easier cleanup...
 
Good idea Wayne. In this case, it might have been wise in areas to use a spacer in the gap. Never thought about a spreader, but I've got the exact opposite problem in this case. In addition, the fuselage profile is so thin that ability bend is inhibited by its inherent strength.

I've done one side and I've saved most of the panel lines. Took me a chunk of time last night, but I'm happy with the results. Thanks for the tips. I'm keeping those.

Here's the result. I used 220grit to for my rough fit, then finished with 1200grit to minimize damage to the panel lines not covered with tape. Tonight, the other side.
 

Attachments

  • DSCF1673.JPG
    DSCF1673.JPG
    51.4 KB · Views: 97
  • DSCF1672.JPG
    DSCF1672.JPG
    58.7 KB · Views: 100
Well looks a bit better, but I'm gonna have to heed Wayne's advice next time to trim the inner side of the fuselage to get proper height between the join. The gap is another story and that boiled down to patience and elbow grease. I began to do my cleanup first with 220grit, followed by 400grit wet. Once I had the contours like I wanted them, I attempted to take the scratch marks out with 1500grit wet.
 

Attachments

  • DSCF1675.JPG
    DSCF1675.JPG
    63 KB · Views: 93
  • DSCF1676.JPG
    DSCF1676.JPG
    47.1 KB · Views: 97
Next, a couple more anomalies that need correction. The forward cockpit for the pilot position suffered a short mold and a huge "tumor". This also has bowed out the lower left side significantly. In addition, the inlet spikes were mis-molded and will need clean up.
 

Attachments

  • DSCF1674.JPG
    DSCF1674.JPG
    62.7 KB · Views: 105
  • DSCF1677.JPG
    DSCF1677.JPG
    41.9 KB · Views: 94
That joint with the canopy and the sprue looks like it's in a real awkward place, Matt! Hope it doesn't get damaged during removal.
 
I think I got it, Airframes. Took a little tweaking, but it fits okay. Here are the inlet spikes gussied up.
 

Attachments

  • DSCF1678.JPG
    DSCF1678.JPG
    39.7 KB · Views: 84
Next, the vertical fins. Nothing exceptional, just need to ensure they are at proper angle and mirror each other. Some masking tape to maintain tension and all is good. Mask the distance between fins. And then mask for outward tension to hold them in place.
 

Attachments

  • DSCF1679.JPG
    DSCF1679.JPG
    56.4 KB · Views: 81
  • DSCF1680.JPG
    DSCF1680.JPG
    62.3 KB · Views: 92
Looking better every time, Matt. I've just thought, if it will help you for the paintwork, I've got a good reference work with colour pics of British-based birds, showing the variations in the finish and panel lines. The accompanying text also describes the amount of structural expansion, and fuel leaks, after flight! If you think you might need them, give me a shout and I'll scan and post them, or mail you my spare 'magazine' type copy.
Terry.

That would be fanstastic, Terry. But two requests, don't mail them (too expensive) and please don't go through too much trouble with the scanning. I know that can be time consuming too. I'll PM you my email address.

Thanks for the offer. I really do appreciate it. I'm finding that my reference material has the colors varying from a solid matt black to birds with some panels dark grey and other birds with grey smudging along the leading edge caused from heat exchange. Kinda all over the map and I wouldn't have thought that with so few Blackbirds.
 

Users who are viewing this thread

Back