Revell 1/72nd Supermarine Walrus Mk.1

Ad: This forum contains affiliate links to products on Amazon and eBay. More information in Terms and rules

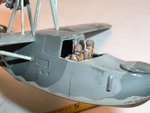
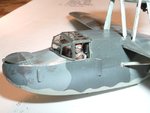
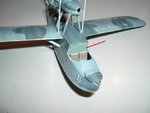
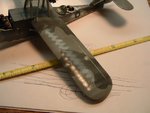
Playin' around some more, I built the rear bulkhead for the cockpit. Just needs some black headrests now. And then a pic of the cockpit perspex. Painted inside and out. Outside in RAF Dark Green, inside in RAF Interior green. And then added the windshield wipers.

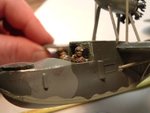
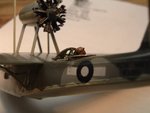
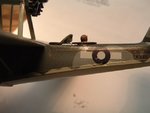
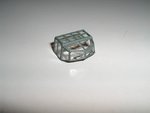
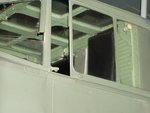
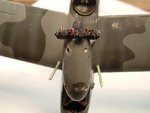
The port side of the cockpit canopy has been cut open and I have scratchbuilt the sliding window for the pilot position. I intend to show it almost fully open with the pilot looking out the open space. I also intend to make some seat shoulder harnesses for the pilots. The cockpit is really sparse, but hey... it's 1/72nd.
 

Attachments

  • DSCF1942.JPG
    DSCF1942.JPG
    34.8 KB · Views: 92
  • DSCF1943.JPG
    DSCF1943.JPG
    31 KB · Views: 98
Matt, that's looking really good. You must have the patience of the most patient thing on Earth; had it been me, it would have gone for its one and only flight, on fire, into a watery grave!
 
Cheers, Airframes. I was thinking the same thing, but I just recently replaced all my toilets in 2005 with low flow flush designs. I can tell you that they are good, but they will not flush a 1/72nd Walrus Mk1. :lol:
 
Great work Matt!

You mentioned in one post the Revell designers should be shot (I feel the same when they package their old crappy kits in the same boxes as the new mouldings) but actually this kit is the old Matchbox kit. Revell just changed the decals (and forgot to supply a canopy in my case)...

I don't know if you want to hear this at this point, but the rear cockpit wall is actually just a half partition from the port side cockpit, ending about half way between the pilot/ co-pilot's seats, allowing complete access from the nose to the rear of the aircraft.

..Great info regarding the rear cover details too -I didn't know it had windows! Where did you find those details?

Evan

Really? What's going on here then? Wrong Mk? You comment would make sense to me, but I was assuming that there was only a pilot and observer position and the observer just jumped down through the floor at his feet. Your explanation makes more sense, but then what am I looking at in this pic?
 

Attachments

  • window.jpg
    window.jpg
    85.2 KB · Views: 103
Agree with Jan. I think the 'black backrest' on the starboard side, is actually the shadowed area of the hatchway. If you look closely, what appears to be a 'cushion', isn't actually standing proud of the subframe above it - there may be a curtain there, but I think the lighting has caused a shadow in the opening. That rear hatch is certainly 'beefy' - maybe the aircraft was originally designed as a submarine, and they converted it into a seaplane!!
 
Some agressive foundation work for the FINAL round of wing assembly. No superglue here. Plastic adhesive. This is the LAST time I will glue these struts.

So some drilling to establish the foundations using small drill bits.
 

Attachments

  • DSCF1944.JPG
    DSCF1944.JPG
    45.2 KB · Views: 87
  • DSCF1952.JPG
    DSCF1952.JPG
    37.3 KB · Views: 90
Okay so next was to make hay from A4K's great catch that the aft cockpit bulkhead was not solid, but rather only behind the port side. Looking at my pic, you can see I scratchbuilt the pilot's headreast and the "silver thingy" to the starboard. :dontknow: 
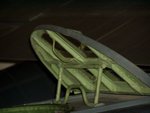
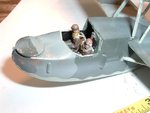
I cleaned up the bulkhead surgery and pressed on.

Next you will notice that some silver weathering has been added in the hatch areas. I also added some rear hatch sliding rails made of 24gauge copper wire. Rear hatch all done.
 

Attachments

  • DSCF1947.JPG
    DSCF1947.JPG
    49.1 KB · Views: 89
  • DSCF1946.JPG
    DSCF1946.JPG
    42.2 KB · Views: 89
  • DSCF1945.JPG
    DSCF1945.JPG
    48 KB · Views: 84
Crumb, forgot the rear hatch pics with new rails.
 

Attachments

  • DSCF1948.JPG
    DSCF1948.JPG
    42 KB · Views: 92
  • DSCF1949.JPG
    DSCF1949.JPG
    37.7 KB · Views: 83
In this first pic you can see the cockpit seat harness details with the pilot/observer looking different directions [remember my beheading earlier :shock: ]. The second pic shows the rear gunner/observer with seat harnesses installed and him looking at 4:00 high. I had to sand the hatch as it had a mar in the paint from a bad mold line.

And then a side pic of the rear gunner/observer position. Can't wait to install that Lewis machine gun.
 

Attachments

  • DSCF1950.JPG
    DSCF1950.JPG
    45 KB · Views: 75
  • DSCF1951.JPG
    DSCF1951.JPG
    42.5 KB · Views: 83
  • DSCF1953.JPG
    DSCF1953.JPG
    37.4 KB · Views: 80
And finally I could not resist some dry fitting to see how that cockpit canopy will look with my RN pilot peering into the ocean looking for that elusive Japanese submarine recharging her batteries or a Japanese task force headed for the Solomons.

Can't wait to get that sliding window on.
 

Attachments

  • DSCF1954.JPG
    DSCF1954.JPG
    51.9 KB · Views: 80

Users who are viewing this thread

Back