Revell 1/72nd Supermarine Walrus Mk.1

Ad: This forum contains affiliate links to products on Amazon and eBay. More information in Terms and rules

Great work Matt! She really looks the part.

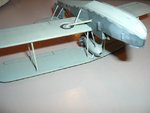
Are the struts too short as supplied in the kit, or have you modified them?

The wing struts are kit supplied. They are now about a 1/16th inch too short due to me having to trim them and insert them into support holes. The engine struts are scratch made and much too long. I'm gonna have to trim them to length to match the wing struts. Hopefully all will work.

If not...She becomes a Supermarine frisbee.

Actually I told my little guy that we would blow her up with firecrackers. :toothy5:
 
Thanks, guys. I'm steeling myself as I write this to give 'er another go. I figure two firecrackers shoved just aft of the copilot/observer position will suffice for explosives.

Another alternative might be a diaroma of a crashed Walrus. But I have no place for a diaroma.

Hmmm... could take her to the mountains and shoot at her from 200yds with my M1A. 7.62x51 makes a good scale representation of Japanese 5in naval guns.

Think positive, damn you. Think positive. :lol:
 
It really is looking good Matt. You've done a splendid job so far, and I'm keeping my fingers crossed that the wing goes on OK. I'd hate to see it shot by a 7.62 !!
 
2/3rds done gents. Only the starboard wing struts to go. Lots of fiddeling and fidgeting getting the wing alignment right. Unfortunately, the trimming of the struts has resulted in the upper wing assembly sitting too low, but it's barely satisfactory. On the bright side, the wing assembly is now much better aligned with the lower wing and the engine sits properly in relation to the upper wing.

Once the final wing struts are glued and set, I'll need to clean up the excess glue and touch up the paint. Now if I can just keep my ham hands from breaking the bond during the final detail work and weathering.
 

Attachments

  • DSCF1958.JPG
    DSCF1958.JPG
    50.1 KB · Views: 96
  • DSCF1959.JPG
    DSCF1959.JPG
    39.2 KB · Views: 85
Starboard struts drying as I write this.

I really look forward to beginning the wire guys installation. Other than aerials, I've never attempted to do wire guys and look forward to the results.

Besides, I have been working on another model in parallel to the Walrus that also needs wire guys. (heh, heh, heh...) But I'm only posting final pics of her. She's gonna have VERY special livery for the Forum.
 
That looks brilliant Matt. You've done a really great job on a difficult subject. Now all you have to do is the really easy bit....... (ducks as contents of modelling tray come hurling across the Atlantic!!)
 
:lol: I'm still a little concerned with the alignment. The outter struts are under a little bit of tension, so I will have to be tender in handling her. But the good news is if the welds break, the tension will likely leave a clean break to just re-glue.

I have to say that I am looking forward to finishing her though. I need another subject! :lol:
 
I've got a home designed wing-fold mechanism you can do on a 1/48th scale only-just-started eight years-ago Hobbycraft Sea Fury if you want......


Ha!!! Too many beers and no way am I touching my Walrus tonight!

Les, you quote that and I'm changing Lucky's sexual orientation in his profile.

It's looking solid guys. I'm actually overjoyed. I'm really looking forward to finishing her up.

Next up is:

* touch up for the wing join butcher job

* rear hatch paint clean up

* a little bit more weathering (rust stains, grime)

* Canopy + sliding pilot's window

* Propeller

* Rigging

* HF aerials

* Vickers MG/100rd gun in rear observer/gunner position

Man, I'm glad I'm past that effing badge of modeling honor. Look forward to the next steps, mates.

Cheers.
 
Hey Matt, what you using for the rigging? Can I suggest getting some CA activator or 'kicker', it sets CA instantly when applied, it'd make the rigging ordeal a lot easier.
 

Users who are viewing this thread

Back