excellent matt
Navigation
Install the app
How to install the app on iOS
Follow along with the video below to see how to install our site as a web app on your home screen.
Note: This feature may not be available in some browsers.
More options
You are using an out of date browser. It may not display this or other websites correctly.
You should upgrade or use an alternative browser.
You should upgrade or use an alternative browser.
Revell 1/72nd Supermarine Walrus Mk.1
- Thread starter Matt308
- Start date
Ad: This forum contains affiliate links to products on Amazon and eBay. More information in Terms and rules
More options
Who Replied?Damn Matt!! awesome work mate....with Terry, despite the problems you have had it's looking great!
- Thread starter
- #163
Matt308
Glock Perfection
Thanks guys. Hope I don't disappoint with a great build of the world's unknown single wing Walrus.  My fourth try better work.
- Thread starter
- #164
Matt308
Glock Perfection
Airframes
Benevolens Magister
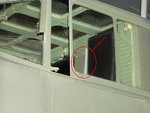
don't really know Matt. Thought Fire Extinguisher cover or something, but it's more likely to be the cover over the control for the bunker where they kept the timber for the wood-burning engine!
- Thread starter
- #166
Matt308
Glock Perfection
Is it just me or does it look like the cover has no top. Kinda like a piece of aluminum that is molded port to starboard around something else. That's what made me think of a coil heater.
Probably much simpler. Likely a fold down tin arm tray for map reading and navigation.

Airframes
Benevolens Magister
It does look 'hollow' at the top, and it also looks familiar somehow, as if I've seen something like it in other aircraft. I'm wondering if it's an incomplete part of the restoration or, as you say, an arm-rest or similar. Looks like those are rivets holding something on the inside, maybe the padding for the arm-rest?
Just found this thread now FFS! Lovely work so far Matt, another one to add to my 1/48 wishlist! Nice paintjob and weathering. Love the figures, good call repositioning their heads. 
I'd be doing mine Irish Air Corps scheme, a much simpler paint job, the whole thing is silver! Just the rear tail struts are black.
I'd be doing mine Irish Air Corps scheme, a much simpler paint job, the whole thing is silver! Just the rear tail struts are black.
109ROAMING
2nd Lieutenant
Nice pics Matt!
- Thread starter
- #170
Matt308
Glock Perfection
Just found this thread now FFS! Lovely work so far Matt, another one to add to my 1/48 wishlist! Nice paintjob and weathering. Love the figures, good call repositioning their heads.
I'd be doing mine Irish Air Corps scheme, a much simpler paint job, the whole thing is silver! Just the rear tail struts are black.
Thanks, Muller.
You can have your "much simpler" silver paint job. Personally I find bare metal color schemes very challenging. I have a quite a few in the wings that I am too timid to approach (B-17G, B-25H, P-47, etc.) for exactly that reason.
Lucky13
Forum Mascot
Looks great Matt...! 
Catch22
Major
Thanks, Muller.
You can have your "much simpler" silver paint job. Personally I find bare metal color schemes very challenging. I have a quite a few in the wings that I am too timid to approach (B-17G, B-25H, P-47, etc.) for exactly that reason.
Use Alclad II. I used it, and it works well. I screwed it up on my Frank and it crackled, but it was also my first time using the airbrush. What turned out, turned out really well! Nice even finish, and you can use multiple "colours" of it, so you get different tones for different panels.
And the Walrus looks great Matt!
The paintjob on the IAC bird wouldn't be too hard, it's not actually bare metal, they painted the walrus with silver paint. Then tri-colour stripes on the wing upper/lower surfaces and tail. I have a Decal sheet for an Anson, it'd work on the Walrus too. Being neutral (on the side of the Allies!) they didn't need to camo their aircraft.
FalkeEins
Senior Airman
Matt,
..just caught this thread..reckon you deserve a medal for getting this far..! keep going mate..
amazing to think that this machine was designed by RJ Mitchell
..just caught this thread..reckon you deserve a medal for getting this far..! keep going mate..
amazing to think that this machine was designed by RJ Mitchell
A4K
Brigadier General
Great work Matt! ..and great save with the cockpit bulkhead, she came out a treat!
Unfortunately I don't know what that aluminium 'thing' is, thought maybe an armrest at first, but it seems too wide. All I can say is it seems to be absent in photos I found of the RAAF museum's example under restoration ( Fleet Air Arm (FAA) Archive Index of British Naval Aviation ), and resin kit accessories ( www.kitreview.com/reviews/images/walrusreviewlr ).
Great pics too - I'll use them when I do my own Walrus in RNZAF scheme.
Evan
- Thread starter
- #176
Matt308
Glock Perfection
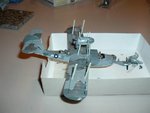
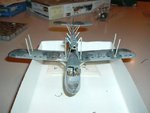
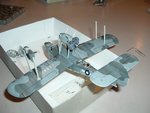
Okay my friends. Fourth and last (I assure you) build of the wing assembly. Scratch built the engine housing supports. Aligned them as best I could. Using only plastic cement (for best and most solid bond) I also glued the outer wing struts drilling holes to maximize surface area to bond for best strength.
Plan is to get the lower wing and struts/supports in alignment. Then mate the upper wing to get the struts/supports parallel with the upper wing. Then glue.
Unfortunately, I have a strut or two that is too short. Me not happy.
Oh... and I did some more subtle weathering, panel lines and decal application.
Attachments
Wildcat
Major
Nice work Matt!
Heinz
Captain
Looks fantastic Matt!
A4K
Brigadier General
Great work Matt! She really looks the part.
Are the struts too short as supplied in the kit, or have you modified them?
Are the struts too short as supplied in the kit, or have you modified them?
109ROAMING
2nd Lieutenant
Nice work Matt
Sorta dreading building mine now
Sorta dreading building mine now
Users who are viewing this thread
Total: 1 (members: 0, guests: 1)