- Thread starter
- #61
vikingBerserker
Lieutenant General
Thanks Fellas!
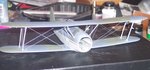
Today I painted the cowling the burnt copperish color. I used Floquil Copper and mixed Testors' Rubber in about a 60/40 Ratio. I did not mix it all the way as I wanted a color variation.

I went to attach the upper wing to the lower and their was so much tension both of the front braces actually bent.

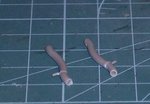
I'd read in another review this happened but my test fitting did not seem to indicate it was to this degree. I tried making ones out of flat tooth picks but halfway through I thought about using a large paper clip - which I scrounged from my briefcase and compared them - the size was perfect.

Using wire snips I cut a couple to size, painted and installed them. I was then able to install the rear ones with no problems.


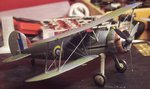
As commented before, I've switched gears about the rigging. I bought a small spool of 5x Fly Fishing Tippet which has a diameter of .0058" (or .147 mm).

Using a size 80 drill bit, I drilled holes all the way through the bottom wing. My plan is to run an end through the bottom wing and glue the line to the upper wing. Once dry I'll apply weight to the other end and put a drop of thin CA into the hole from the bottom. Once dry I'll snip off the remaining line, sand and repaint the area as well as paint the line itself.

Today I painted the cowling the burnt copperish color. I used Floquil Copper and mixed Testors' Rubber in about a 60/40 Ratio. I did not mix it all the way as I wanted a color variation.
I went to attach the upper wing to the lower and their was so much tension both of the front braces actually bent.
I'd read in another review this happened but my test fitting did not seem to indicate it was to this degree. I tried making ones out of flat tooth picks but halfway through I thought about using a large paper clip - which I scrounged from my briefcase and compared them - the size was perfect.
Using wire snips I cut a couple to size, painted and installed them. I was then able to install the rear ones with no problems.
As commented before, I've switched gears about the rigging. I bought a small spool of 5x Fly Fishing Tippet which has a diameter of .0058" (or .147 mm).
Using a size 80 drill bit, I drilled holes all the way through the bottom wing. My plan is to run an end through the bottom wing and glue the line to the upper wing. Once dry I'll apply weight to the other end and put a drop of thin CA into the hole from the bottom. Once dry I'll snip off the remaining line, sand and repaint the area as well as paint the line itself.
")