Ugh. I'm not looking forward to this build I'm doing. (Airbrushing camo)

Ad: This forum contains affiliate links to products on Amazon and eBay. More information in Terms and rules

[SC] Arachnicus

Senior Airman
439
4
May 1, 2012
West Chester OH
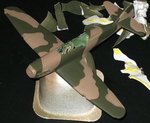
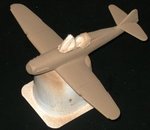
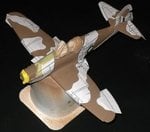
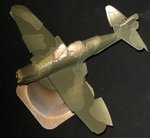
My next build is a Messerschmitt Bf 109G-10, (the 1:48 Revell version). This will be my first paint job doing camo. I have to do camo on the tops of the wings and stabilizers and make those splotches on the sides.

It's a challenge, so hopefully I will do okay. Any help will be appreciated as far as tips.
 
The wing tops are best done by spraying the lighter colour first then masking the pattern for the dark zones. Mottles can be daunting and take lots of practice. Myself, I'm still not fully happy with the ones I do but every try gets a bit better. Use a slightly thinner mix and a bit higher pressure, then do lots of them on a practice surface before trying the model. Don't make them round as they were most often an irregular shape. Good luck!
 
This is what most do for the patterns.

Make a copy of the instruction sheet to size. Tear or cut the pattern out, attach them to the wings/fuselage with little ribbons of blue tac at the edges. When spray painted it will be a little fuzzy, or push it tight to the body and the lines will be sharp. Your choice.

I buggered this plane up bad with my first go before someone finally pointed out this method to me.
Do a little sample first to test the waters.

Good luck.
 

Attachments

  • 27 r-p4.jpg
    27 r-p4.jpg
    24.5 KB · Views: 253
  • 27 r-p1.jpg
    27 r-p1.jpg
    17.1 KB · Views: 232
  • 27 r-p2.jpg
    27 r-p2.jpg
    19.1 KB · Views: 248
  • 27 r-p3.jpg
    27 r-p3.jpg
    17.9 KB · Views: 229
Great advice guys, especially with the photos Bill! I also learnt something :)

Good luck with the build mate!
 
It's safe to say that the demarcation between the camouflage colours on a late war Bf 109 (like a G-10) would have been soft or diffuse. At 1/48 this can be sprayed free hand.
The masking method above works brilliantly for a hard,or hardish,demarcation as seen on British aircraft. The Air Ministry had rigorous rules controlling this area. Most were sprayed in the factory using masks.

For the mottle seek a reference,it varied a lot. Apply with low pressure and thin paint,build it up slowly. You will go wrong,I've been doing it a long time and always do,but it is always fixable. You may want to tone it down with a highly thinned overspray of the base colour (yours would be a version of RLM 76).

This is my version of the rather diffuse mottle on a G-14 I made a while ago.

light.gif


And the rather more defined mottle on a Fw 190 D

heavy.gif


Both these were sprayed entirely freehand with various Iwata airbrushes.

For scaling try and imagine you are that worker holding a spray gun,what sort of reach have you got and how big an arc can you apply.Have a play and practice first. It can actually be good fun to do.

Cheers
Steve
 
There is really a few ways for making a such splotches depending on a model scale. It might have been done with an airbrush , a brush or a sponge. So it is quite difficult to state which way was used by the modeller. However I would say these were airbrushed.
 
Arachinus, don't be afraid to try this on a sheet of paper to get a feel for it. You can try different air pressures and distances from surface to get feel for it also. Also, don't be afraid to throttle the trigger ever so lightly. this can give good effects also. Just get a sheet of paper and do some doodling with the airbrush and you may quickly get a feel for it.
 
I did get another airbrush. A Paasche H-SET with three different nozzles. I will play with it for a bit. I still have a 1:72 scale Hellcat I have to paint.
 
I agree with all above. The main thing, before trying it on a model, is practice, practice, practice. Especially for mottle camouflage.
Use some cheap, kids water colour paints, the type which comes in bottles, and practice on paper, to get used to the 'feel' of the 'brush, the trigger pressures, and different air pressures. Do this on paper or card. Then, switch to the paint you will use, experimenting with different thinner ratios, again on paper or card, before switching to spraying on to painted plastic - the results will be different on the latter.
It takes a lot of practice to perfect mottles, although general spraying can be mastered in a relatively short time in most cases - I've been doing it since Moses was a Corporal, and I still **** up sometimes!!
 
This is what most do for the patterns.

Make a copy of the instruction sheet to size. Tear or cut the pattern out, attach them to the wings/fuselage with little ribbons of blue tac at the edges. When spray painted it will be a little fuzzy, or push it tight to the body and the lines will be sharp. Your choice.

I buggered this plane up bad with my first go before someone finally pointed out this method to me.
Do a little sample first to test the waters.

Good luck.

Camo is something I have always had a problem with. Thanks for this tip. When I finally get around to trying a model again, I will try this.
 
This is what most do for the patterns.

Make a copy of the instruction sheet to size. Tear or cut the pattern out, attach them to the wings/fuselage with little ribbons of blue tac at the edges. When spray painted it will be a little fuzzy, or push it tight to the body and the lines will be sharp. Your choice.

I buggered this plane up bad with my first go before someone finally pointed out this method to me.
Do a little sample first to test the waters.

Good luck.


Do you have a bit more detailed instructions?
 
Whilst I agree that a lot of practice and then a bit more practice,preferably not on your prized model,are vital for learning any airbrush technique I think Luftwaffe camouflage can readily be airbrushed in 1/48 scale.
Any decent airbrush with a typical modelling nozzle size,say 0.3-0.5 mm,will spray a pencil thin line if used correctly. It is evident from the pictorial evidence that from fairly early in the war German aircraft were usually sprayed,or resprayed,without using masks to demarcate the camouflage colours. I know modellers who replicate this using raised masks but I find that harder than spraying freehand. Trying to maintain a constant right angle to the mask edge gives me a head ache:)
Cheers
Steve
 
Somehow I think the point is being missed.

It's dealers choice to use or not to use a paper mask. The closer the paper to the object, the sharper the line. Use a thin line of tac and it becomes a little fuzzy at the edges. Use a thicker line of tack and you have a very old a well used looking camo result. It is my understanding Spitfires were painted at the factory and used specific camo patterns. Positive and negative color schemes depending on the serial number. So a new plane would be sharper at the edges than a well used and faded a/c.

In the case of the German plane shown above, it looks like a mask was used for the top color, but the wings could have been done freehand. Then a drunkin sailor was asked to do the dots and didn't bother masking at all. Onde could use a piece of paper with a hole in it to do the dots if he's nervous trying to do them. Test first!

It takes a bit of experience with the airbrush, trying all methods. I did one of my Spitties freehand, another using a mask for better accuracy. The Defiant I have pictures of above is 1/72nd scale, I Had to use masks, to look new as it lasted less than an hour in combat in the first few days of the BoB.

Non the less, nothing bloody ventured, nothing bloody gained. Right angle, obtuse or acute, the result will be different, but one may be the one you want!
 

Users who are viewing this thread

Back