„Volksjäger“ (people fighter) Heinkel He 162 in 1:32 scale

Ad: This forum contains affiliate links to products on Amazon and eBay. More information in Terms and rules

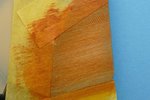
Now it's time for the ligther ochre.

13t43bp5y9nx.jpg


Again smear the paint on but very lightly.

14bymfj2e357.jpg


With the big and sturdy flat brush draw the grain as you like it.

15ym749qfxdc.jpg


You can play with various states of drying acryl paint. It's a thing of try and error.

16c1qts37oye.jpg


Don't be too carefull now. Nothing is lost when the primer colour shines through contrary it adds.

179v3eo6x0iw.jpg


Voila! Your first painted grain. You can leave it or go on.
 

Attachments

  • 187k6nyh0bgv.jpg
    187k6nyh0bgv.jpg
    71.6 KB · Views: 208
The rest of the wood story.

You can further accentuate your grain pattern. Take the small needle pin brush.

01.jpg


Take some dark colour and paint a V if you will. Look for patterns of real wood (furniture).

02.jpg


Now you have to be quick. Take the smaller flat brush and behave as you were dry brushing.

03.jpg


Next step. Do only short stripes at once.

04.jpg


After that "dry brushing" this is what you can get.

05.jpg


And so on. Play around with patterns you like best.

06.jpg


One more V in front of the others

07.jpg


When the paint is dry take the sponge again and draw some more paint very thinly over your pattern to blend in your colours.

08.jpg


This can be the outcome of your labour.

09.jpg


Best of all you can wipe off the acrylics with water and some soap and go for a new try.

10.jpg
 
New variation.

11.jpg


And another one. It all depends how much paint you rub off the primer colour.

12.jpg


Here I tried out a finer grain.

13.jpg


Play with patterns of your own choice look for the real wood.

14.jpg


Another example. There are no limits to your imagination.

15.jpg


When you are content with your efforts let dry your panel thoroughly before you start the next one. Seal the acrylics with gloss varnish before you put tape on it. To finish your "wood" sand very , very lightly to get an even surface and spray with semi gloss clear paint.
Hope you enjoyed this little tutorial.
 
Last edited:
very good tutorial on how to make the effect of wood, this is noted in the list of my technical improvements thanks for sharing
 
Hi snokri,
allready had the privilege to see the outcome of your work in real. Thanks for showing the "how to do it". :BIG:
 
Last edited:
Enough wood!
let's go back to the "Volksjäger".
Next were cables and wires. Thin copper and soldering wires were used. This is the main cable of the right side.

2jage53.jpg


The left sidewall is complete. The small decals are leftovers from old Revell kits. The rear cockpit bulkhead is dry fitted.

2ccxx52.jpg


And here comes the right sidewall. The kit parts aren't too bad here but a new radio was needed anyway.

if1hkm.jpg


The kit part of the instrument panel needed some refinement. The original part was constructed from two panels I used thin plastic sheet for them. The suspension for the rudder pedals was made from U-channel which taper a little at the front end. The pedals are kit items their supports are scratched again.

fofwah.jpg


After painting:
Some old decals were used on the kits panel. I'm not to contend with the result maybe I will consult the aftermarket for a photo etched part but for now it will do.

2mrd3k3.jpg


The front wheel well:
I scratched the support for the joy stick and did some refinements. The joystick got metal axes and is moveable in narrow limits. The viewing window is covered with masking tape which will be removed later.

29cvp55.jpg


I intended to use the modified Revi sight of the kit but it jumped from my fingers and wasn't sighted again. I had to make a new one. Black spruce and plastic sheet were used. The lens was made from clear spruce polished to an apt form.

2wo8xfs.jpg


The colored sight with its wiring:

2119u90.jpg
 
Last edited:

Users who are viewing this thread

Back