- Thread starter
- #181
Airframes
Benevolens Magister
All the decalling is now complete, with the stencils from the Revell Mk22 kit supplementing the Hasegawa decals and a couple from the spares files.
The model was then given another coat of clear gloss, just to provide an even finish, and then a small amount of smoke staining, trailing back from the gun ports, was added, using pastels, and a little more exhaust staining rubbed in, again with a mix of varying pastels. Two coats of clear matt were then sprayed on, and the model allowed to dry for a couple of hours, before all the masking around the cockpit and open gun bay was removed.
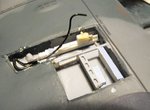
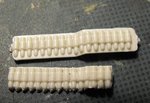
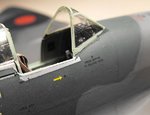
PIC 1 shows the gun bay, ready for a clean-up before adding the cannon. One of the guns from the Revell kit will be used here, after some more detail has been added to it, along with its assocaited belt of cannon shells. Once this has set, the gun bay itself will have more detail added, in the form of internal frame work,gun heatiing ducts, and the gun firing hoses etc. The doped canvass patches will also be added to the MG ports, modelled as torn and dirty after the guns have been fired. These will be made from the thin tissue that covers some decal sheets, and ideal material for simulating aircraft fabrics in this scale.
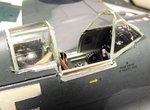
PIC 2. The Hasegawa kit can be built with the canopy open or closed, but there is no provision for the canopy rail on the starboard cockpit wall. Consequently, this area was deliberately masked at the same time as the cockpit, in order to leave a clean area to work with. Once the area has been cleaned up, and the moulded, aft section of slider rail cleaned out, a rail will be added from strips of thin plastic card. The windscreen frame, and the rear, fixed canopy frame, will then be painted. I'm not sure yet whether or not to fit a rear-view mirror, which, on the MkXIV, would be the circular, streamlined type, as photographs of this particular aircraft taken early in its service life suggest it did not have a mirror. However, I'll probably make one and add it anyway!
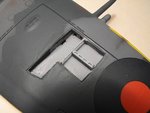
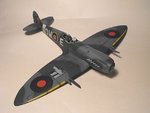
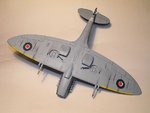
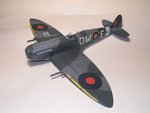
PICS 3 to 6 are general views of how the model looks so far, with minimal dirt and other staining, as it will be depicted in mid-1944, when it ws only 6 months old.
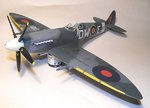
PIC 7 The prop has been fitted temporarily, just to show what the MkXIV will look like - a lot longer and sleeker- looking than previous Marks.
So, after finishing the work outlined above, the next step will be to adapt the Mk22's retractable tail wheel and its doors and fit them, along with the main landing gear. I just hope I've got my measuremnts right on the latter, and that the model will 'sit' evenly! Then it will be the turn of the canopy and entrance hatch to recieve some detailing work, if possible, before fitting the various antennas, adding a very small amount of paint scuffing, and then, it should be finished.
Thanks again for all your complimentary remarks, and I hope you've enjoyed this build so far - I have!
Terry.
The model was then given another coat of clear gloss, just to provide an even finish, and then a small amount of smoke staining, trailing back from the gun ports, was added, using pastels, and a little more exhaust staining rubbed in, again with a mix of varying pastels. Two coats of clear matt were then sprayed on, and the model allowed to dry for a couple of hours, before all the masking around the cockpit and open gun bay was removed.
PIC 1 shows the gun bay, ready for a clean-up before adding the cannon. One of the guns from the Revell kit will be used here, after some more detail has been added to it, along with its assocaited belt of cannon shells. Once this has set, the gun bay itself will have more detail added, in the form of internal frame work,gun heatiing ducts, and the gun firing hoses etc. The doped canvass patches will also be added to the MG ports, modelled as torn and dirty after the guns have been fired. These will be made from the thin tissue that covers some decal sheets, and ideal material for simulating aircraft fabrics in this scale.
PIC 2. The Hasegawa kit can be built with the canopy open or closed, but there is no provision for the canopy rail on the starboard cockpit wall. Consequently, this area was deliberately masked at the same time as the cockpit, in order to leave a clean area to work with. Once the area has been cleaned up, and the moulded, aft section of slider rail cleaned out, a rail will be added from strips of thin plastic card. The windscreen frame, and the rear, fixed canopy frame, will then be painted. I'm not sure yet whether or not to fit a rear-view mirror, which, on the MkXIV, would be the circular, streamlined type, as photographs of this particular aircraft taken early in its service life suggest it did not have a mirror. However, I'll probably make one and add it anyway!
PICS 3 to 6 are general views of how the model looks so far, with minimal dirt and other staining, as it will be depicted in mid-1944, when it ws only 6 months old.
PIC 7 The prop has been fitted temporarily, just to show what the MkXIV will look like - a lot longer and sleeker- looking than previous Marks.
So, after finishing the work outlined above, the next step will be to adapt the Mk22's retractable tail wheel and its doors and fit them, along with the main landing gear. I just hope I've got my measuremnts right on the latter, and that the model will 'sit' evenly! Then it will be the turn of the canopy and entrance hatch to recieve some detailing work, if possible, before fitting the various antennas, adding a very small amount of paint scuffing, and then, it should be finished.
Thanks again for all your complimentary remarks, and I hope you've enjoyed this build so far - I have!
Terry.
Attachments
-
 Spit XIV Build 351.jpg42.6 KB · Views: 155
 -
 Spit XIV Build 352.jpg34.9 KB · Views: 171
 -
 Spit XIV Build 356.jpg27.4 KB · Views: 162
 -
 Spit XIV Build 355.jpg25 KB · Views: 153
 -
 Spit XIV Build 359.jpg39.6 KB · Views: 167
 -
 Spit XIV Build 364.jpg32.9 KB · Views: 168
 -
 Spit XIV Build 357.jpg27 KB · Views: 154
")