1/48 Finnish Brewster dio "Unofficial GB"

Ad: This forum contains affiliate links to products on Amazon and eBay. More information in Terms and rules

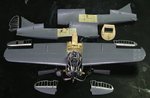
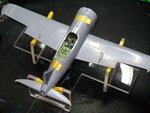
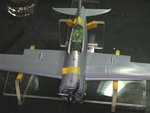
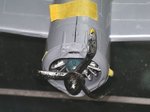
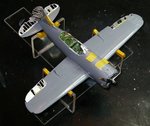
Dirk, I have to say I used to share a hangar at an airport when I was doing sign painting in the States. I managed to wrangle my way into the wood fabric and dope section of A&P school, I did a freebie for an air museum who let the schools students repair unairworthy aircraft at the museum. I also had a chance to hang around pilots building both Christan Eagles, Long Ezez and others repairing planes like Steerman. So I do have some, albeit minimal knowledge of A/C construction which is helping do this project. Having said that, I'm pretty satisfied with how this is turning out.

So just jump into it mate.

Bill

Well it looks like the experience paid off. It looks fantastic.
 
Beautiful job Bill, looks very authentic. When you come to use the tissue paper, cover the entire control surface, just as if it was the real thing, and do the 'shredding' etc when it's set. I've normally painted it first, then done the 'damage', retouching as required. This also allows the inner surface to be given the desired 'dope' colour, and also makes it easier to creaet areas of sagging, shredding etc, as the tissue will have tightened.
 
I think I can relax a bit now, all the control surfaces are dry fitted! And, by golly they fit! Looks like I may get there after all. Now for the paper. Whew!

*Wayne, when you said a Complete set, you were not kidding....... I can't thank you enough. How did you come up with all of them??? It's the finishing touch mate.

You're welcome Bill, had it all on a set for a few different aircraft.....Love those control surfaces mate! :thumbright:
 
Thanks guys.

A4..... if I remeber correctly, You started this UGB, are you gonna join in??????? Or anyone else for that matter........... LOL But it's given me the kick in the butt to do something I've wanted to do for a while.

Am painting now. I used some Tamiya spray on the engine, "silver leaf", boy oh boy is it bright. Used semi-gloss black for the cylinder heads and thinned a bit with alcohol it acts as a wash. So I may do some tests on some scrap to use on the interior, and perhaps exterior.
 
It's interior assembly and paint day. I will spray everything, cept the little instrument panels and the main panel, with gloss aluminum Tamiya can spray paint. Then I will dab on with a sponge all the colors and brush a wash to look like mud. This way everything will have paint "flaking" off from the lake water. I did a little test on the spinner and it looks pretty good. I sailor on.
 

Attachments

  • 12 inter - painting.jpg
    12 inter - painting.jpg
    62.1 KB · Views: 70
Thanks for all the positive encouragement.

Today I have done some assy and painting. I have to assemble the fuselage around the cockpit. Can't glue the sides together and lower it over the motor and the seat and back wall. Pictured is some of the dry fitting. Next I will have to tackle the control surfaces.
 

Attachments

  • 13a.jpg
    13a.jpg
    60 KB · Views: 111
  • 13b.jpg
    13b.jpg
    48.3 KB · Views: 88
  • 13c.jpg
    13c.jpg
    47.1 KB · Views: 88
Thanks for following my build. I hope I live up to all the expectations. Only one picture tonight.

Control surfaces are "covered" in shredded" fabric. Terry I cant thank you enough for the paper tip. It worked a treat. Don;t know how long it would have taken me to figure that one out. So now I get to start assembling the fuselage around the cockpit and doing some gap filling.

I sailor on.
 

Attachments

  • 14 dry fit.jpg
    14 dry fit.jpg
    60.6 KB · Views: 97

Users who are viewing this thread

Back