1/48 Finnish Brewster dio "Unofficial GB" (1 Viewer)

Ad: This forum contains affiliate links to products on Amazon and eBay. More information in Terms and rules

So am I !
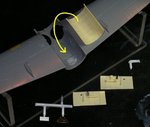
Bill, for the shredded fabric, the tissue which is often found covering decal sheets is ideal. When painted, it is exactly like taught fabric, and can be cut, split, torn, shredded etc very easily. It can be fixed in place very simply with small amounts of poly cement.
 
Good idea Terry for the fabric, I will give that a go in my tests.
Thanks for all the kudos, I am stretching my skills on this one. But I figure each one leads to the next one. One learns more by their mistakes than successes! I've been learning a heap!

I got the instrument panel and the little wing panels on each side set up. I'm happy!

Now I have another stumbling block. I am trying to attach the curved under surface of the cockpit in the section between the wings. Glue will not do it because it needs some filler. Now my question is, can I use Milliput as a filler and adhesive? If I mix some up, can I spread it and stick the resin belly pan in place?????
 

Attachments

  • 8 c-pit belly pan.jpg
    8 c-pit belly pan.jpg
    46 KB · Views: 100
Simple answer is yes. Press the part into the Milliput before it sets. For good measure, to ensure the part stays put once you're happy about its position etc, run a bead of CA or even PVA around the edges. This should hold it solidly.
 
Ha ha!!!!!!!!!!!!

I've been mulling over in my head how I could possibly do the rib thingies, had come up with some ideas, and the first one has worked.

Pictured is my mold of the resin pieces, kit pieces in the first row, my cast pieces behind. I just didn't want to screw up the only pieces I have, so I made some I could toss if it didn't work. I cut between the ribs with my saw and finished the flat inside with micro files, thanks to Vic for them. I am adding a round at the trailing edge to finish the shape. I will add a thin sheet strip at the back of the trim tab and the scallop at the bottom of the rudder.

Wahoo. Now I just have the elevators and ailerons to do. Piece of cake!!!!!
 

Attachments

  • 9a castings.jpg
    9a castings.jpg
    55.5 KB · Views: 84
  • 9 feathers.jpg
    9 feathers.jpg
    52.7 KB · Views: 88
Had some more time today to work on the control surfaces. Just one more aileron to do. Did some "damage" to the wing tip and nose of the plane as well. I didn't realize how little damage was done to aircraft, till I looked for places to grind away. It really is pretty much intact. There are a couple of what looks like bullet holes in the prop tho. Honestly, I didn't realize how much I have gotten done on this till this minute. But I will have to pick away at it to finish after I start on the Aces GB.
 

Attachments

  • 10 cntrl srfcs.jpg
    10 cntrl srfcs.jpg
    98.6 KB · Views: 77
Wow, that is some great work. I've been wanting to try something like this for some time now. I'm learning a bunch just following the thread. I love Terry's idea for the torn fabric. 8) 8) 8)
 
Thanks for the positive remarks.

Dirk, I have to say I used to share a hangar at an airport when I was doing sign painting in the States. I managed to wrangle my way into the wood fabric and dope section of A&P school, I did a freebie for an air museum who let the schools students repair unairworthy aircraft at the museum. I also had a chance to hang around pilots building both Christan Eagles, Long Ezez and others repairing planes like Steerman. So I do have some, albeit minimal knowledge of A/C construction which is helping do this project. Having said that, I'm pretty satisfied with how this is turning out.

So just jump into it mate.

Bill
 
I think I can relax a bit now, all the control surfaces are dry fitted! And, by golly they fit! Looks like I may get there after all. Now for the paper. Whew!

*Wayne, when you said a Complete set, you were not kidding....... I can't thank you enough. How did you come up with all of them??? It's the finishing touch mate.
 

Attachments

  • 11 cntrl srfcs fitted.jpg
    11 cntrl srfcs fitted.jpg
    83.2 KB · Views: 102
Last edited:

Users who are viewing this thread

Back