1/48 P-47 Razorback - Tamiya Kit

Ad: This forum contains affiliate links to products on Amazon and eBay. More information in Terms and rules

Ok, Guys,
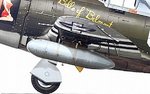
I am waiting for the resin paper tanks to get in. After reading Gabby's autobiography, I am going with 2 tanks on thew wings with the belly racks empty. Given that, I do have a question for you all. Do I need to fill in the slot in the belly? I have included a pic with bubble indicating what I am asking about. I do have the fore and aft brackets installed.

Pic:
BellySlotFillIn.jpg
 
Hey, Andy,
I'll take a look, but the tamiya kit does not include that tank. I may have to scratch something up.
 
Well, still waiting on the resin tanks....... I have the main gear about done. They need just a touchup and the final gluing of the wheels once the legs are installed to ensure I get the flattened bulges just right. I added brakes lines and the aftermarket tires/wheels. Got the interior of the wheels to pop nicely with a careful application of black on the interiors. I then muddied up the treads a bit. I do like the Vallejo washes and the Tamiya weathering pastels. I am going to let everything setup over night then come back and give the legs and interior of the doors another wash to get them to pop as well.

I do have one question for you all. The wheel axle holes are a tad larger than the axles themselves. I have been noodling over how to get those filled withOUT having to add any rod or filler in the wheels. Any ideas guys?

Pic:
MainGear.JPG
 
Last edited:
I would have glued in some rod and re-drill the hole but since you don't want to do that, the only other option is to make the axle thicker. One wrap of tape? Or maybe dip it in thick CA a few times?
 
Yep, I'd agree with that.
Have you added the retraction rods, on the outer side of each gear leg (the side where the gear leg door is)?
Fill that belly slot with a tab of plastic card, protruding to simulate the mounting. As far as I know, the actual attachment lugs were left off when the belly hard-point was not in use, but the four sway brace arms were permanently in position.
 
Hey, Andy, Wojtek, and Terry,
The tape/CA idea worked like a charm! I guess I was in a stupor with the Tmiya tape right in front of me. Doh! Thanks for the feedback on the axle idea. I need to find a couple of close up pics of the main gear to look at the retraction rods. I will see what I can find on the web. Thanks for that input.
 
Not sure why you posted your question here versus in the more help focused areas of the forum. But, here goes. By Stumovik, I assume you are looking for an IL-2? If so, check Scalehobbyist.com. They have many kits by Academy, Hobby Boss, Tamiya, and a few others I am not sure about. The Tamiya will be a great kit with a steeper price tag. The Academy kits are good, but I have not seen one of their IL-2s at this time. As for cement, I use either Tamiya's liquid cement or Pro Weld.
 
Last edited:
Hey, Guys,
Well, the resin tanks came in. I am NOT impressed with them. With the way they are cast, you lose too much of the nose cleaning them up. Man, I am glad they were only about 5 bucks. So, back to using the Tamiya tanks as much as I do not like them. So, I was working on getting the braces installed. Cutting them off the sprue and............ PING, off to feed carpet gods. I spent about an hour combing through the carpet. Nope, no luck. So, I dug out an Academy kit and used those braces (far less delicate than the Tamiya parts). So, those are on and painted. I got the centerline filled with the part from the Tamiya kit. I have the main wheels on and main gear is in place and drying. Down to the damned fiddly bits now. I am going to use the Tamiya tanks under each wing for now (I will just friction fit them in) and keep looking for better aftermarket tanks. BTW, anyone have any ideas on decent tanks (no True Details)?
 
There were a couple of sets of tanks which looked pretty good, but I can't remember who made them, or if they're still available - it might have been Ultracast, but not sure. Have a look at the Hannant's web-site - look under 1/48th scale, all manufacturers, then add 'P-47' and then 'P-51'. All items associated will then be shown.
If using the kit tanks, have you thought about rubbing down the ridges of the 'paper' tanks, and making them into grey-painted steel tanks? That way, you should be able to eliminate the joint lines without any problem, as the moulded detail will not be needed.
I was going to post a couple of pics showing the retraction, or compression rods, but as you've now fitted the undercart, you won't be able to fit the rods.
And keep up the good work with 'this modelling junk' !!!
 
Yep, those are the grey-painted steel tanks, with dull red retaining bands.
Let me know if you need any information on the feed and pressure lines, and the deflection bar, visible at the rear of the tanks in the above pic of a 362nd FG aircraft.
 
Hey, Andy, Terry,
Thank you for the pic, Andy! Excellent shot there. However, picking out the feed and pressure lines is a little hard on these old fart eyes. So, Terry, would you mind the information? I am looking into sanding down the "ribs" in the paper tanks. Not sure about that yet, but certainly looking hard into the idea.
 
Yep, no problem. I'll post a pic or two in the next couple of days. I've already sanded down some 'ribbed' tanks, in preparation for a couple more 1/48th scale P-47s, and a 1/32nd scale re-furb, and it works fine.
 
Hey, Terry, and all,
I could not find any other sources for external tanks so I begin the process of sanding down the kit paper tanks to represent the 108 gal, steel tanks. The picture below is the 1st serious round of sanding one of the tanks next to the other tank that has yet to sanded. My plan is get the tanks sanded down and then apply some wraps of tape (probably the mylar stuff I have for oleos) to implement the straps on the steel tanks.

Terry, I think the external retraction you mentioned in molded into the main legs. Not a perfect thing, but not bad either. I'll get a pic posted within the next day or two so we can discuss further.

Pic:
ExternalTankSanded.JPG
 
Good stuff with the tanks, they should look good when finished and mounted.
I've been trying to find a clear shot of the 'plumbing', but so far this is the best I can come up with - I thought I had a close-up shot and a schematic drawing, but must be getting confused with the P-51 stuff I have on file.

PIC 1. Shows a Luftwaffe tank on a P-47 wing pylon. The plumbing arrangement on the 108 gallon tank was similar, but shorter, as the tank connections were further to the rear.
PIC 2. These are the connections on the top of the 108 gallon steel tank, and as can be seen, they were just aft of the rearmost retaining band.
PIC 3. Is an enlargement from a profile, showing the location of the pipes/hoses. The smaller diameter pipe and hose came out of the rear of the pylon, with larger, feed pipe out of the pylon near the top, where it angles up to the wing.
PIC 4. Shows the tank/pylon deflection bar in position, and retracted after the demonstration drop. Note, as this was a demonstration, there is no plumbing to the tank in the first pic. The landing gear compression rods can also be seen in these last two photos.
If you look closely at the pic Andy posted, it will also give you an idea of the location of the plumbing.

Hope this helps.
 

Attachments

  • Can Jan 809.jpg
    Can Jan 809.jpg
    94.6 KB · Views: 196
  • Can Jan 810.jpg
    Can Jan 810.jpg
    86.8 KB · Views: 147
  • Can Jan 811.jpg
    Can Jan 811.jpg
    59.7 KB · Views: 144
  • P-47 tank connections..jpg
    P-47 tank connections..jpg
    41.4 KB · Views: 221

Users who are viewing this thread

Back