r2800doublewasp
Senior Airman
Wow looks awesome so far! The Mi 28 is such a cool helicopter
Follow along with the video below to see how to install our site as a web app on your home screen.
Note: This feature may not be available in some browsers.
Ad: This forum contains affiliate links to products on Amazon and eBay. More information in Terms and rules
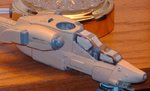
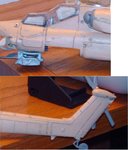
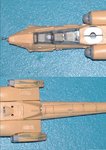
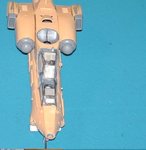
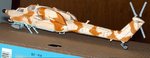
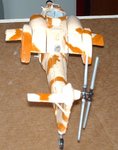
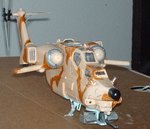
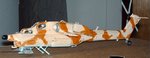
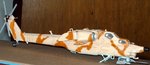
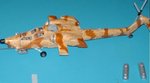
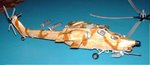
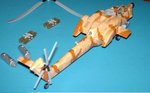
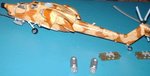
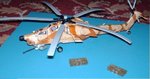
") Should have more pix by this weekend. Hazza! Fortunately I know what to look for but it is quite obvious quality was not a part of the planning for this kit. :/. Memo to me...Memo to me, should I ever attempt a Russian kit again remember to use have more photos handy. I'm having a hard time finding any close detailed pictures of this thing so I'm kind of winging it. I'll try to improve its looks sometime during the week. I don't like how the brown cammo turned out and I want the panel lines to show a little better. Still its the experience that counts right. So here I am at work with a little time to load these latest photos. Picture 2 shows the main rotor. You can see the wash plate and the cap on the end. The wash plate moves so it can be glued to the fuselage and allow the main rotor to turn when pushed. The IR camera mounted just above the gun as well as the gun itself also moves. I used a pen to add the dark around the windows which came out pretty good. It gave it definition and cleaned up the lines. I think I will touch the cammo up just a little more before I add varnish and external decals. Once the decals are on I can add the external pylons and mount the missile racks. This has taken longer than I wanted it to but the time has allowed me to learn some new things and experiment with different methods of painting.
Should have more pix by this weekend. Hazza! Fortunately I know what to look for but it is quite obvious quality was not a part of the planning for this kit. :/. Memo to me...Memo to me, should I ever attempt a Russian kit again remember to use have more photos handy. I'm having a hard time finding any close detailed pictures of this thing so I'm kind of winging it. I'll try to improve its looks sometime during the week. I don't like how the brown cammo turned out and I want the panel lines to show a little better. Still its the experience that counts right. So here I am at work with a little time to load these latest photos. Picture 2 shows the main rotor. You can see the wash plate and the cap on the end. The wash plate moves so it can be glued to the fuselage and allow the main rotor to turn when pushed. The IR camera mounted just above the gun as well as the gun itself also moves. I used a pen to add the dark around the windows which came out pretty good. It gave it definition and cleaned up the lines. I think I will touch the cammo up just a little more before I add varnish and external decals. Once the decals are on I can add the external pylons and mount the missile racks. This has taken longer than I wanted it to but the time has allowed me to learn some new things and experiment with different methods of painting.