A Model from Russia... Mi - 28 Havoc.. by popular demand. (1 Viewer)

Ad: This forum contains affiliate links to products on Amazon and eBay. More information in Terms and rules

Night Fighter Nut

Master Sergeant
2,762
522
Nov 3, 2009
Plano Texas
Scale 1/72nd
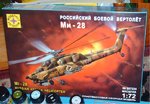
Model Manufacturer Modelist
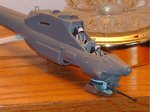
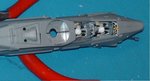
Aircraft Type Mi - 28 Havoc

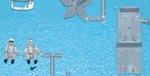
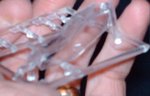
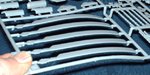
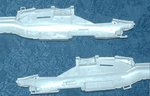
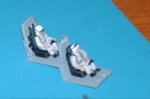
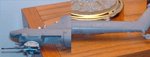
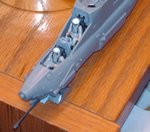
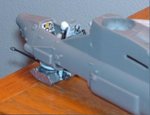
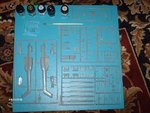
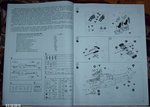
I normally don't do helicopters but this was a gift from my inlaws in Russia and a chance to combine a hobby I love and to practice the language I'm learning. I'm sorry if this doesn't fit the normal forum but it was suggested I post this so everyone can see what a model kit looks like from the former Soviet Union. A Russian friend of mine from work said to expect lots of filing. On first inspection, it doesn't look that bad. The detail on the clear plastic is not as crisp as say something from Tamiya but its there. The kit comes with its own glue, brush, and four paint colors. The plans call for 13 colors. Well, now I start with the research and washing of the parts... did I mention I still need to translate all the directions? English is the only other language on the kit and its on the cover.

A little bit more about the kit. As I understand it. These types of kits were made to help kids develop coordination and imagination. I've been to Russia seven times so far and this is the very first Russian model kit I've seen. Apparently there is a special store where these can be purchased. Memo to me... Memo to me... need to find that store on my next visit to see what else they have.
 

Attachments

  • HPIM2317.JPG
    HPIM2317.JPG
    45.6 KB · Views: 315
  • HPIM2312.JPG
    HPIM2312.JPG
    41.6 KB · Views: 310
  • HPIM2314.JPG
    HPIM2314.JPG
    24.1 KB · Views: 306
Last edited:
Directions... directions...we don't need no directions. :lol:. I am looking forward to watching your build. I always liked the looks of this bird.

DBII
 
I've started doing the basic fitting together to look for obivious gaps. So far nothing serious. I'll have pictures later. Need to charge up my batteries for my camera. Will also try something different with this. I read somewhere that rubber cement would make a good masking agent for transparent pieces. I'll experiment with this to see if its so.
 
Well I have finally gotten through the first step. Painting the pilots, attaching pilots to chairs and putting together the seats and control consul for a general build of the cockpit. For this model I decided to go with the desert camo. Now for a better description of the kit. First thing to note is there are a lot of mold marks. You can see them in the pictures I made. I'm still learning how to make clear photos to the correct size but I think I got enough good pix to get the point across.

The inside of the cockpit is covered with mold marks. Fortunately you will not see them through the windows. There are decals for the control panels that look ok but they don't stick very well. Watered down elmers white glue works ok as a decal fixative. A quick note about the provided paint. The directions suggest using acetone to clean your brushes and I agree. Whatever the paint is made from paint thinner doesn't seem to work on it, only acetone. The parts seem to fit together rather well so far. The surface detail on the body varies from part to part. For example after fitting to two main halves together, I noticed that the panel lines under the tail were sharp on one half and faint on the other. At least they match up. On the top of the tail some of the panel lines don't match up at all.

On the clear piece I'm debating on demeling out the windows then attaching a clear sheet from the inside to simulate recessed windows the photos seem to show.

Funny thing, the profile of this bird reminds me of the Beatles movie, "Yellow Submarine." That blue hand that flys around pointing. I feel like yelling, "Blue Meanies!" :)
 

Attachments

  • HPIM2319.JPG
    HPIM2319.JPG
    28.7 KB · Views: 261
  • HPIM2322.JPG
    HPIM2322.JPG
    23.4 KB · Views: 247
  • HPIM2323.JPG
    HPIM2323.JPG
    40.7 KB · Views: 242
  • HPIM2324.JPG
    HPIM2324.JPG
    58.2 KB · Views: 249
  • HPIM2329.JPG
    HPIM2329.JPG
    15.9 KB · Views: 248
Last edited:
It came with some paints and glue although I don't think you would want to use this paint in a air brush. I don't own an air brush but I would think it a major pain to thin a clean with acetone.
 
Looks interestring. Once upon a time, quite a few manufacturers offered kits with pots of paint and glue, mainly as a 'starter pack' for kids, as your kit is. In fact, one or two comapnies still do this. Generally, the best thing to do with the paints is give them to the kids to paint pictures with, as they tend not to be particularly good quality, compared to what we are accustomed to.
From what I can see of the kit itself, it looks quite good - should turn out well.
 
well I now have the gun built but I will have to post pictures tomorrow. However, two of my experiments seemed to have worked out. The first was an experiment using elmers rubber cement as a masking agent for my windows. Before I add paint I wanted to see what kind of an affect or reaction it would have on the plastic. I am happy to report that it has no affect on the plastic what so ever. It sticks very well and when I want to remove it, I just roll it off and there is no harm, no fogging, no smearing, absolutely nothing. Because it is a thick substance I need to find a thin applicator like a small paint brush in order to get the tricky corners. I will try painting over it next time and see what kind of a reaction I get. More to follow. The second experiment was painting with a Q-tip. I don't own an airbrush but I would like to get a smooth finish without brush lines. I remembered that using paint rollers works well on walls and other flat surfaces so I thought why not try painting the model using a smaller roller and see how it comes out. Happy to report, so far so good. I tried it with some of the paint that came with the kit. Once I finished using that color for awhile, I just tossed the Q-tip.

For the initial part of the gun assembly I drilled the end of the barrel for obvious reasons and cleaned out the fluting around the flash suppressor. Put black paint in these recesses and dry brushed over it to obtain satisfactory results. Pictures to follow... honest.
 
Last edited:
The rest of the gun carriage was interesting. Apparently the gun sits between two drums. Getting the assembly right is a little tricky since some parts fit through or around other parts in order to fit right. Needed to file a lot around the drums. One of the sides to each drum doesn't fit squarely. Once I got everything plum, I could glue them together after fitting this puzzle into place... My Russian friend was right. Lots of filing to make the smaller parts fit right. Perhaps this is why I didn't see to many models in Russia. I bet I could open up a hobby shop there with descent models and make a killing. :)
 
Ok, here we go. I hopefully now have better pictures to show my progress. In these you can see the gun and how the two halfs fit together. I re-cut the panel lines in the tail section on port side. Not shown in the clear canopy. I had cut new lines around the windows.

The tail rotor was suppose to have a hole for the shaft. :mad: guess they forgot to include it. Had top drill my own hole through a nice thick part none the less. My modeling skills are still elementry but hopefully I'm showing some improvement. :|
 

Attachments

  • HPIM2334.JPG
    HPIM2334.JPG
    38.9 KB · Views: 190
  • HPIM2335.JPG
    HPIM2335.JPG
    33.6 KB · Views: 185
  • HPIM2336.JPG
    HPIM2336.JPG
    17.3 KB · Views: 169
  • HPIM2339.JPG
    HPIM2339.JPG
    39.4 KB · Views: 183
  • HPIM2340.JPG
    HPIM2340.JPG
    36.8 KB · Views: 180
  • HPIM2341.JPG
    HPIM2341.JPG
    26.7 KB · Views: 177

Users who are viewing this thread

Back