Airfix 1/72 Halifax B.Mk.III

Ad: This forum contains affiliate links to products on Amazon and eBay. More information in Terms and rules

Peebs

Senior Airman
426
2
Apr 7, 2010
Werribee Vic
This one has been calling me ever since it arrived a month or so ago..

Going to build it for W/O Don Smedley RAFVR, a gentleman I'm pleased to say I've met through my Wife's Podiatry Practice.

HX324 coded TL-B, that was shot down during an operation to Magdeberg on January 21, 1944. The aircraft was intercepted by a night-fighter and shot down near Hannover, killing four of the crew. The remaining crewmembers, including W/O Donald Smedley, escaped the aircraft and became prisoners of war. (Bombercrew.com – A Tribute to Heroes of RAF Bomber Command)

W/O Don Smedley - 35 Squadron

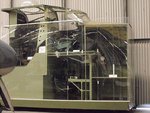
The Kit:-- an oldie I was lucky enuogh to be able to source

Hali001.jpg


First Up, took to all outer surfaces with some 'wet n dry' to remove all the shocking 'rivots'
I'll have to score all the panel lines as my next task..

Hali002.jpg
 
Great stuff Pete, looking forward to the build. Although I don't normally 'do' 1/72nd scale, this is a kit I've wanted to do again for many years.
BTW, if you have a look at the Yorkshire Air Museum web site, there's a virtual tour of the interior of their Halifax, which might be useful.
 
Been thinking of getting those old Airfix 1/72 Lancaster and Stirling kits, just for sentimental reasons, plus the old Matchbox Halifax! :oops: :lol:
 
Scribed the panel lines and 'undercoated' the underside of one wing,
for a bit of a look see as I've not attempted this before. Some of the rivot lines are just visible
but no where near as prononouced as they were, I'm hoping with the addition of 'colour' it will
all look passable.

Hali003.jpg


Hali004.jpg


Hali005.jpg


Hali006.jpg
 
Good stuff. I remember spending hours lightly scraping off all the rivets when I last built this kit, about 30+ years ago !
Looks like I'll be doing it again soon!
 
I've done a repair on a Halifax and remember how long those rivets were. I've got a Lancaster on the shelf and what you've done with the skin is magic.
I'll be watching!!!!
 
That's a good way of doing it, or carefully scrape them with the edge of a scalpel blade. It then leaves a 'ghost image' which can often look just like flush rivets under the paint.
Don't know if this will help for when you get to the interior work. It's a full-scale mock-up, using original fittings where possible, next to the full Halifax at Elvington. Sorry about the reflections off the Perspex frontage - not a lot I could do about that, even with a Pola filter.
 

Attachments

  • Elvington 052.jpg
    Elvington 052.jpg
    127.5 KB · Views: 175
All the pannel lines re scribed... that was fun.... patience required!! lol

a bit of a test fit shows it all goes together reasonably well, was a bit of mucking about to get the aileron to fit properly
and as you can see going to take some fiddling to get the landing gear enclosure to fit together..

Hali007.jpg


Hali008.jpg
 
Don't know if you might have been around when I posted this thread. I repaired a Halifax for a golf mate. Shows what I had to do to "save" it. As it reads, his dad built it after the war. He was the bomb aimer, the nose art was done by one of the crew, real and on the model.

I remember the rivets and panel lies. Deep enough to hide in, and you could hang a hat on the rivets. You're gonna have a cracker by the look of the start!

http://www.ww2aircraft.net/forum/modeling/i-am-repairing-kelly-gang-halifax-friend-27644.html
 

Users who are viewing this thread

Back