Airframes
Benevolens Magister
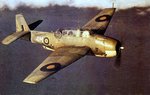
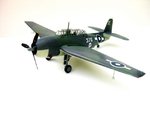
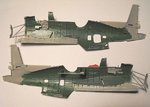
This is the 1/48th scale Italeri (re-boxed Accurate Miniatures) Avenger, which will be built and finished as an Avenger II of the Fleet Air Arm, Serial No. JZ525, coded P1X. This aircraft, flying off H.M.S. Victorious, took part in the raids against Japanese oil installations, including the famous raid against Palembang, in January 1945, when the Avengers dived through heavy flak and attacking fighters to deliver their bombs on target, destroying the oil refinery, and severely hampering the enemy's output.
This aircraft was the equivalent to the TBM, built by the Eastern Aircraft Division of General Motors, and as such, there were a few small detail changes compared to the Grumman-built aircraft. The most obvious of these was the use of 'U.S. equivalent colours' for the camouflage paints. Where Grumman used British paints, Eastern Aircraft substituted the nearest equivalent in American paints, employing, for example, Olive Drab in place of Extra Dark Sea Grey, and the internal colours were also slightly different. These will be detailed as the build proceeds.
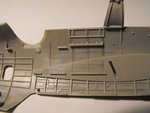
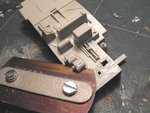
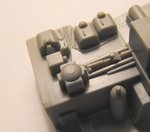
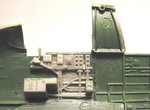
There were also some internal equipment and layout differences, which will entail a small amount of conversion and scratch-building. The main internal difference was the inclusion of an Observer's seat in the rear cockpit, where some of the radio and electrical equipment would be fitted on aircraft being used by the U.S. The attached pic shows the port fuselage half, with the pencil marks indicating where frames and stringers will be added from plastic strip, and the equipment locating rack which will need to be removed from the wall. The floor in this area will also need modification, and again, this will be shown during the appropriate stage of the build.
I intend to 'open' the canopy over the observer's cockpit, and I'm hoping that the careful use of a razor saw will accomplish this without tears!
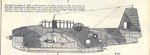
The black white profile, from a 1984 edition of 'Scale Aircraft Modelling', incorrectly describes the (British) colours as Extra Dark Sea Grey, Dark Slate Grey, and Sky which, as mentioned above, were only used by the Grumman factory.
This really is a beautiful kit, and I only hope I can do it justice.
This aircraft was the equivalent to the TBM, built by the Eastern Aircraft Division of General Motors, and as such, there were a few small detail changes compared to the Grumman-built aircraft. The most obvious of these was the use of 'U.S. equivalent colours' for the camouflage paints. Where Grumman used British paints, Eastern Aircraft substituted the nearest equivalent in American paints, employing, for example, Olive Drab in place of Extra Dark Sea Grey, and the internal colours were also slightly different. These will be detailed as the build proceeds.
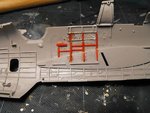
There were also some internal equipment and layout differences, which will entail a small amount of conversion and scratch-building. The main internal difference was the inclusion of an Observer's seat in the rear cockpit, where some of the radio and electrical equipment would be fitted on aircraft being used by the U.S. The attached pic shows the port fuselage half, with the pencil marks indicating where frames and stringers will be added from plastic strip, and the equipment locating rack which will need to be removed from the wall. The floor in this area will also need modification, and again, this will be shown during the appropriate stage of the build.
I intend to 'open' the canopy over the observer's cockpit, and I'm hoping that the careful use of a razor saw will accomplish this without tears!
The black white profile, from a 1984 edition of 'Scale Aircraft Modelling', incorrectly describes the (British) colours as Extra Dark Sea Grey, Dark Slate Grey, and Sky which, as mentioned above, were only used by the Grumman factory.
This really is a beautiful kit, and I only hope I can do it justice.