Airframes
Benevolens Magister
As the Group Build 'Dora' is finished, and I'm waiting for the next one, a Bf110, to arrive, my fingers were growing itchy, and I couldn't resist making a start on the Revell 1/32nd scale Hawker Hunter!
It's my intention to build this model of a beautiful aircraft to depict a Hunter F6 of 66 Squadron, R.A.F., based at Acklington, Northumberland, in 1960. As a youngster, these graceful fighters were a common sight to me, when I spent the summer holidays only three miles from the airfield. I was lucky enough to get up close to the Hunters, as a relative was based at Acklington, and have fond memories of watching the aircraft, just off the coast, as they fired their Aden guns at the drogue target towed by a Meteor.
The only thing I'll need to do to complete the model in 66 Sqn colours, apart from alter the serial number and add a couple of code letters, is to hand-paint the blue and white Squadron markings, which surrounded the fuselage roundels. If for some reason this is not possible, then I have the option of using one of the decal schemes in the kit, for a Hunter based at Middleton St. George, another airfield fairly close to where I lived at the time.
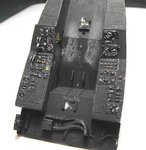
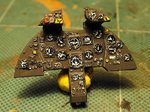
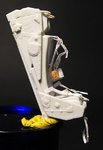
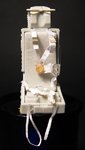
I've started on the cockpit, and hand-painted the instruments and panel, as well as picking out the various switches etc on the side consoles. A throttle lever, or more correctly, a thrust lever, has been added from stretched sprue, as have a couple of other handles and nobs. The pictures show the parts almost finished, just requiring a little touching up here and there.
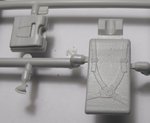
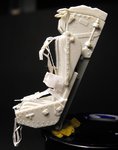
There are parts for two different ejection seats included in the kit, the Martin Baker Type 2H, and the Type 3H.
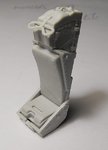
Having checked various sources, including the Martin Baker web-site, I discovered that Hunters at that time were equipped with the Type 3H seat, reverting at a later date to the earlier Type 2H. So, armed with the relevant photographs and drawings, I set out to see what I could do to make this prominent part look more authentic.
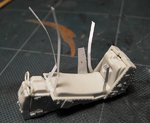
The kit parts are really rather good, although the harness is moulded as part of the seat squab and cushion. This was easily removed with a sharp scalpel, and then the main seat parts assembled.
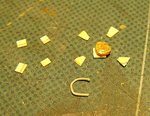
The next step was to fabricate the combined parachute and seat harness, and this was achieved by using strips of paper, superglued into place, before being cut to length. Some adjusters and fastening lugs were made from thin palstic card, and the circular quick-release box was shaved from a wooden BBQ skewe, and glued to a rectangle of plastic card.
The parachute ripcord and handle were made from stretched sprue, as were a couple of pieces of pipework for the seat.
Once the main harness had set, the adjusting straps, fastening lugs, release box and harness adjusters were added, and a pair of leg restraints added, the latter again made from thin strips of paper.
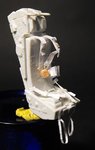
The photographs show these in place, and the oxygen hose, more 'plumbing' and wiring have yet to be made and fitted.
I reckon this is going to be a long build, with the cockpit area alone set to take many hours of work to do it justice. I'll bring you some more pics as the build progresses, but for now, I hope you enjoy these.
Thanks for your interest.
Terry.
It's my intention to build this model of a beautiful aircraft to depict a Hunter F6 of 66 Squadron, R.A.F., based at Acklington, Northumberland, in 1960. As a youngster, these graceful fighters were a common sight to me, when I spent the summer holidays only three miles from the airfield. I was lucky enough to get up close to the Hunters, as a relative was based at Acklington, and have fond memories of watching the aircraft, just off the coast, as they fired their Aden guns at the drogue target towed by a Meteor.
The only thing I'll need to do to complete the model in 66 Sqn colours, apart from alter the serial number and add a couple of code letters, is to hand-paint the blue and white Squadron markings, which surrounded the fuselage roundels. If for some reason this is not possible, then I have the option of using one of the decal schemes in the kit, for a Hunter based at Middleton St. George, another airfield fairly close to where I lived at the time.
I've started on the cockpit, and hand-painted the instruments and panel, as well as picking out the various switches etc on the side consoles. A throttle lever, or more correctly, a thrust lever, has been added from stretched sprue, as have a couple of other handles and nobs. The pictures show the parts almost finished, just requiring a little touching up here and there.
There are parts for two different ejection seats included in the kit, the Martin Baker Type 2H, and the Type 3H.
Having checked various sources, including the Martin Baker web-site, I discovered that Hunters at that time were equipped with the Type 3H seat, reverting at a later date to the earlier Type 2H. So, armed with the relevant photographs and drawings, I set out to see what I could do to make this prominent part look more authentic.
The kit parts are really rather good, although the harness is moulded as part of the seat squab and cushion. This was easily removed with a sharp scalpel, and then the main seat parts assembled.
The next step was to fabricate the combined parachute and seat harness, and this was achieved by using strips of paper, superglued into place, before being cut to length. Some adjusters and fastening lugs were made from thin palstic card, and the circular quick-release box was shaved from a wooden BBQ skewe, and glued to a rectangle of plastic card.
The parachute ripcord and handle were made from stretched sprue, as were a couple of pieces of pipework for the seat.
Once the main harness had set, the adjusting straps, fastening lugs, release box and harness adjusters were added, and a pair of leg restraints added, the latter again made from thin strips of paper.
The photographs show these in place, and the oxygen hose, more 'plumbing' and wiring have yet to be made and fitted.
I reckon this is going to be a long build, with the cockpit area alone set to take many hours of work to do it justice. I'll bring you some more pics as the build progresses, but for now, I hope you enjoy these.
Thanks for your interest.
Terry.
Attachments
-
 Hunter Build 018.jpg58.5 KB · Views: 95
 -
 Hunter Build 041.jpg69.2 KB · Views: 102
 -
 Hunter Build 002.jpg38.5 KB · Views: 99
 -
 Hunter Build 005.jpg25.7 KB · Views: 90
 -
 Hunter Build 033.jpg79.2 KB · Views: 95
 -
 Hunter Build 037.jpg41.6 KB · Views: 104
 -
 Hunter Build 045.jpg29.2 KB · Views: 91
 -
 Hunter Build 044.jpg27.1 KB · Views: 108
 -
 Hunter Build 046.jpg22.3 KB · Views: 95
 -
 Hunter Build 051.jpg26.1 KB · Views: 94
 -
 Hunter Build 054.jpg31.7 KB · Views: 85
