Excellent start Terry......8) 
Navigation
Install the app
How to install the app on iOS
Follow along with the video below to see how to install our site as a web app on your home screen.
Note: This feature may not be available in some browsers.
More options
You are using an out of date browser. It may not display this or other websites correctly.
You should upgrade or use an alternative browser.
You should upgrade or use an alternative browser.
Big Build - Hawker Hunter.
- Thread starter Airframes
- Start date
Ad: This forum contains affiliate links to products on Amazon and eBay. More information in Terms and rules
More options
Who Replied?- Thread starter
- #22
Airframes
Benevolens Magister
Thanks Wayne!
- Thread starter
- #23
Airframes
Benevolens Magister
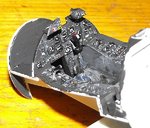
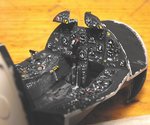
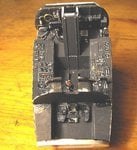
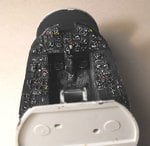
I've been able to do a little bit more on the cockpit, although there's some tidying to do, as my hands are b****y stiff and sore at the moment, which caused a few slips!
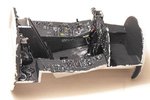
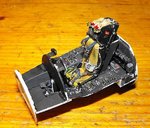
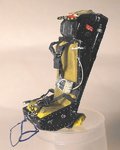
The kit detail is very good, but I'll be adding some extra wires and pipework when the final assembly is near, and some detail to the side walls and more on the seat. I've got the latter looking fairly decent, with the harness painted and an oxygen hose added, made from stretched sprue. I've portrayed the seat harness partly 'assembled', as it is standard practice to leave at least one strap lug locked into the quick release box, in order to retain tension on the mechanism - often, the whole harness will be left fastened. There's a bit of touching-up still to do here.
There are decals provided for cockpit placards and for the seat, but the guide numbers bear no relation to those on the sheet! The only decal I can positively identify, is the one representing the graduation scale on the base of the gyro gunsight! Consequently, I hand painted those for the side walls and the seat, and the latter need some attention to smarten them up a bit.
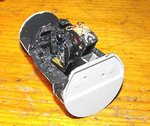
I carved a bit of the top of the control column grip, to make it look more like the right shape, and added a brake lever from strectched sprue. The upper panel behind the seat will be added once the nose sections are joined, and some wiring/pipes added where the sockets are moulded on, and the front coming and gunsight will be added after the main assembly is completed.
The pics show the progress to date, and note that the seat is only fitted temporarirly, to check fit; it will be fitted eventually, after painting the model.
Attachments
-
 Hunter Build 103.jpg72.4 KB · Views: 75
 -
 Hunter Build 072.jpg55.2 KB · Views: 67
 -
 Hunter Build 081.jpg63.9 KB · Views: 72
 -
 Hunter Build 130.jpg48.7 KB · Views: 68
 -
 Hunter Build 136.jpg41.7 KB · Views: 70
 -
 Hunter Build 101.jpg74.7 KB · Views: 68
 -
 Hunter Build 100.jpg67.9 KB · Views: 68
 -
 Hunter Build 121.jpg39.7 KB · Views: 67
 -
 Hunter Build 120.jpg33.6 KB · Views: 70
109ROAMING
2nd Lieutenant
Looking the stuff Terry! ,Absolutely Excellent mate
Catch22
Major
Wow Terry, just wow!
- Thread starter
- #27
Airframes
Benevolens Magister
Thank you very much guys! BUT! I've just found out I need to start again on the seat!
The Hunter F6 was fitted with two types of ejection seat during it's service life with the R.A.F., the Martin Baker Type 3H, then later, the earlier Type 2H. I'm modelling the 3H, correct for the period being depicted, and was working off some rather fuzzy photos, and an indistinct line drawing, plus a rather hazy memory! Something was niggling me, so I did some digging. The niggles were right - the Type 3H had a separate parachute harness, in a light buff colour, with the seat harness over the top!
B*ll*cks!
No problem, I'll re-paint the seat harness as the parachute harness, and fold it down, then add the correct seat harness and anti-negative G strap. It'll be a bit fiddly, and the seat will look very 'busy', but it should be worth it - I hope!
Ah, well! More work, more photos, more fun!
Heinz
Captain
Superb work Terry 
looks great Terry
Right or wrong it still looks great!
lesofprimus
Brigadier General
Agreed with Wayne, it looks very detailed and tight.....
Lucky13
Forum Mascot
I say! Looking spiffy there old boy! Jolly good show old chap...carry on!
ian lanc
Staff Sergeant
Loving it Terry 8) , one thing about your hunter at least its got pedals ! my lightning hasn't got any,not that you can really see under the flight panel.
ian.
ian.
- Thread starter
- #35
Airframes
Benevolens Magister
Thanks again chaps, much appreciated! I've made a start on the seat again, now that my hands seem to be working a little better, and hope to post some pics of it, and the rest of the cockpit, later tonight.
I have to say, for the price (normally £25, from Model Zone £10!), it's a very nice, detailed and accurate kit. How Trumpeter can ask so much for their Lightning is beyond me! I've just seen an advert for their 1/72nd scale Lightning, at £18.92!!! For a 1/72nd scale kit? Come on!!
I have to say, for the price (normally £25, from Model Zone £10!), it's a very nice, detailed and accurate kit. How Trumpeter can ask so much for their Lightning is beyond me! I've just seen an advert for their 1/72nd scale Lightning, at £18.92!!! For a 1/72nd scale kit? Come on!!
- Thread starter
- #37
Airframes
Benevolens Magister
You're right Wojtek - at those prices, they won't sell many, and the kids will starve!
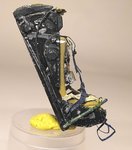
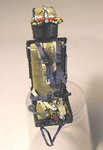
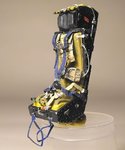
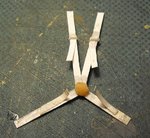
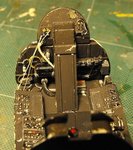
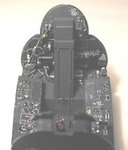
Anyway, I managed to correct the seat without too much trouble, and it now consists of 49 parts! Eight are the kit parts, the rest are the scratch-built harnesses and other fittings. The pics show the seat harness under construction, and the finished seat, with the re-painted parachute harness, and the new harness belts in position.
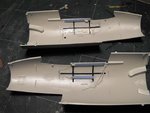
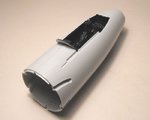
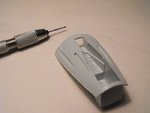
The cockpit walls have had some framework and wiring added, from plastic strip, sheet, and stretched sprue, and the rear bulkhead has been assembled, with some wiring and 'plumbing' added, again from stretched sprue. Both have been painted or touched-up as required,and a few details picked out and dry-brushed. With this work complete, the cockpit was assembled and cemented into the fuselage halves, which have been joined. Fit overall was very good, and only a very small amount of filler will be needed on one joint, which will probably be varnish and talcum powder. Note that the instrument panel coaming and gyro gunsight have yet to be added; the gunsight will be fitted near the end of construction.
The cannon muzzles have been drilled out, and the nose wheel bay fitted to the lower panel, ready for cementing in place on the lower fuselage; the nose wheel leg has been left off until after the model is painted.
This is it up to Step 8 in the instructions, with another 45 construction steps to go!
I'll post some more pics as I progress with the next stage, which involves the slightly complex air intakes, and the rear fuselage.
Thanks for your interest and kind comments to date.
Terry.
Attachments
-
 Hunter Build 137.jpg64.6 KB · Views: 64
 -
 Hunter Build 148.jpg33.2 KB · Views: 65
 -
 Hunter Build 147.jpg24.7 KB · Views: 76
 -
 Hunter Build 142.jpg30.2 KB · Views: 60
 -
 Hunter Build 139.jpg67.7 KB · Views: 68
 -
 Hunter Build 153.jpg29.9 KB · Views: 71
 -
 Hunter Build 138.jpg55.3 KB · Views: 66
 -
 Hunter Build 150.jpg29.1 KB · Views: 66
 -
 Hunter Build 160.jpg31.1 KB · Views: 66
 -
 Hunter Build 159.jpg46.4 KB · Views: 62
109ROAMING
2nd Lieutenant
Excellent stuff Terry!
looking very good mate
Heinz
Captain
Terry looks magnificent! Seeing your work is inspiring me to perhaps start adding details of my own to models.
Users who are viewing this thread
Total: 1 (members: 0, guests: 1)
