Colin1
Senior Master Sergeant
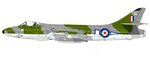
Terry...neither myself or my brother have been able to locate colour shots of the Acklington-based aircraft...
which Hunter squadron was based at Acklington?
I've got a page of squadron markings here that I can post up; I didn't think the camouflage scheme would differ at all between squadrons