Navigation
Install the app
How to install the app on iOS
Follow along with the video below to see how to install our site as a web app on your home screen.
Note: This feature may not be available in some browsers.
More options
You are using an out of date browser. It may not display this or other websites correctly.
You should upgrade or use an alternative browser.
You should upgrade or use an alternative browser.
Big Build - Hawker Hunter.
- Thread starter Airframes
- Start date
Ad: This forum contains affiliate links to products on Amazon and eBay. More information in Terms and rules
More options
Who Replied?- Thread starter
- #102
Airframes
Benevolens Magister
Thanks guys. Wojtek, I started to use masks, but had problems as my hands were too stiff to place them properly. So, most has been sprayed free hand, with the edges touched in with a fine brush, for a hard-edged seaparation of the colours.
Now that I've looked at it again, I'm not happy with the tone of the green, so I'll have to mask the undersides and start again!
Oh well! See you in two months!!
Now that I've looked at it again, I'm not happy with the tone of the green, so I'll have to mask the undersides and start again!
Oh well! See you in two months!!
- Thread starter
- #104
Airframes
Benevolens Magister
It'll take me ages to re-mask it! But only kidding, it shouldn't take too long, it's just a shame the current Humbrol paint is so unreliable on shade and tone these days. But I'm sure I can correct it, and there is no rush, as I want to get back to the Bf110 anyway, and the Hunter I want to have perfect, as it's part of my memories of growing up. This one will definitely be going in a glass case when finished!!
Tony Hill
Tech Sergeant
Hi Terry,
Looking good mate.....don't you hate it when everyone says it looks great but YOU are not happy with it?
Still, only one person can decide how happy you are with the job...can't wait to see the camo once you are!!
Darryl
Looking good mate.....don't you hate it when everyone says it looks great but YOU are not happy with it?
Still, only one person can decide how happy you are with the job...can't wait to see the camo once you are!!
Darryl
ian lanc
Staff Sergeant
Just like 'Mullers' avatar ! looking rather nice and the shape looks well too.
ian.
ian.
- Thread starter
- #107
Airframes
Benevolens Magister
Thanks Ian, that's one way of putting it!!
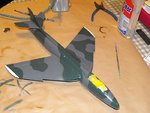
Done a little bit more. I re-painted the green, as I wasn't happy with the tone of the first attempt with the currently unpredictable Humbrol enamel. As I wanted a hard-edged demarcation, I decided to brush-paint it freehand.
After doing a little light panel-line work, the model was sprayed with a couple of thin coats of gloss clear, using Johnson's 'Klear' (Future). This was more to protect the paint-work from grease and scratches, whilst the rest of the painting is carried out; it'll get a couple of more coats before decalling, and then a final one or two coats as a finish.
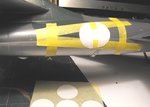
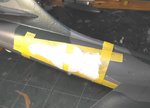
Once the 'Klear' had fully dried, the area for the Squadron markings, surrounding the fuselage roundels, was masked, ready for hand-painting. In order to get the proportions right on the Squadron flash, an 'arrowhead' shape in white, with a thin blue outline, I used a circular adhesive label, the same size as the RAF roundel, to mark the position of the roundel, then used the halves of another label to create the curve of the inner edges of the 'arrowhead'. The rest of the masking was done using Tamiya masking tape, then the required area painted in matt white. Once this is dry, it will be given a thin coat of 'Klear', again to protect it, then more tape masking will be added, and the thin blue cheat-line painted in.
And then, it's time to apply the massive amount of decals! I'm still undecided whether to make a decal for the squadron badge on the nose, or hand-paint it, but that's a problem that can be solved nearer the time, many hours work from now!
Thanks again for your interest and kind comments.
Attachments
Tony Hill
Tech Sergeant
Looking good Terry. She'll be a beauty when finished.
Darryl
Darryl
Heinz
Captain
Looking great Terry!
lesofprimus
Brigadier General
Comin along quite beautifully Terry.....
Lookin' good Terry, doin' a great job mate!
109ROAMING
2nd Lieutenant
With the guys Terry ,doing it proud!
- Thread starter
- #114
Airframes
Benevolens Magister
Thanks a lot guys, much appreciated!
- Thread starter
- #116
Airframes
Benevolens Magister
Thanks awfully Wojtek old boy!
top job mr Fox
Lucky13
Forum Mascot
Sweeeet as ever Mr Fox! Makes me wanna do a Swedish Hunter....

- Thread starter
- #119
Airframes
Benevolens Magister
Thanks Karl and Jan, might have some more pics tonight. A Swedish Hunter would be nice Jan, why don't you do one, either this kit or the Academy 1/48th?
Lucky13
Forum Mascot
Might have a look at the Academy 1/48 then, 1/32 is a tad too big....
 What's your opinion on it btw, the Academy?
Users who are viewing this thread
Total: 1 (members: 0, guests: 1)


