Big Build - Hawker Hunter.

Ad: This forum contains affiliate links to products on Amazon and eBay. More information in Terms and rules

I was intending to get it, as the 1/32nd kit IS big, but went for the latter purely due to the price deal at Model Zone - £10 instead of £25 !! (Thanks Ian!)
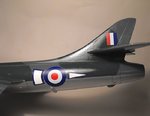
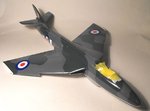
All the reviews I've seen say it is excellent, with the only draw-back being a cockpit that is, apparently, slightly too shallow I think. But this is easily rectified, or not even noticeable, from what I've discovered. Although I've only seen photographs of a completed model, it did look exceptionally good and accurate, and, like the big kit, is available in the F6 and FGA9 variants - both in stock with Model Hobbies. The thing is, can you get decals for a Swedish one? I believe there are some for Danish and Norwegian, so you might be in luck, but might only need the roundels anyway.
 
The Hunter has started to take on its identity, with the 66 Squadron flash now hand-painted and the masking removed. The area was given a couple of coats of 'Klear' to smooth it out, then the two-part RAF roundel decals applied. Once it's all settled, a slight bit of retouching will be done, which is easier, with a fine brush, on a gloss surface.
Some panel lines under the wings have been re-done, and the masks removed from the flap recesses and the wheel bays; the latter will have some extra detailing added, in the form of wiring and pipework, then both areas will be painted matt silver.
With the national markings in place, there's only about another 200 decals to go (!), then the model will be sprayed in a semi-gloss clear coat, before the undercarriage is added, followed by the wing tanks, flaps and other small details, plus, of course, the gunsight, windscreen and canopy. But, that's some time off, as I need to get the Bf110 finished for the Group Build.
 

Attachments

  • Hunter Build 264.jpg
    Hunter Build 264.jpg
    34.4 KB · Views: 74
  • Hunter Build 276.jpg
    Hunter Build 276.jpg
    45.8 KB · Views: 72
  • Hunter Build 271.jpg
    Hunter Build 271.jpg
    25.6 KB · Views: 80
Thanks very much indeded chaps, much appreciated. The Hunter is going back into the hangar for a while, so that I can concentrate on the GB '110.
 
Thanks very much Darryl, just hope i can hand-paint the Squadron crest for the nose, it's on a disc that's only about 8 or 10mm in diameter, making the crest about 6mm diameter!!
Just thought, those 66 Sqn pilots who used to fly over when I was a kid, will be in their 70's now!
 
With the Group Build entries completed, and a week to go before starting on the next Group Build project, I thought it about time to do a bit more on the Hunter. I'd been putting this off, as there are over 200 decals to apply, with the large, underwing serial numbers being tricky to position.
For reasons unknow, back in the 1950's, some numpty at the Air Ministry thought it would be a wonderful idea to change the layout of the large serial numbers and letters on the undersides of the wings on R.A.F. aircraft, grouping the numbers below the letters.
"So?" you might ask.
Well, on most fighters of the period, it means that the serial block overlaps the undercarriage doors, which must have been bad enough painting the real thing. But on a model, it really is an ache in the spherical regions of the body!
After five hours work, I managed to give the Hunter its identity, with the wing and fuselage serials in place, and the identification code letter on each side of the fin. I used a combination of the kit's decals, 'Letraset' rub-down numerals, and decals from the spares box to create the serial number, XG154, in black. The white letter 'T' on the fin came from an old Microscale USAAF I.D. letters sheet.
The gear doors were held in place as near as possible with Plasticine childrens' modelling clay. The main gear leg doors, in two parts, couldn't be fitted into the wells fully, as the locating pegs and hinges would need to be removed to achieve this. So it was a case of applying the decals, with lots of Micro Sol, waiting for them to set, then cutting around the edges of the doors, before removing the latter. Thankfully, there was minimal misalignment or cracking, and a quick touch-up will correct any blemishes.
I was part-way through applying the tail serial numbers when I realised I didn't have any suitable figure'5's'!
I had originally planned to model XG266, coded 'R', but found that the only white letter 'R' of the correct size that I had was the wrong design, so changed plans at the last minute. Consequently, the tail serial is made up of decals and 'Letraset'!
After this lot, I'd had enough, and contented myself with adding the ejection seat warning triangles, and the canopy jetison instructions; the other 200 stencils will be added in stages, before the detail painting is completed, and the undercart etc added.
Thanks for your kind comments to date.
Terry.
 

Attachments

  • Hunter Build 280.jpg
    Hunter Build 280.jpg
    56.2 KB · Views: 71
  • Hunter Build 283.jpg
    Hunter Build 283.jpg
    58.9 KB · Views: 75
  • Hunter Build 291.jpg
    Hunter Build 291.jpg
    35.3 KB · Views: 69
  • Hunter Build 293.jpg
    Hunter Build 293.jpg
    25.2 KB · Views: 56
  • Hunter Build 299.jpg
    Hunter Build 299.jpg
    37.2 KB · Views: 57

Users who are viewing this thread

Back