Man...that looks fantastic Charles!
Navigation
Install the app
How to install the app on iOS
Follow along with the video below to see how to install our site as a web app on your home screen.
Note: This feature may not be available in some browsers.
More options
You are using an out of date browser. It may not display this or other websites correctly.
You should upgrade or use an alternative browser.
You should upgrade or use an alternative browser.
**** DONE: 1/24 Spitfire Mk.Vb Floatplane – Home Country Modern Aircraft/Spitfire GB
- Thread starter ccheese
- Start date
Ad: This forum contains affiliate links to products on Amazon and eBay. More information in Terms and rules
More options
Who Replied?- Thread starter
- #182
ccheese
Member In Perpetuity
Thanks for the "rave reviews", Lads. Probably won't get too much done in the next couple of days. With a break in the weather I'll be putting in the summer veggie garden. Next job is to get the wing covered.
Charles
Charles
Crimea_River
Marshal
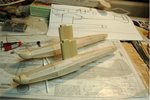
Yeah, Andy. I added four ribs to the wings and made a box for the tongue of the pylon to fit into. Also added some sheet balsa to the underside of the wing, so I'd have something to glue the upper flat portion of the pylon to. It will be pretty sound.
If you take another look at the first pic, you can see (from inboard out) where I added rib #3 #4, and the tongue of the pylon sticking up.
Charles
Well done. Looks like you got it covered.
meatloaf109
1st Lieutenant
Coolest looking spit in the build!
- Thread starter
- #185
ccheese
Member In Perpetuity
Coolest looking spit in the build!
Be sure to tell the judges that !
Charles
Crimea_River
Marshal
- Thread starter
- #187
ccheese
Member In Perpetuity
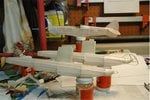
Finally got the pylons attached to the floats. Looks like a couple of U-boats !! While checking the fit of the canopy I dropped the fuselage and broke off the starboard elevator. Didn't realize just how fragile this thing is.....
After I get the wing covered I can do some priming..... I think the fabric will be a little tougher with paint on it.
Charles
After I get the wing covered I can do some priming..... I think the fabric will be a little tougher with paint on it.
Charles
Attachments
Last edited:
meatloaf109
1st Lieutenant
O.k. now it's the second coolest looking spit in the build. (mine still has both stabs)
Looking good Charles!
Shame about the elevator, hopefully not to difficult to repair/replace.
Shame about the elevator, hopefully not to difficult to repair/replace.
- Thread starter
- #190
ccheese
Member In Perpetuity
Looking good Charles!
Shame about the elevator, hopefully not to difficult to repair/replace.
I can fix it, Hugh, it will just leave an unsightly bead of glue under the elevator, at the fuselage. Maybe I can paint it and
call it a fairing ?
Charles
vikingBerserker
Lieutenant General
Well done!
A4K
Brigadier General
Yep, keep at it, Charles. You're doing great so far.
Vic Balshaw
Major General
Still think this is one of the coolest builds in a GB.
Last edited:
meatloaf109
1st Lieutenant
yep!
- Thread starter
- #196
ccheese
Member In Perpetuity
Thanks, Lads, for the nice comments, 'specially Vic. The plan for today is to get the wing covered, and wet down. If it's sunny, today, the wing will dry quickly. I may get some paint on the parts, this evening.
Charles
Charles
A4K
Brigadier General
Good stuff Charles, looking forward to the pics.
- Thread starter
- #198
ccheese
Member In Perpetuity
The wing is covered, sprayed with water and after sitting in the sun, dry. I didn't take any pic's of the wing.... if you've seen one wing, you've seen them all !!
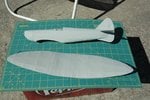
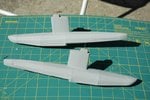
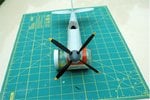
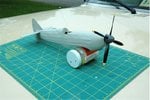
Next I painted the fuselage, wing and floats with a light gray primer. Now I wish I had used the Sea Gray as a primer, which is the lighter of the two camo colours (notice the Aussie spelling). It would have saved time and two bottles of paint. BTW, I used Model Masters enamel, and will use MM's enamels for the Sea Gray and Extra Dark Sea Gray which are the camo colours. Next move, probably tomorrow, is to attach the wing and tape off and paint the undersides of the fuselage, bottoms of the floats and the underside of the wing with "Sky".
The pic's of the fuselage with the prop installed is one of those "I had to see what it would look like", pic's. BTW, a little tip for making the holes in the spinner for the prop blades...... I used a single hole hand punch. The type a railroad conductor would use to punch your ticket. Worked fine !
Wayne Terry: Does the rudder and ventral fin look about right ???
Moving right along.....
Charles
Attachments
Last edited:
meatloaf109
1st Lieutenant
Very nice, and those floats look more like u-boats now!
Users who are viewing this thread
Total: 1 (members: 0, guests: 1)