Crimea_River
Marshal
Lovely engine work Vic!
Follow along with the video below to see how to install our site as a web app on your home screen.
Note: This feature may not be available in some browsers.
Ad: This forum contains affiliate links to products on Amazon and eBay. More information in Terms and rules
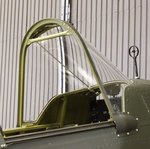
Still a ways off Vic, but I thought I'd mention it before you got there. The Hobbycraft P-36 windscreen (and for that matter the early P-40) is molded with braces making for a 3 pane windscreen. This is incorrect for the P-36 and model of Hawk you're building as well as the early P-40's like the one I have in this GB. The wind screen was one piece of curved Plexiglas and there were brace rods inside the Plexiglas that went from the last fuselage frame before the cockpit opening to a horizontal bar at the top of the windscreen. These bars are many times mistaken for the separation between panes. I found that my not painting the lines on the plastic part it gives a good impression of the bars behind the glass
It's beautiful
the twelve cartridges flare 1"cal. was on the left, 4 red, 4 green and 4 white. The colors was painted on the top of cartridges.
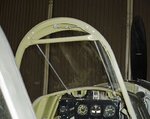
On the french H75 the throttle was push ahead when it is idle or cut off, and rear when full open
Have to devote tomorrow to the better half and my dentist.
Hello Vic
Hello Al,
when I shot the pic, the throttle was not installed. On my model, the throttle is US version I have not changed it
French Curtiss:
G for gaz (admission pressure), ouvert(open) when rear
E for essence (mixture) off when rear
So did you get drilled? And then went to see the dentist?
Lovely work you're doing on this one as usual.
Looking great Vic.