Navigation
Install the app
How to install the app on iOS
Follow along with the video below to see how to install our site as a web app on your home screen.
Note: This feature may not be available in some browsers.
More options
You are using an out of date browser. It may not display this or other websites correctly.
You should upgrade or use an alternative browser.
You should upgrade or use an alternative browser.
**** DONE: 1/48 F6F-5P VF-88 Yorktown - Jet/Recon/Transport GB
- Thread starter N4521U
- Start date
Ad: This forum contains affiliate links to products on Amazon and eBay. More information in Terms and rules
More options
Who Replied?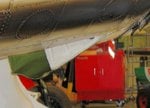
Looking the part Bill!
- Thread starter
- #123
N4521U
Plastic Pirate
Thanks for that Glenn, see what I can do wit it now.
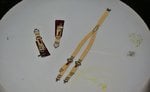
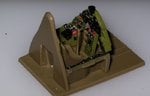
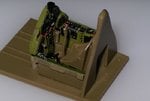
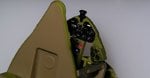
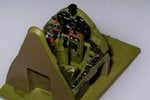
Had a lot of time today, so have tackled the cockpit. Did 99% of the PE stuff. Havent painted the while thing yet, just the panels.
Found if I left the belts themselves attached to the PE frame, and taped it to the table, I could manipulate the pieces and get them in place easier and faster.
The OLD GOAT sailors on.
Last edited:
- Thread starter
- #124
N4521U
Plastic Pirate

Vic Balshaw
Major General
You've done a nice job with the belts and pit old bleating sailor…………………………..
meatloaf109
1st Lieutenant
Thats 1/48? Beautie work!
Aaron Brooks Wolters
Brigadier General
 Amazing job Bill. You make it look so easy.
 - Thread starter
- #128
N4521U
Plastic Pirate
Aaron, it pretty much is easy. A couple of things I do.
I have small squares of 20mm thick acrylic I use as pads for working on, about two inches square. I take a wad of blue tac and stick the part to it on the block. This way I don't have to handle the part.
I use the curved blade scalpel for cutting the PE part loose from the frame, cutting the tab loose as close to the part as you can. The idea of putting some tape on the back then cutting so the part doesn't disappear, was posted here a couple of days ago and is a good ides. I use a ball of blue tac, rolled to a point at one end for picking up the part. Then use a piece of wire to apply some Super Glue to the place you want to put the part. hold the part over the glue dot, and with a pointed exacto press the piece in place, pulling it off the blue tac and hold it there for a second or two till the SG sets.
When I apply the face of the instrument panel I use the white glue. I dot glue to the instrument faces, all of them, with a tooth pick end I have dipped into the glue. Then place the face, using the pointed blue tac again, over the instruments, press in place with the blade again, squishing the glue thru the holes for the instruments. Let it dry and the glue goes clear at the instruments.
Just make sure the plastic is FLAT where you're going to place the PE. Use the pointed blue tac to handle the PE, the stuff pops out of tweezers. If you want plastic blocks to work on, hit the plastic suppliers and see if you can find some off cuts.
Hope I haven't been too wordy.
vikingBerserker
Lieutenant General
Dam, NICE!
- Thread starter
- #130
N4521U
Plastic Pirate
Lucky13
Forum Mascot
Superb!
Crimea_River
Marshal
That's turned out beautifully Bill!
Airframes
Benevolens Magister
It sure has.
meatloaf109
1st Lieutenant
Again, that is 1/48 scale?!!!
Most excellent work, old wombat!
Most excellent work, old wombat!
ccheese
Member In Perpetuity
Looking very good, Bill. (What double post ?)
Charles
Charles
- Thread starter
- #137
N4521U
Plastic Pirate
Wombat??????????????????????????
To the others, thank you!
To the others, thank you!
meatloaf109
1st Lieutenant
Just trying out various animals.
"Just Plane Bill', doesn't do you justice!, Old Bear!
"Just Plane Bill', doesn't do you justice!, Old Bear!
- Thread starter
- #140
N4521U
Plastic Pirate
Old Bear eh??????? Good thing that's the Only thing my mother saw outside the teepee when I was born!
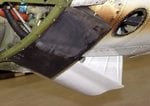
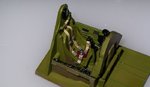
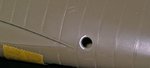
So today is an off day, drilled a hole for the camera to peek thru. It had a little half circle of sheet metal on the windy side. So I punched a hole in some styrene and did a little shaping, glued it on and Bob's your uncle (there yah are).
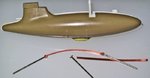
The PE strap for the aux tank just didn't look the part to me. So I used a sprue piece from some PE, drilled a couple of holes, one each end. I got some bead pins a long while back. Cut the heads of on the side to make sort of a rectangle, stuffed them thru the holes and bent the ends round. There yah are!
The button sticking up from the other side will be trimmed down for the gascap.
I sailor on.
So today is an off day, drilled a hole for the camera to peek thru. It had a little half circle of sheet metal on the windy side. So I punched a hole in some styrene and did a little shaping, glued it on and Bob's your uncle (there yah are).
The PE strap for the aux tank just didn't look the part to me. So I used a sprue piece from some PE, drilled a couple of holes, one each end. I got some bead pins a long while back. Cut the heads of on the side to make sort of a rectangle, stuffed them thru the holes and bent the ends round. There yah are!
The button sticking up from the other side will be trimmed down for the gascap.
I sailor on.
Attachments
Users who are viewing this thread
Total: 1 (members: 0, guests: 1)