Nicely done so far Terry!
Navigation
Install the app
How to install the app on iOS
Follow along with the video below to see how to install our site as a web app on your home screen.
Note: This feature may not be available in some browsers.
More options
You are using an out of date browser. It may not display this or other websites correctly.
You should upgrade or use an alternative browser.
You should upgrade or use an alternative browser.
**** DONE: 1/48 Hawker Sea Fury FBII, 807 NAS, 1951 - Carrier Aircraft GB
- Thread starter Airframes
- Start date
Ad: This forum contains affiliate links to products on Amazon and eBay. More information in Terms and rules
More options
Who Replied?looking good Terry
meatloaf109
1st Lieutenant
"Doctor, I get stiff in the joints."Thanks very much chaps, good to know it meets approval. Not got any more done today, it's been one of those days where I can't seem to wake up properly, and I'm stiff in hands and shoulders to boot. Maybe more tomorrow.
"Well stay out of those places!"
Ba-dum-bump!
- Thread starter
- #124
Airframes
Benevolens Magister
And Paul wins this month's 'Give an old joke a home' competition !
Bit more progress to show, and getting closer to that wing fold fitting.
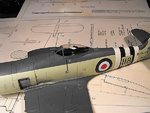
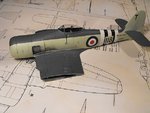
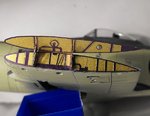
PIC 1. The vac-formed canopy is in place, although a little more work needs to be done to blend-in the joints of the windscreen, and tidy up the rear edge of the canopy.
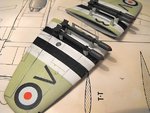
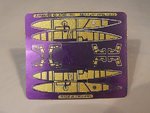
PIC 2. The fins on the RPs were thinned down and the 'saddles' trimmed back, before painting the rocket motors very dark green, and the 60lb SAP HE warheads mid olive, with red rings. The completed projectiles were then tacked into place on the mounts, with poly cement, and then reinforced with a tiny drop of CA glue. Also visible here are the landing lamps, which were glazed with discs of thin, clear plastic, punched out from a piece of packaging material.
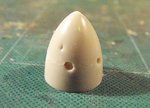
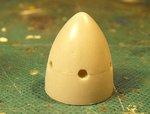
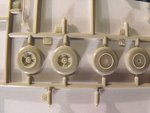
PICS 3 and 4. I decided to prepare the rest of the parts before tackling the wing fold, and found this sink hole in the spinner when I joined the two parts. The hole was filled with 'Superglue', allowed to set, then filed down and sanded smooth. The joint between the two halves was also lightly sanded.
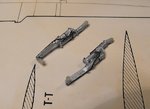
PIC 5. Next job is to prepare this PE wing fold set, before fitting it to the main wing sections, although I'll probably fit the landing gear before attempting to fit the outer wing sections.
If all goes to plan, and the other small jobs get done, I hope to start on the wing fold tomorrow night.
Bit more progress to show, and getting closer to that wing fold fitting.
PIC 1. The vac-formed canopy is in place, although a little more work needs to be done to blend-in the joints of the windscreen, and tidy up the rear edge of the canopy.
PIC 2. The fins on the RPs were thinned down and the 'saddles' trimmed back, before painting the rocket motors very dark green, and the 60lb SAP HE warheads mid olive, with red rings. The completed projectiles were then tacked into place on the mounts, with poly cement, and then reinforced with a tiny drop of CA glue. Also visible here are the landing lamps, which were glazed with discs of thin, clear plastic, punched out from a piece of packaging material.
PICS 3 and 4. I decided to prepare the rest of the parts before tackling the wing fold, and found this sink hole in the spinner when I joined the two parts. The hole was filled with 'Superglue', allowed to set, then filed down and sanded smooth. The joint between the two halves was also lightly sanded.
PIC 5. Next job is to prepare this PE wing fold set, before fitting it to the main wing sections, although I'll probably fit the landing gear before attempting to fit the outer wing sections.
If all goes to plan, and the other small jobs get done, I hope to start on the wing fold tomorrow night.
Attachments
Crimea_River
Marshal
Coming along beautifully Terry and nice job on the spinner.
good fix there Terry, doin' great!
Nice work Dogsbody
meatloaf109
1st Lieutenant
Thank you!, I'll be here all week, don't forget to tip your waitress!
My wife says I'm an old joke, but she's an old....
Any-who..., looks like the wing attatchment will be easy, what with the two parts connected and all.
And I'd use the "Made in England" tag.
My wife says I'm an old joke, but she's an old....
Any-who..., looks like the wing attatchment will be easy, what with the two parts connected and all.
And I'd use the "Made in England" tag.
- Thread starter
- #129
Airframes
Benevolens Magister
Thanks guys, it's much appreciated. I think the wing fold should be straightforward - if my hands allow me to place the small hinges without them sticking to me, rather than the model !
Looks great so far Terry!
Vic Balshaw
Major General
Liked the dimple in the spinner, should have kept it Terry, 'genuine flak damage'…..goog fix though.
The wing fold looks nice and simple, looking forward to seeing you getting into it.
The wing fold looks nice and simple, looking forward to seeing you getting into it.
- Thread starter
- #134
Airframes
Benevolens Magister
Thanks chaps. I've started to fit the wing fold, and have the hinges in place, and the units attached to the main wing - all a lot easier than I anticipated. However, fitting the outer wing sections is going to be a bit more fiddly, as the upper section of the wing fold plates are very 'springy'. Because the wings, when fitted, would make aligning the main undercarriage tricky, these parts have been fitted before attempting to fit the wing panels, although the remainder of the landing gear parts will be fitted later.
PIC 1. The vac-formed canopy has now been properly blended and sealed, and the rear section corrected.
PIC 2. Brake lines have been fitted to the main undercarriage legs, made from lead wire, and the legs painted, although they have yet to receive a semi-matt clear coat in this shot, which will give a smoother, more even appearance to the finish.
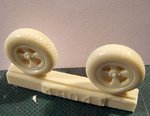
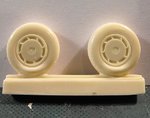
PIC 3. The kit wheels are reasonable on the front faces, but the rear hubs lack detail, and the tyres have smooth treads, rather than the diamond block of the real aircraft.
PICS 4 and 5. They have been replaced by a set of 'True Details' resin wheels, which are much better, but perhaps a touch too flat on the 'weighted' sections.
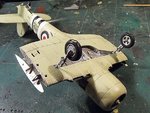
PIC 6. The wing folds in place, with the hinges fitted, but not yet folded down to the correct angle, or the hinges attached to the upper sections. This will be done once the outer wing sections are fitted, and then they'll have some extra details added and be painted. So far, they received a coat of silver, to act as a primer for the main coats.
PIC 7. Main gear and tail wheel in place. The retraction struts, and some extra detail, along with the gear doors, will be added once I'm happy the outer wings are firmly attached at the correct angle.
Thanks again for the kind words and continued interest, and tomorrow, I should either have the wings attached - or a pile of plastic smashed with a lump hammer !!
PIC 1. The vac-formed canopy has now been properly blended and sealed, and the rear section corrected.
PIC 2. Brake lines have been fitted to the main undercarriage legs, made from lead wire, and the legs painted, although they have yet to receive a semi-matt clear coat in this shot, which will give a smoother, more even appearance to the finish.
PIC 3. The kit wheels are reasonable on the front faces, but the rear hubs lack detail, and the tyres have smooth treads, rather than the diamond block of the real aircraft.
PICS 4 and 5. They have been replaced by a set of 'True Details' resin wheels, which are much better, but perhaps a touch too flat on the 'weighted' sections.
PIC 6. The wing folds in place, with the hinges fitted, but not yet folded down to the correct angle, or the hinges attached to the upper sections. This will be done once the outer wing sections are fitted, and then they'll have some extra details added and be painted. So far, they received a coat of silver, to act as a primer for the main coats.
PIC 7. Main gear and tail wheel in place. The retraction struts, and some extra detail, along with the gear doors, will be added once I'm happy the outer wings are firmly attached at the correct angle.
Thanks again for the kind words and continued interest, and tomorrow, I should either have the wings attached - or a pile of plastic smashed with a lump hammer !!
Attachments
-
 Sea Fury Build 107.jpg55.2 KB · Views: 109
 -
 Sea Fury Build 110.jpg41 KB · Views: 110
 -
 Sea Fury Build 103.jpg48.7 KB · Views: 116
 -
 Sea Fury Build 105.jpg57.1 KB · Views: 116
 -
 Sea Fury Build 106.jpg56.6 KB · Views: 114
 -
 Sea Fury Build 115.jpg52.5 KB · Views: 102
 -
 Sea Fury Build 117.jpg90.2 KB · Views: 116
Crimea_River
Marshal
Looks great Terry. Hard to believe those wing folds will hold everything together, being so delicate.
- Thread starter
- #136
Airframes
Benevolens Magister
Thanks Andy, and that's exactly what I'm concerned about!
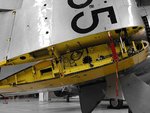
Given I can get the wings attached and aligned properly, more support will be gained by the addition of a scratch-built ammo feed chute to each wing, and the metal etch hinges will give a lot more support than they appear to offer. Also, one hinge on each side should have a tubular, rather than 'flat', ram arm, and there would normally also be red-painted, tubular, safety locking sleeve to the rear of this. I'm going to possibly attempt to 'beef up' the PE part to replicate this, which again will add strength - I hope!
The pic here of one of the Duxford Sea Furies, shows the red safety lock, and the rectangular openings towards the trailing edge are where the ammo feed chute would normally fit. Note that in FAA service, the inside of the wing fold was normally painted 'Aluminium', not ZC as here.
Attachments
Crimea_River
Marshal
I'm sure your resourcefulness will result in a solution Terry.
Vic Balshaw
Major General
You're doing well Terry and once you have a ram arm in place this should add much greater stability to the folded wing. I also agree that placing the fold part of the wing is going to be one of the last jobs. I'm thinking undercart, decals, touch-ups and aerials will all have to be done first.
I'm sure your resourcefulness will result in a solution Terry.
Yep!

meatloaf109
1st Lieutenant
That ammo chute should stiffen it up also.
Users who are viewing this thread
Total: 1 (members: 0, guests: 1)