Navigation
Install the app
How to install the app on iOS
Follow along with the video below to see how to install our site as a web app on your home screen.
Note: This feature may not be available in some browsers.
More options
You are using an out of date browser. It may not display this or other websites correctly.
You should upgrade or use an alternative browser.
You should upgrade or use an alternative browser.
**** DONE: 1/48 Supermarine Spitfire 1 - Defense of Britain/Atlantic.
Ad: This forum contains affiliate links to products on Amazon and eBay. More information in Terms and rules
More options
Who Replied?- Thread starter
- #22
ozhawk40
Master Sergeant
Nice work, and the mouldings look good.
Here's the profile and 'badge'. The aircraft is that of Richard Hardy, not, as I originally thought, Pat Hughes' kite, but the profile and badge might help a bit. They're from a series of articles originally published in 1982, in 'Scale Models' magazine, and then re-published as a book a few years later. Note the misprint of the Squadron number !
Thanks Terry, much appreciated, I don't have that profile, and Airfix must have done a boxing of this one
Details of this one are:
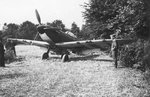
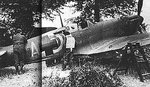
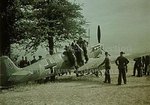
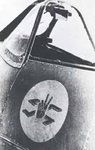
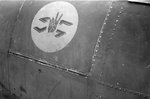
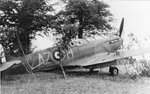
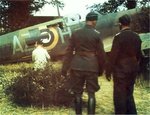
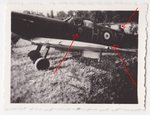
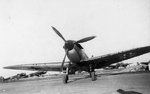
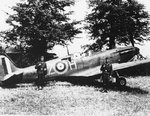
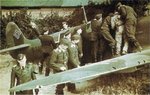
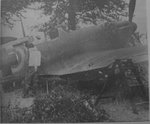
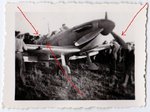
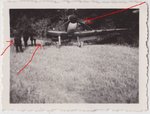
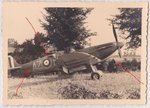
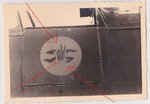
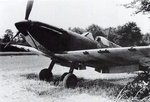
AZ-H N3277 Spitfire Mk. 1 aka 'Dirty Dick' of 'A' Flight, Red Section 234 Squadron. P/O R. Hardy made a forced landing on the evening of 15 August 1940 after it was damaged in combat over the Channel, near Cherbourg, with Hardy being taken captive. AZ-H landed wheels down and was rather prolifically photographed by the Germans (I've scraped together 20 odd pics for reference on this build). Some say AZ-H was shot down by Oblt. Georg Claus of III./JG53. Note the damaged area behind the cockpit probably caused by the demolition charge activated to destroy the radio equipment. AZ-H was fixed and later transferred to Rechlin for testing. It reportedly received the code 5+2 for testing.
What the hell! Everyone loves the Spitfire. Here's some more pics of this interesting Spit [Source the internet - WARNING - don't search under Dirty Dick if your easily offended!].
Attachments
-
 AZ-H 005.jpg81.8 KB · Views: 289
 -
 AZ-H 004.jpg152.5 KB · Views: 207
 -
 AZ-H 003.jpg134.3 KB · Views: 213
 -
 AZ-H 002.jpg139.1 KB · Views: 218
 -
 AZ-H 001.jpg91.2 KB · Views: 207
 -
 AZ-H 007.jpg87.8 KB · Views: 221
 -
 AZ-H 008.jpg134.1 KB · Views: 206
 -
 AZ-H 009.jpg70.1 KB · Views: 200
 -
 AZ-H 010.jpg86.4 KB · Views: 189
 -
 AZ-H 011.jpg84.4 KB · Views: 217
 -
 AZ-H 016.jpg67.9 KB · Views: 213
 -
 AZ-H 015.jpg37.2 KB · Views: 194
 -
 AZ-H 014.jpg127.5 KB · Views: 191
 -
 AZ-H 013.jpg117.2 KB · Views: 185
 -
 AZ-H 012.jpg61.9 KB · Views: 185
 -
 AZ-H 017.jpg63.3 KB · Views: 185
 -
 AZ-H 018.jpg61.8 KB · Views: 221
 -
 AZ-H 019.jpg82.9 KB · Views: 200
 -
 AZ-H 020.jpg57.5 KB · Views: 204
 -
 AZ-H 021.jpg92.5 KB · Views: 203
Last edited:
Airframes
Benevolens Magister
I agree. There's a couple there I hadn't seen before.
I have a very large, framed picture of this aircraft, which is actually a jig-saw puzzle of the original Airfix box art, given to me for my 15th Birthday (!) three years ago, by the Landlady and Landlord of the local pub. I blowed if I can find the photos of it though !
I have a very large, framed picture of this aircraft, which is actually a jig-saw puzzle of the original Airfix box art, given to me for my 15th Birthday (!) three years ago, by the Landlady and Landlord of the local pub. I blowed if I can find the photos of it though !
Vic Balshaw
Major General
Great set of pics and a good start Peter.
fubar57
General
Nice looking kit, pics and history.
Geo
Geo
That it is! 
JKim
Senior Master Sergeant
Great choice! I was thinking about doing a BoB Spit or Hurricane for this GB as I wanted to experience a new Airfix kit (haven't built one yet). Looking forward to this one!
Good work so far!
- Thread starter
- #30
ozhawk40
Master Sergeant
Hi and thanks for the comments guys.
This weeks update.
Pic 1 2
I got stuck into the exhausts. They are nicely molded and don't really deserve to be replaced with resin alternatives. Just the ends need drilling and scraping out with a scalpel. That's very easy to do with the type of soft plastic that Airfix use, so no bother really.
Pic 3 4
I painted and detailed the instrument panel and frame. Airfix supply a decal for the panel, so I thought I'd use that to see how it turns out. Not bad really, but it did require 3 applications of decal softener before it laid flat against the contours of the IP. Everything lined up well, apart from one gauge that seems like it is on the wrong spot on the decal. An Eduard panel would probably look better, but a good result with the standard Airfix parts.
Pic 5
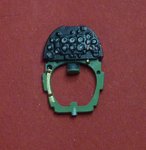
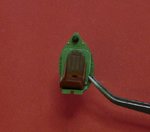
Interior painting commences with initial spray of cockpit green and aluminum, followed with a dry brush of 50/50 interior green and white to highlight the raised areas.
Pic 6, 7, 8
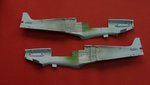
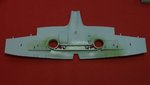
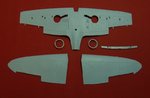
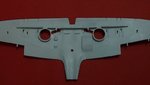
I made a start on the wings. Fit seems excellent and the construction by adding the spars in place make certain the dihedral is at the right angle. The only thing I'm uneasy about is the attachment points for the oleo legs which are "butt joined" to the pivot castings. I guess I'll sought that out later. Interior of the wing inboard of the wheel wells I've painted aluminum.
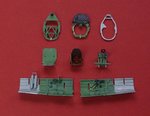
Pic 9
All the interior parts painted, detailed and laid out. Overall the kit has some nice details. It could always be bettered with resin, but nice just the same. I'm very impressed with this Airfix kit. After painting I dry brushed to bring out the detail, but I'm not going to do a wash to grunge things up with this interior because this aircraft did not last long in service. Three weeks only! I did add straps to the rudder pedals using Tamiya tape. I did not like the rudder pedals actually, one of the mediocre parts of the kit, but they remain mostly out of sight.
Pic 10
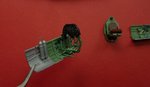
Seat detailing almost done. I got to this point, ready to add the seat belts and realised that I had the wrong type for this build, so I had to order in the earlier Sutton type. I've ordered the new Eduard fabric belts, so we'll see how they look.
Pic 11
Interior ready for assembly (waiting for the belts), but all seems good. If you follow in my footsteps the only thing I can say is to dry fit all the components before painting with the cockpit interior. The frames particularly need a bit of fangling before they will sit in place correctly and any thing not fitting together properly will make the cockpit walls wider than they should be.
Okay, thanks for dropping by, and the next up date will happen soon. 8)
Cheers
Peter
This weeks update.
Pic 1 2
I got stuck into the exhausts. They are nicely molded and don't really deserve to be replaced with resin alternatives. Just the ends need drilling and scraping out with a scalpel. That's very easy to do with the type of soft plastic that Airfix use, so no bother really.
Pic 3 4
I painted and detailed the instrument panel and frame. Airfix supply a decal for the panel, so I thought I'd use that to see how it turns out. Not bad really, but it did require 3 applications of decal softener before it laid flat against the contours of the IP. Everything lined up well, apart from one gauge that seems like it is on the wrong spot on the decal. An Eduard panel would probably look better, but a good result with the standard Airfix parts.
Pic 5
Interior painting commences with initial spray of cockpit green and aluminum, followed with a dry brush of 50/50 interior green and white to highlight the raised areas.
Pic 6, 7, 8
I made a start on the wings. Fit seems excellent and the construction by adding the spars in place make certain the dihedral is at the right angle. The only thing I'm uneasy about is the attachment points for the oleo legs which are "butt joined" to the pivot castings. I guess I'll sought that out later. Interior of the wing inboard of the wheel wells I've painted aluminum.
Pic 9
All the interior parts painted, detailed and laid out. Overall the kit has some nice details. It could always be bettered with resin, but nice just the same. I'm very impressed with this Airfix kit. After painting I dry brushed to bring out the detail, but I'm not going to do a wash to grunge things up with this interior because this aircraft did not last long in service. Three weeks only!
Pic 10
Seat detailing almost done. I got to this point, ready to add the seat belts and realised that I had the wrong type for this build, so I had to order in the earlier Sutton type. I've ordered the new Eduard fabric belts, so we'll see how they look.
Pic 11
Interior ready for assembly (waiting for the belts), but all seems good. If you follow in my footsteps the only thing I can say is to dry fit all the components before painting with the cockpit interior. The frames particularly need a bit of fangling before they will sit in place correctly and any thing not fitting together properly will make the cockpit walls wider than they should be.
Okay, thanks for dropping by, and the next up date will happen soon. 8)
Cheers
Peter
Attachments
-
 P1040345.jpg36.7 KB · Views: 95
 -
 P1040346.jpg38.5 KB · Views: 92
 -
 P1040354.jpg51.3 KB · Views: 99
 -
 P1040355.jpg94.6 KB · Views: 103
 -
 P1040357.jpg68.7 KB · Views: 112
 -
 P1040359.jpg40.3 KB · Views: 103
 -
 P1040361.jpg39.4 KB · Views: 98
 -
 P1040362.jpg70.3 KB · Views: 92
 -
 P1040365.jpg36.3 KB · Views: 92
 -
 P1040336.jpg42.5 KB · Views: 85
 -
 P1040338.jpg33.9 KB · Views: 95
Nice work Peter!
Crimea_River
Marshal
Very.
Airframes
Benevolens Magister
Very nice work there Peter, and it certainly looks like a nice kit.
The green in the cockpit looks rather dark, more like U.S. Interior Green, compared to the pale, Cockpit Grey-Green used on British aircraft, but it might be the lighting - the pics of my MkV cockpit look much darker for that very reason.
The green in the cockpit looks rather dark, more like U.S. Interior Green, compared to the pale, Cockpit Grey-Green used on British aircraft, but it might be the lighting - the pics of my MkV cockpit look much darker for that very reason.
Good stuff Peter
- Thread starter
- #36
ozhawk40
Master Sergeant
Thanks guys!
Yes, its a trick of the light Terry. My point and shoot camera tends to enhance the colour somewhat in inside lighting conditions. I'll take some outside ones on the weekend for comparison.
Cheers
Peter
Very nice work there Peter, and it certainly looks like a nice kit.
The green in the cockpit looks rather dark, more like U.S. Interior Green, compared to the pale, Cockpit Grey-Green used on British aircraft, but it might be the lighting - the pics of my MkV cockpit look much darker for that very reason.
Yes, its a trick of the light Terry. My point and shoot camera tends to enhance the colour somewhat in inside lighting conditions. I'll take some outside ones on the weekend for comparison.
Cheers
Peter
fubar57
General
Innards look good Peter. Funny thing; on my computer, I though you had already painted the innards back in Post #18 as they look like the correct cockpit green. (I'll save you the time of scrolling back)
http://www.ww2aircraft.net/forum/-2...nse-britain-atlantic-43774-2.html#post1219551
Geo
http://www.ww2aircraft.net/forum/-2...nse-britain-atlantic-43774-2.html#post1219551
Geo
Vic Balshaw
Major General
Damn good start Peter.
Nicely done so far!
- Thread starter
- #40
ozhawk40
Master Sergeant
Hi Guys
More progress today.
Pic 1
I grabbed the wife's camera (DSLR) and took some shots of the cockpit outside in better light and this is the result. Bad news is that further research tells me that this is still too dark for an early Spitfire, which should be lighter again than cockpit grey-green. I'm too far down the track to change it now, unfortunately. Next time I'll get it right. 8)
Pic 2
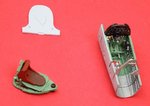
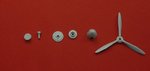
These are the parts for the spinner assembly. Interesting parts breakdown for this prop by Airfix, just to make it easy I think so all parts align and 'make it a bit harder to glue the prop fixed by accident. It also allows fitting the prop at the very last step, which is great for final painting.
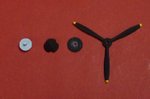
Pic 3
A coat of white as base, followed by the yellow for the tips.
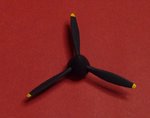
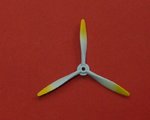
Pic 4 5
Masked off, painted and everything brought together.
Thanks for looking!
Cheers
Peter
More progress today.
Pic 1
I grabbed the wife's camera (DSLR) and took some shots of the cockpit outside in better light and this is the result. Bad news is that further research tells me that this is still too dark for an early Spitfire, which should be lighter again than cockpit grey-green. I'm too far down the track to change it now, unfortunately. Next time I'll get it right. 8)
Pic 2
These are the parts for the spinner assembly. Interesting parts breakdown for this prop by Airfix, just to make it easy I think so all parts align and 'make it a bit harder to glue the prop fixed by accident. It also allows fitting the prop at the very last step, which is great for final painting.
Pic 3
A coat of white as base, followed by the yellow for the tips.
Pic 4 5
Masked off, painted and everything brought together.
Thanks for looking!
Cheers
Peter
Attachments
Last edited:
Users who are viewing this thread
Total: 1 (members: 0, guests: 1)