**** DONE: 1/72 BV222 Wiking Seaplanes / Floatplanes of WW II

Ad: This forum contains affiliate links to products on Amazon and eBay. More information in Terms and rules

Sure looks good on the inside, shame them widows are so few and far between. Look forward to seeing how you fit that lid as well.
 
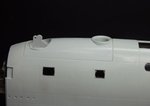
Boo....Hiss.... All that beautiful work done on the flight engineers compt. and it gets hidden. Oh well, at least we know, "it's in there" !

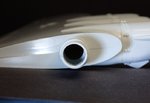
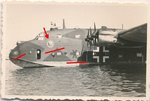
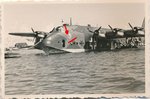
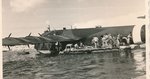
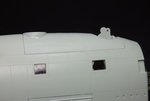
Going to look good with some paint splashed on. Charles
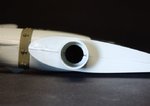
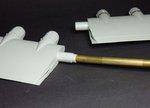
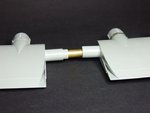
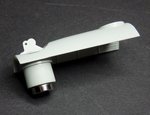
It's not closed up for good yet Charles will see how plan A goes first...and plan B which doesn't exist yet....before I go to plan C....

Next step i have done is drill and file out the wing join sections that fit together inside the fuselage, to make way for a section of Brass tubing bent slightly upwards to create additional support extending through the fuselage and into the wings once they are glued in place, I think this is necessary due to the sheer size and weight providing their own problems for correct sit and remaining that way into the future...

Thanks for looking in Guys!
 

Attachments

  • 95_Wing support opening_4034.jpg
    95_Wing support opening_4034.jpg
    38.9 KB · Views: 68
  • 96_Wing Support opening_4032.jpg
    96_Wing Support opening_4032.jpg
    42.2 KB · Views: 70
  • 97_Brass Tube Wing Support_4037.jpg
    97_Brass Tube Wing Support_4037.jpg
    49.1 KB · Views: 72
  • 98_Brass Tube Wing Support_4038.jpg
    98_Brass Tube Wing Support_4038.jpg
    46.3 KB · Views: 71
Thanks Hugh and George.

been looking over the upper surface colours and trying to come up with some Tamiya colour mixes for RLM72 and 73, think iv'e got some mixes that are real close slightly on the lighter side compared to the official colour chips in Vol.2 of Luftwaffe Camo and markings by Ken Merrick and Jurgen Kiroff but will do me just fine for this project.

have splashed some RLM65 on the wings today, so will give them a try tomorrow to see how they scrub up.
 

Attachments

  • 99_RLM 72  73_Paint Mixes_4058.jpg
    99_RLM 72 73_Paint Mixes_4058.jpg
    34.4 KB · Views: 81
Im struggling with scale effect on my PBY Black Cat build. probably should not do this, you guys will already know, but FWIW black presents as no depth when used iin scale. ive found Nato Black the best for black effects.

I dont really have a problem for colours other than black, though white and yellow each have dazzle effects that i cant quite explain. large amounts of white for a novice is a real royal pain in the behind for a beginner. i always do the white bits last now.

i think Waynes colour match is as near to perfect as can be expected
 
Wayne, do you allow for "scale effect" with your paint? what are your thoughts on the topic, if any?

Not always, as usually I apply the lighter lower surface colour overall as a base then do my mottling upper surface effect application which usually gives a lighter appearance to the paints.
Sometimes i just go full mix, like this one and will make adjustments later, quite often with the flat coat adding some tan or grey to tone down the colours or pastels too...each subject requires a little thought on just how you should apply your colours for the right effect as each is different.

The colours on the BV222 on good photo's are clearly darker than 70/71 but do have a reasonable contrast, so that they are clearly seen.
Check out these couple of Ebay/internet shots. The first two appearing lighter due to the bright sunlight.
 

Attachments

  • bv222FRONTVIEW4.jpg
    bv222FRONTVIEW4.jpg
    56.1 KB · Views: 69
  • bv222FRONTVIEW.jpg
    bv222FRONTVIEW.jpg
    60.6 KB · Views: 77
  • BV222aa.jpg
    BV222aa.jpg
    57.7 KB · Views: 74
Now, Plan A for the upper decking 'Fixing' and removal for viewing....went well, I have simply used magnets! One attached to the bottom of the turret assembly, the other beneath the floor using some superglue. bought a set of small sample magnets and used the appropriate pair that gave the right attractional pull.
Had to do some fine tuning to the plastic section to get a nice neat fit but I think I nailed it, we will see when the paint goes on.
 

Attachments

  • 100_Upper Fuselage Panel  Magnet_4061.jpg
    100_Upper Fuselage Panel Magnet_4061.jpg
    62.8 KB · Views: 77
  • 101_Internal Fuselage Magnet _4064.jpg
    101_Internal Fuselage Magnet _4064.jpg
    44.7 KB · Views: 77
  • 102_Upper fuselage cover-4067.jpg
    102_Upper fuselage cover-4067.jpg
    32.4 KB · Views: 81
  • 103_Upper Fuselage Cover_4069.jpg
    103_Upper Fuselage Cover_4069.jpg
    32.8 KB · Views: 79

Users who are viewing this thread

Back