Looks great so far Wayne!
Navigation
Install the app
How to install the app on iOS
Follow along with the video below to see how to install our site as a web app on your home screen.
Note: This feature may not be available in some browsers.
More options
You are using an out of date browser. It may not display this or other websites correctly.
You should upgrade or use an alternative browser.
You should upgrade or use an alternative browser.
**** DONE: 1/72 BV222 Wiking Seaplanes / Floatplanes of WW II
- Thread starter Wayne Little
- Start date
Ad: This forum contains affiliate links to products on Amazon and eBay. More information in Terms and rules
More options
Who Replied?ccheese
Member In Perpetuity
Doin' great, Wayne, just great !
Charles
Charles
- Thread starter
- #83
Nice work on the panel lines Wayne and never thought of gluing a strip to help with the gap.Geo
Thanks guys, while it was a good idea at the time George, I have since removed it and cut open the join line again as the engine section was not going to fit as well as I thought it would, will explain later....
N4521U
Plastic Pirate
Always nice Wayne old man.....
I lurk and watch. Just stooging around overhead.
I lurk and watch. Just stooging around overhead.
- Thread starter
- #85
cheers Bill...
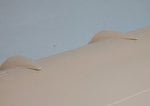
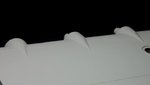
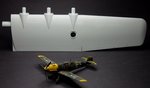
Ok I removed the small reinforcing support piece and cut open the front face of the wing again...so it spread apart...again, the reason i did this was once i dry fitted the engine section I was left with some gaps under them that would be a pain to align or fix, once the main wing was "sprung" outward again the fit was much better.
You will see what I mean from the following pics as to the gaps...
Attachments
Last edited:
N4521U
Plastic Pirate
Flaps are the only thing that should have gaps!
vikingBerserker
Lieutenant General
Wow, now those are gaps!
- Thread starter
- #89
Wow, now those are gaps!
Yep....and now they are gone....with a nice fit....

pics up tomorrow!
ccheese
Member In Perpetuity
mikewint
Captain
I would have used putty to fill. I tried the putty/nail polish remover/Q-tip method for the first time and it worked beautifully. I'm sold
Saw some guy online raving about whiteout and alcohol!
Vic Balshaw
Major General
Holy guacamole Wayne my boy that is one big mother, you booked your room down at the local panel beaters for a spray job yet!
Nice star mate.
Nice star mate.
- Thread starter
- #95
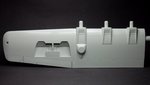
It sure is a big mother Vic....and will need some serious painting time on her too...
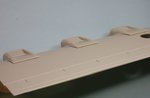
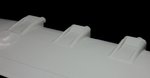
Ok missed yesterday here are those "No gaps" nacelles all fixed up....wing is pretty much done, only a few touchups required...
Ok missed yesterday here are those "No gaps" nacelles all fixed up....wing is pretty much done, only a few touchups required...
Attachments
In a word. Glorious!
It sure is a big mother Vic....and will need some serious painting time on her too...
Ok missed yesterday here are those "No gaps" nacelles all fixed up....wing is pretty much done, only a few touchups required...
Geeus!! that is big.
Oh yea. Nice work on the gaps.
mikewint
Captain
Very nice filling on the gaps would never know it even existed
- Thread starter
- #99
Well it's not really gap filling guys, when I first glued the wings and did the fit I got the gap, The wing must have flattened the curvature of the wing slightly to create the gap, when I recut the glue join open along the front edge I must have 'sprung' the curvature back as the gap reduced somewhat. So i then glued the bottom square sections of the nacelles to the wing first and then did the top....no filling required at all....
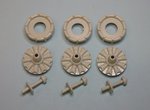
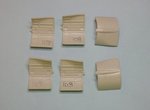
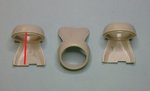
Today I started prepping the engine components and discovered all the front cowl sections all had a thin piece missing, broken off each one, a quick search in the box revealed only 2 pieces, so it looks like i will have to make up the rest to attach the cowling panels to...
Today I started prepping the engine components and discovered all the front cowl sections all had a thin piece missing, broken off each one, a quick search in the box revealed only 2 pieces, so it looks like i will have to make up the rest to attach the cowling panels to...
Attachments
mikewint
Captain
From the pieces you pictured, it looks like they're all missing...bummer
Users who are viewing this thread
Total: 1 (members: 0, guests: 1)