Great work so far Wayne!
Navigation
Install the app
How to install the app on iOS
Follow along with the video below to see how to install our site as a web app on your home screen.
Note: This feature may not be available in some browsers.
More options
You are using an out of date browser. It may not display this or other websites correctly.
You should upgrade or use an alternative browser.
You should upgrade or use an alternative browser.
**** DONE: 1/72 BV222 Wiking Seaplanes / Floatplanes of WW II
- Thread starter Wayne Little
- Start date
Ad: This forum contains affiliate links to products on Amazon and eBay. More information in Terms and rules
More options
Who Replied?vikingBerserker
Lieutenant General
Well done sir!
- Thread starter
- #104
From the pieces you pictured, it looks like they're all missing...bummer
Yep all six cowl sections, but a pretty easy fix to solve the problem...
thanks looking in!
Vic Balshaw
Major General
That was a lucky break with those gaps Wayne and I'm sure you'll find fixing the engine cowls no problem. Question though, are you going all out with this build or just the usual (by your standards) build. My mind goes back to your 88
fubar57
General
Nice work Wayne.
Geo
Geo
Crimea_River
Marshal
Seems like one of your more challenging builds in recent times Wayne. Doing great as always though.
- Thread starter
- #109
That was a lucky break with those gaps Wayne and I'm sure you'll find fixing the engine cowls no problem. Question though, are you going all out with this build or just the usual (by your standards) build. My mind goes back to your 88
The good thing was i dry fitted the parts before glueing the wings together so i knew the fit was good to start with....after I glued the wings and clamped them it was then I had the gap problem, so i just reversed the process and problem solved!
Extra work will depend on time frame of build Vic, and just what is worth doing....my initial thinking is there may not be much extra stuff to do...will see as i go along...
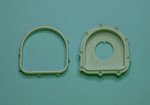
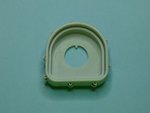
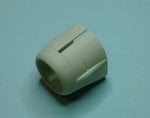
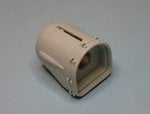
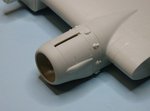
Ok started assembling the first engine cowl including drilling out the small exhaust outlets....and a test fit to the wing, as you can see in the last shots the missing broken part becomes rather obvious...easy fix though will grab some 1.5mm plastic strip tomorrow on the way to lacrosse and sort it out real quick...!
Only 5 more to do!
Thanks for stopping by Guys...
Attachments

Last edited:
Vic Balshaw
Major General
A true craftsman at work.
- Thread starter
- #111

Cheers mate!
T Bolt
Colonel
Very nice Wayne
Crimea_River
Marshal
With Vic.
vikingBerserker
Lieutenant General
Always a pleasure to observe.
- Thread starter
- #117
Thanks very much Guys!
Lucky13
Forum Mascot
Beautiful work as always Master Wayne! 
mikewint
Captain
very nice Wayne
- Thread starter
- #120
Thanks Mike and Jan...
Users who are viewing this thread
Total: 1 (members: 0, guests: 1)