Navigation
Install the app
How to install the app on iOS
Follow along with the video below to see how to install our site as a web app on your home screen.
Note: This feature may not be available in some browsers.
More options
You are using an out of date browser. It may not display this or other websites correctly.
You should upgrade or use an alternative browser.
You should upgrade or use an alternative browser.
**** DONE: 1/72 BV222 Wiking Seaplanes / Floatplanes of WW II (1 Viewer)
- Thread starter Wayne Little
- Start date
Ad: This forum contains affiliate links to products on Amazon and eBay. More information in Terms and rules
More options
Who Replied?vikingBerserker
Lieutenant General
Very nice.
parsifal
Colonel
would love to see how you are going to make the internals visible wayne. Reason should be pretty obvious mate...
Its a good level of detail for this scale I have to say. must be a good quality kit
Its a good level of detail for this scale I have to say. must be a good quality kit
- Thread starter
- #164
would love to see how you are going to make the internals visible wayne. Reason should be pretty obvious mate...
Its a good level of detail for this scale I have to say. must be a good quality kit
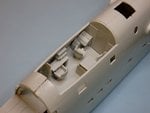
as a matter of fact Michael I don't have to do much at all if I choose to leave this area open to view, as this upper section comes as a separate piece which I likely will create a tight but removeable fit....

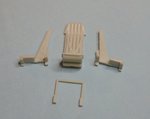
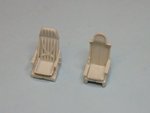
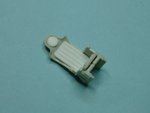
See the following couple of pics, which shows the seats mounted to those spitoon looking upchuck buckets...!
Attachments
Wayne, do you use glue...or do you will the parts together?
- Thread starter
- #166
A few different methods....even harsh language sometimes...!
mikewint
Captain
Wayne, any possibility of getting a clear piece of plastic and molding it to fit? something like vaccuforming? On the B-29 I just set the removed pieces in place. It's a static display
- Thread starter
- #169
Wayne, any possibility of getting a clear piece of plastic and molding it to fit? something like vaccuforming? On the B-29 I just set the removed pieces in place. It's a static display
i'll just go with the original part mike, and make a good fit so it sits snug and can be removed for display.
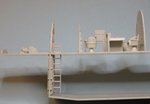
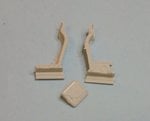
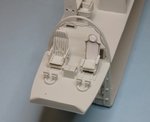
Now on to the Pilot and copilot seats...parts and assembled, didn't feel like removing the seam on the armoured pilot seat so decided he wanted some comfort so i covered the seam with some plasticard fashioned into a backrest and headrest for those long flights...
Attachments
- Thread starter
- #170
AND....did anyone see bright light in the sky today?
....that was me launching into orbit....put some boxes in the back seat of the car today and took the missus shopping and did some modelling...put the model box in the back seat when she came back and off we went home....rounding the corner near home one of the boxes slid and fell onto the model box...
....suppose it could have been worse!!
Attachments
fubar57
General
Nice work on the seat and OUCH!!!
Geo
Geo
N4521U
Plastic Pirate
Don't know how Wayne.
And them seats. Does one have a motor to help the pilot stand up?
If it does, I could use one like it for me old bones.
And them seats. Does one have a motor to help the pilot stand up?
If it does, I could use one like it for me old bones.
Vic Balshaw
Major General
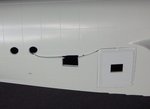
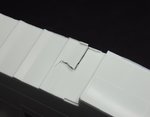
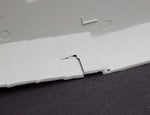
Those little seats are something and oh my what metal fatigue, bit of a third line repair needed there Wayne.
Airframes
Benevolens Magister
That's some flak hit there Wayne! Hopefully, being a relatively 'clean' crack, it should repair OK.
Wildcat
Major
Damn Wayne! No doubt you'll fix it up good.
mikewint
Captain
Wayne, that's a shame but I'm sure when you are done it will look better than new
Lovely work so far Wayne!
vikingBerserker
Lieutenant General
Beautiful and OUCH!
- Thread starter
- #179
Thanks Guys...
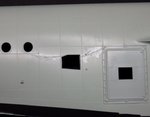
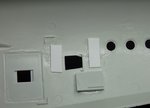
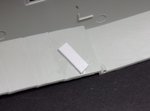
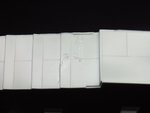
repair done, no filler at all...sprung it back in place opened it it a tad ran the seam with liquid glue worked the join a little bit to get the plastic melted in the crack squeezed and worked it get some melted plastic to ooze slightly to the surface and let it set, added some internal reinforcing strips....surface is sanded and is as good as new!
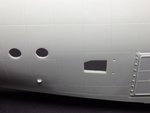
Found another crack in the bottom of the other fuselage half, will soon get the same attention with the sandpaper...
repair done, no filler at all...sprung it back in place opened it it a tad ran the seam with liquid glue worked the join a little bit to get the plastic melted in the crack squeezed and worked it get some melted plastic to ooze slightly to the surface and let it set, added some internal reinforcing strips....surface is sanded and is as good as new!
Found another crack in the bottom of the other fuselage half, will soon get the same attention with the sandpaper...
Attachments
-
 61_Crack Glued_3887.jpg44.4 KB · Views: 93
 -
 62_Reinforce crack_3889.jpg39.2 KB · Views: 91
 -
 63_Crack Repair complete_3898.jpg38.7 KB · Views: 81
 -
 64_Second crack_3900.jpg33.6 KB · Views: 92
 -
 65_Another crack_3899.jpg44.5 KB · Views: 84
 -
 66_crack repair_902.jpg46.5 KB · Views: 85
 -
 67_Crack glued_3904.jpg32.9 KB · Views: 94
Wildcat
Major
Good save!
Users who are viewing this thread
Total: 2 (members: 0, guests: 2)