**** DONE: F4U-1D Corsair USNASLVK - Your Favorite Aircraft of All Time GB

Ad: This forum contains affiliate links to products on Amazon and eBay. More information in Terms and rules

Thanks fellas.

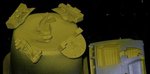
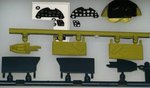
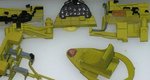
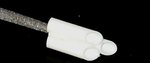
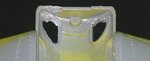
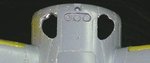
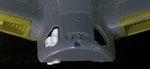
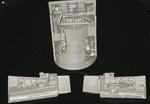
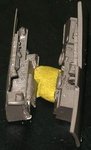
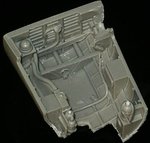
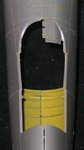
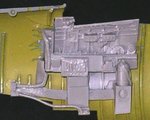
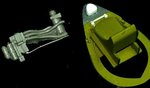
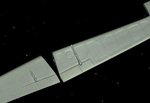
I was rummaging thru my PVC box and ran across some small tube. So I drilled it out, cut it off at an angle, glued three together and wah lah, exhaust tubes. I had to do some surgery to the kit to allow the tubes to be glued in. But the result is okay! Now I just have to duplicate the other side!!!! The tubes are made tho, so it's just off to the operating theater for surgery.
 

Attachments

  • NASLVK 12a exhaust.jpg
    NASLVK 12a exhaust.jpg
    59.7 KB · Views: 64
  • NASLVK 12b exhaust.jpg
    NASLVK 12b exhaust.jpg
    66.6 KB · Views: 66
  • NASLVK 12c exhaust.jpg
    NASLVK 12c exhaust.jpg
    67.9 KB · Views: 65
  • NASLVK 12d exhaust.jpg
    NASLVK 12d exhaust.jpg
    66.6 KB · Views: 63
Last edited:
Thanks guys. I do appreciate your lookin in, and all the comments that make my builds better..... and more accurate ;) Sometimes I think I have gone Looney with all this. But then I have never claimed to work within boundaries.

I got the other exhaust side done. Was difficult to get these things glued in place, no flat contact areas. So I used my Hot Glue gun!!! Worked a treat.

I got a real deal on an Aires cockpit yesterday and I have gone bonkers with it. The rudder will be there tomorrow! I've said before, these resin things are not something for the faint of heart.

The first pic shows the set. The second how much of the casting I had to remove to get it to lay flush and not add three inches to the thickness of the cockpit wall, takes time! Third shows my starting to chip away at the tub, I didn't want two layers at the lower window so I have cut all the side and lower walls off the tub section. The kit comes with a new dash shroud and panel so the next is how much of the kit I had to cut away to get it to fit. The new dash panel cover has the bomb release switch panel nicely done. The next two show the port and starboard sides pretty much as they will be installed. The port picture has the dash and panel shown.

Back to it.
 

Attachments

  • NASLVK 13a aires c-pit.jpg
    NASLVK 13a aires c-pit.jpg
    73.8 KB · Views: 70
  • NASLVK 13b c-pit sides.jpg
    NASLVK 13b c-pit sides.jpg
    70.4 KB · Views: 71
  • NASLVK 13c c-pit tube.jpg
    NASLVK 13c c-pit tube.jpg
    83.2 KB · Views: 75
  • NASLVK 13d kit c-pit.jpg
    NASLVK 13d kit c-pit.jpg
    68.1 KB · Views: 69
  • NASLVK 13e strbrd side.jpg
    NASLVK 13e strbrd side.jpg
    87.6 KB · Views: 73
  • NASLVK 13f port side.jpg
    NASLVK 13f port side.jpg
    77.6 KB · Views: 78
Thanks for that.
Don't mean to post again today, but................. why the linkage on the elevators, top And bottom. I have never noticed this before. Any hints?

I did the trim tabs on the aileron and the rudder. A little bit of card for the links. Didn't like the headrest so I made one-o-my own!!!
 

Attachments

  • LVK13a c-pit.jpg
    LVK13a c-pit.jpg
    69.7 KB · Views: 70
  • LVK13b trim tabs.jpg
    LVK13b trim tabs.jpg
    64.6 KB · Views: 66
  • LVK13c elev tabs.jpg
    LVK13c elev tabs.jpg
    64.9 KB · Views: 63
Sometimes one wonders if these resin bits are worth it. Lots of work, makes the model look good, gives a challenge, a sense of satisfaction and loads of frustration………….and then you can't see it. But we still use them. Have fun Bill.
 
Great work Bill. It's gonna be a real looker methinks. Regarding the actuators on the tabs, theory only but I think that one actuator controlled the tab angle from ther cockpit and the other was tied to the elevator so that when the elevator deflected the tab went opposite to balance stick forces.
 
Great work Bill. It's gonna be a real looker methinks. Regarding the actuators on the tabs, theory only but I think that one actuator controlled the tab angle from ther cockpit and the other was tied to the elevator so that when the elevator deflected the tab went opposite to balance stick forces.

I think you are quite right. I didn't notice till later the trim tab in the elevators are split! So I has did it!

Vic, you are oso right. The only ones who will ever know are the followers of our builds and our ownselves. And, the little women who have to listen to the "see what I have done to This"! and could care less.

Last night I worked out the tab actuators for the elevators. Today doing final interior fits. Amm gettin there.

Wayne and AF, thanks for keepin tabs.
 
Okay, here's more Wayneman........

Air brush painted everything green, even the wheel wells and their plumbing. Then couldn't resist and sprayed the outside of the gear doors Tamiya AS-8 blue.

Now am in the midst of attempting to paint the interior. How bl00dy difficult is This. I bet the people at Aires laff at every one of these kits. I sprayed the back of the instruments clear film white, Tamiya TS matt white. Then used white glue to stick that baby on the resin panel area. I placed a drop of white glue over each instrument, used a toothpick for this, then pushed the PE panel over the top of the white glue with a little glue coming thru each hole a bit. This all dried and you get instrument glass!!!! Easy peasy. Sorry for the quality of the instr panel pic!

So now I go back to the panels and add color to the knobs and stuff, while watching the Melbourne F1 Grand Prix qualifying!!!!!!
 

Attachments

  • NASLVK14a green paint.jpg
    NASLVK14a green paint.jpg
    68.4 KB · Views: 58
  • NASLVK14b green paint.jpg
    NASLVK14b green paint.jpg
    75.7 KB · Views: 52
  • NASLVK14c cockpit paint.jpg
    NASLVK14c cockpit paint.jpg
    76.4 KB · Views: 57
  • NASLVK14d instr panel.jpg
    NASLVK14d instr panel.jpg
    83 KB · Views: 55

Users who are viewing this thread

Back