Done : Fw190D-9, "Black 12" of Leutnant Teo Nibel of 10/JG54, Gruppe Build

Ad: This forum contains affiliate links to products on Amazon and eBay. More information in Terms and rules

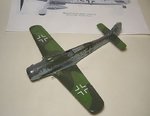
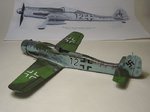
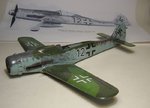
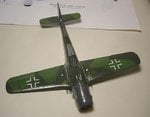
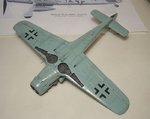
Thanks very much chaps. I'm not sure what to do about both greens. The light green doesn't look as bad in 'real life', and I think I can tone it down some more. If not, tough - I aint starting again, or it will clog all the detail and be too heavy. But that dark green b****y Humbrol paint! There is no way the paint in the tin is the same as the colour on the lid! When first applied it had a distinct yellowish tinge and was too light. Now, with just a touch of black added, it looks too brown! Again, it looks better in 'real life', but it is already too thick and has obscured some detail. No matter what I did to spray it, it wouldn't dry! The only way it would dry was to brush-paint it, and it doesn't thin-out and settle, or cover as Humbrol paints used to!
Ah well! I'm going to have to put up with it, and definitely change to a different paint of some sort. Maybe I'll have to accept the limitations of acrylics after all.
 
Well, just to inform to you Del Boy....they had 4....4! of Revell's 1/32 Junkers Ju 88A-1 in my local hobby shop when I was there AND their 1/32 Hawker Hunter....and a 1/24 Dora-9 I think that I saw as well....:shock:
 
Thanks for the encouragement chaps, it is much appreciated, and somewhat needed!
I believe Model Master paints are available in the UK, but I haven't seen them locally. Unfortunately, where I live, although not exactly remote, is not really convenient (for me) for the larger towns, or Manchester. We're a bit in 'the sticks', and the most modern appliances are the new fangled gas lamps in the streets; and we've heard that someone near by has bought one of those horse less carriage contraptions! But seriously, it's not quite that bad, but you get the idea. I'm going to ask my local model shop to try to stock an alternative to Tamiya and Humbrol paints, otherwise my only option is mail order - fine for kits and decals etc, but not really convenient for consumables.
I fancy a Revell Hunter at the ModelZone price of £9.99, as posted by Ian Lanc, and who does the 1/24th 'Dora', and how much? Very interesting!
Anyway, I bit the bullet, rubbed down the paint on the wings, and started again. I mixed the colours using different paints, from my 'old' Humbrol stock and, although probably not 100% accurate, it's looking a bit better, and I should get some toning effects done later tonight, and hopefully get it clear-coated. Maybe even get some decals on!
I'll post some progress pics soon but, if you hear strange noises in the night (or day, in Oz and NZ), it's only me throwing my Teddy in the corner, and kicking the s**t out of some plastic and paint tins!
 
I can get them by mail order Wojtek, but, they are acrylic, and I'm not keen on this type of paint. I don't think they are as versatile in use , not allowing as many effects and techniques, as enamels. But, if all else fails, I might have to change, even though they work out more expensive, and harder to clean the airbrush.
 
I can get them by mail order Wojtek, but, they are acrylic, and I'm not keen on this type of paint. I don't think they are as versatile in use , not allowing as many effects and techniques, as enamels. But, if all else fails, I might have to change, even though they work out more expensive, and harder to clean the airbrush.

Yep I understand you.I also prefere Humbrol enamels to others, especially these acrylic paints.But these Air Vallejo paints are ready to paint with airbrushes for instance.What is more Vallejo offers some colour sets for different air forces.
 
I might have a go then Wojtek. The problem with mail order, is that you can't SEE the product, although Model Hobbies web site does illustrate all products. But it means trawling through the whole list, looking for colour numbers, to check against, for instance, RLM or RAF colour numbers.
Jan, yes please, have a look see. Model Hobbies have the '88 at £26.95 +p&p, and Ian said that ModelZone do the Hunter at an incredible £9.99 ! If the latter is right, I'll DEFINITELY have one of those!
 
I've managed to do some work on the paint colours on the upper wings, all six hours of it! Although probably not an accurate match, they look a lot better, and I added a little bit of tonal difference on some of the panels, and highlighted the control surfaces slightly, plus some light weathering.
After a couple of coats of Klear/Future, I was able to start on some of the decalling.
I began with the dreaded spinner spiral, and this should have been a warning for what was to come!
The indicated spiral for this decal choice seemed a bit long to me, as only the front section of the spinner on 'Black 12' has this marking. I wasn't particularly concerned, thinking that, if it overlapped to the full depth of the spinner, it could always be overpainted. The decal slipped into place quite easily, although it didn't want to remain centralised on the spinner tip, and I was just gently moving it into position, when it dissolved into four separate pieces!
No problem, thought I, the shorter one for one of the other options might do the trick. So, on with decal, off with three separate parts this time!
B*****s thought I, put it to one side and hand paint the b****y thing later!
Anyway, I got the wing crosses on first, and they settled down nicely with the help of Micro Sol, as did the fuselage crosses, although one of these started to curl and fold, but behaved itself after a few stern words and some gentle manipulation with the help of Micro Sol again. It ended up about 2mm further forward than I would have liked, but there was no way I was going to risk moving it! Hopefully, it won't be that noticeable.
The swastikas came next and, just like the spinner spirals, one of these dissolved into three pieces! No, I didn't shout at all.....I b****y well screamed! Good job I had a Microscale sheet with one that would do the job!
Then it was the turn of the 'Black 12' number decals. The one for the port side went on, and was about 2mm further forward than required, due to the Balkencreuz. The '12' for the starboard side behaved in a similar fashion, but this one decided to lose its head, literally. The tip of the figure '1' dissolved and broke away, so that means I'll have to hand-paint this part too, with a 5/0 brush!
At this point, I thought enough is enough, and stopped.
I'm guessing that this could be an old kit, even though it ws new stock at the shop, and that the decals have been affected with age. As the kit design dates back to 1995, I suppose it is possible that it could be that old, but it's a bit much, don't you know!
Anyway, I'm cool! (well, nearly!)
I'll get it done eventually, but for now, to save my sanity, and the site of a FW190D flying across the room, I've been getting on with other tasks, such as masking and painting the canopy, and painting the tyres etc.
It's one of 'those' builds this one. First it was the paint, now it's the decals. What else? Or is that tempting fate?
Anyway, here's a few pics to illustrate the progress(?) to date, including one of that damaged number 12.
You might not see anymore posts for awhile, as I'll probably still be trying to paint that b****y spinner spiral!!
 

Attachments

  • Group Build 179.jpg
    Group Build 179.jpg
    40.4 KB · Views: 97
  • Group Build 174.jpg
    Group Build 174.jpg
    45.3 KB · Views: 101
  • Group Build 178.jpg
    Group Build 178.jpg
    43.4 KB · Views: 95
  • Group Build 181.jpg
    Group Build 181.jpg
    39.5 KB · Views: 86
  • Group Build 180.jpg
    Group Build 180.jpg
    46.2 KB · Views: 88
For some reason, the pic of the damaged number '12' wouldn't upload, so hopefully, here it is now!
 

Attachments

  • Group Build 183.jpg
    Group Build 183.jpg
    42.1 KB · Views: 76

Users who are viewing this thread

Back