Navigation
Install the app
How to install the app on iOS
Follow along with the video below to see how to install our site as a web app on your home screen.
Note: This feature may not be available in some browsers.
More options
You are using an out of date browser. It may not display this or other websites correctly.
You should upgrade or use an alternative browser.
You should upgrade or use an alternative browser.
**** DONE: Revell 1/48 P-40B RAF 112 Squadron in Egypt in 1941 MTO Group Build (3 Viewers)
- Thread starter B-17engineer
- Start date
Ad: This forum contains affiliate links to products on Amazon and eBay. More information in Terms and rules
More options
Who Replied?- Thread starter
- #2,642
B-17engineer
Colonel
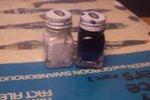
Well the paint will be mixed. Sea blue and white.
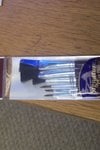
Brushes, sure. Give me a sec
Brushes, sure. Give me a sec
- Thread starter
- #2,643
B-17engineer
Colonel
- Thread starter
- #2,646
B-17engineer
Colonel
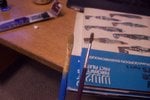
None. I used a different brush but it needs some serious washing... these I just bought yesterday. 
- Thread starter
- #2,648
B-17engineer
Colonel
Sure  that's up to you though.
I just need to mix the paint and post it to make sure it has the right tonality when we start.
I just need to mix the paint and post it to make sure it has the right tonality when we start.
- Thread starter
- #2,650
B-17engineer
Colonel
The number is 4 
- Thread starter
- #2,652
B-17engineer
Colonel
Sure thing 
- Thread starter
- #2,653
B-17engineer
Colonel
- Thread starter
- #2,654
B-17engineer
Colonel
Dinner. If you are not here when I get back we'll just work tomorrow 
- Thread starter
- #2,655
B-17engineer
Colonel
Ok I am back.
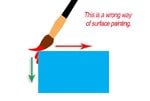
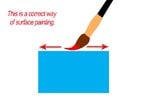
I have earlier prepared these diagrams for you. It is useful to understand the painting process.The main problem of brush painting are bruises.Of course these appear when airbrushing as well.But when brushing these occur much often.As a result there are areas that were "flooded" with a paint...like your Ju-87 flaps for instance. These bruises are made when there is too much of paint on the paintbrush and its moving is incorrect. What is more these bruises are going to appear on surfaces that are perpendicular to the painted one. It is because the paint is taken from the brush ending by an edge between these two upright surfaces.This effect can be seen in the first diagram.
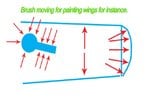
To avoid a such effect it is used quite easy way of painting.Applaying of a paint has to be started from the middle of painting surfaces and continued to one adge and then from the middle to the another one. It can be seen in the second diagram.
What does it mean for a modeller.It means that the wing should be painted from its middle to trailing edge and than from middle to the leading edge.At the wing tips the moving of the brush should ne the same , from the miidle of near surface to the tip.Of course it depends on the tip shape.For instance the tip is rounded so the brush moving is from the near surface to tip edge.The same if the main landing gear wheel bay areas are painted.To be honest I always start painting undersides of wings with them. Look at diagram 3.These red arrows show hoe the paint should be moved.
A paint should be applied with quite thin layer. A big surface should be divided into a few smaller ones and painted step by step.It is better to apply two thin coats than one thick.There has to be always a small amount on the brush ending.Painting is done with the ending of the brush only but not with the whole one.
Any question?
Attachments
Last edited:
- Thread starter
- #2,657
B-17engineer
Colonel
Okay. So to get this right,
Start from the middle
then just follow the arrows in Diagram three?
Start from the middle
then just follow the arrows in Diagram three?
Yes....mix these paint .But do it in different can or box.Take some amount of one paint and put it into the can then take the another one and add to the same can.Then add a few drops of the thinner and mix them. For painting always prepare a little bet much of paint than you need.
And yes follow these arrows in the third diagram. Also you can use the black brush from the pic above.
The light blue paint apply on the fuselage sides al ittle bit higher than you need.Also paint the nose of the P-40 up to its half looking from side view.
You can paint on these mask as well.
And yes follow these arrows in the third diagram. Also you can use the black brush from the pic above.
The light blue paint apply on the fuselage sides al ittle bit higher than you need.Also paint the nose of the P-40 up to its half looking from side view.
You can paint on these mask as well.
- Thread starter
- #2,659
B-17engineer
Colonel
Ok. For the thinner how many drops?
Users who are viewing this thread
Total: 4 (members: 0, guests: 4)

